-
I BUY/SELL REFURBISHED CM5907s & CM5908s
HOWTOs:
DB vert plastic bumpers
OEM Keys
MTech1 docs
88 ix Lach/Card
91 ic Calypso 3.1
86 Cosmo 2.7
OEM+ or bust!

reelizmpro: I will always be an e30 guy.. I still do all of my own labor
TrentW: There's just something so right about a well-built M20 in an E30
e30m3s54turbo: I save my money for tuner parts. -
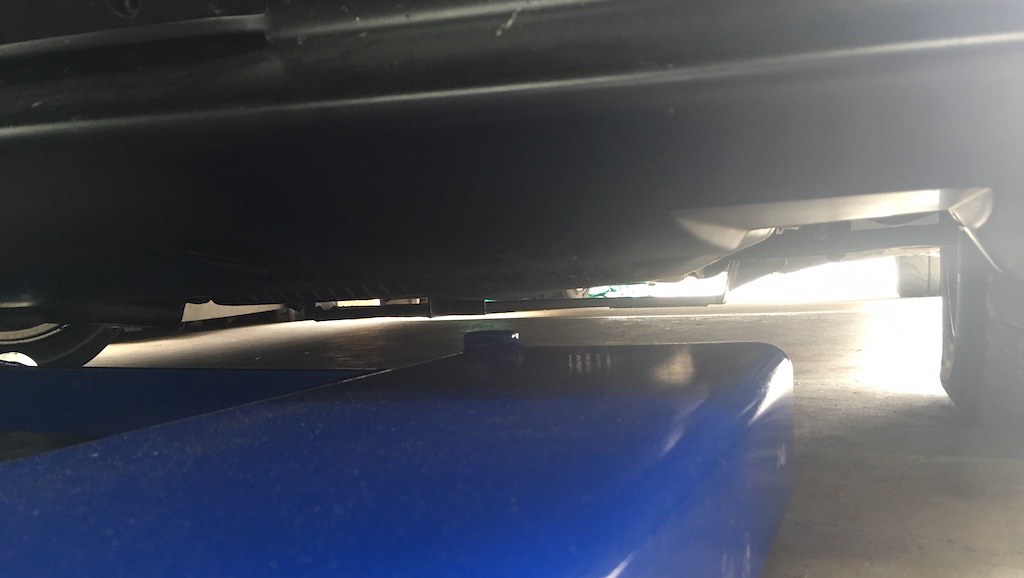
Good work as always! In my opinion the exhaust tips would look better if the left one was a bit longer. Now it is left more under the rear valance than the right one. When doing my exhaust tips I tried to get them to protrude the same distance from the valance. (a bit bad pic but here's what I mean)

Comment
-
Comment
-
I BUY/SELL REFURBISHED CM5907s & CM5908s
HOWTOs:
DB vert plastic bumpers
OEM Keys
MTech1 docs
88 ix Lach/Card
91 ic Calypso 3.1
86 Cosmo 2.7
OEM+ or bust!
reelizmpro: I will always be an e30 guy.. I still do all of my own labor
TrentW: There's just something so right about a well-built M20 in an E30
e30m3s54turbo: I save my money for tuner parts.Comment
-
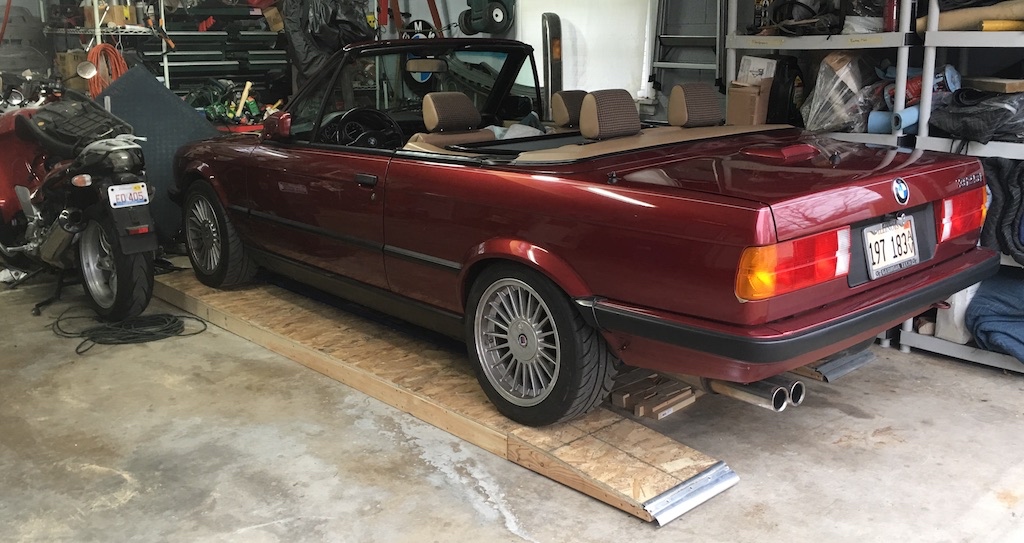
It was sunny and 52 deg F in Chicago yesterday - In January!
Took the vert out for a quick fillup nearby and reunion with the Laguna 92 @mposer and I picked up in Raleigh last summer.

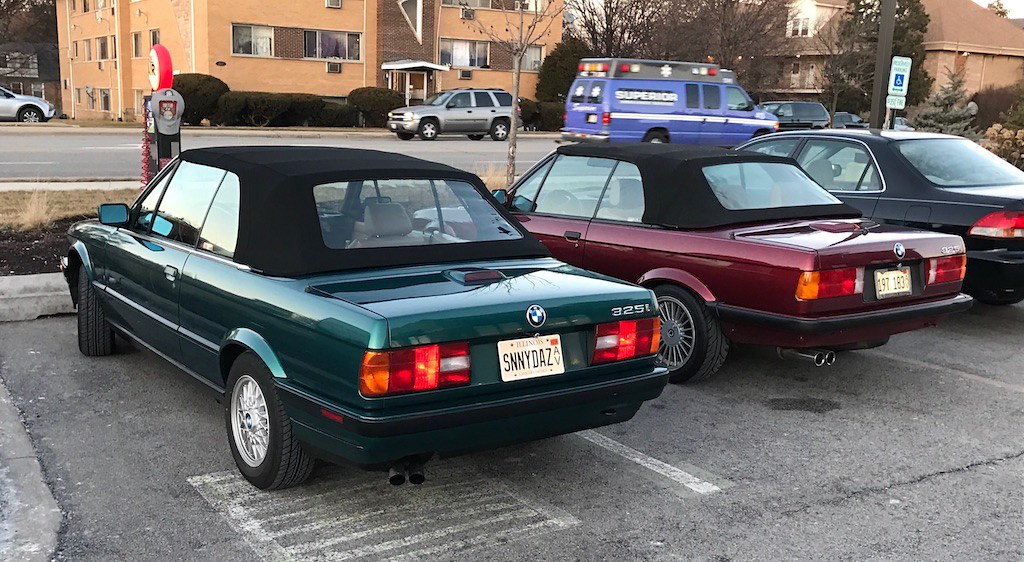
Man I can't stand those third brake light warts. Have the coupe trunk lid sprayed and ready to go, with IS holes for the mtech1 spoiler. Also a new undrilled decklid, as yet unpainted. Pics earlier in thread.
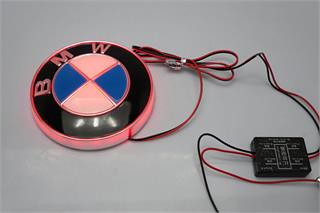
I'll look into an LED 3rd light strip solution at some point, something clean and unobtrusive that doesn't require sheet metal modification - maybe surrounding the roundel?
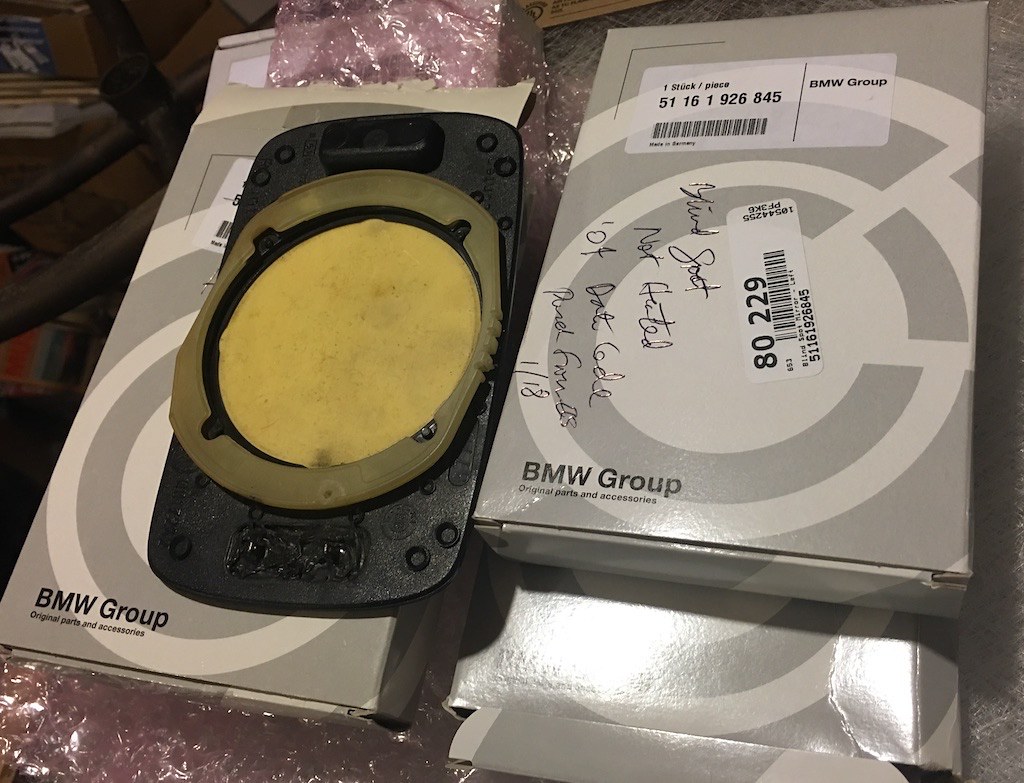
Picked up a 51161926845 blind spot driver's side mirror, $35 new from ECS - yes they are still available..
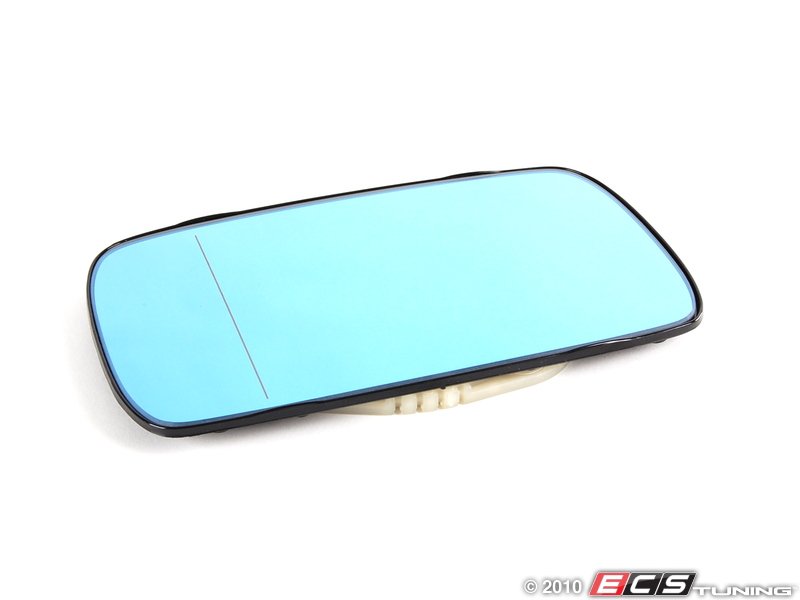
you can see how the outside edge of the mirror compresses the image horizontally in this pic. a bit more peripheral image right where you need it
Also scored a unicorn HEATED blind spot driver's side mirror from @monty23psk. He lives in Miami so don't think he'll miss it lol. It's one of the same batch that @japandrew had sold a few years back and I'm lucky to have it. Saving that one for Godfrey, our Lachs/Cardinal 88 IX. It even has an 88 mold mark date code on it. wow. The messy looking part near the connectors is some sort of flexible urethane, not a repair or heat damage. The unheated mirrors are of course missing those pins. Both of my unheated mirrors have 04 date code stamps on them.
So went to put the mirrors away on the basement shelves and I found ANOTHER mirror I had already bought lol. Tracking what I already have is getting hard.
 Last edited by bradnic; 01-28-2018, 09:43 AM.I BUY/SELL REFURBISHED CM5907s & CM5908s
HOWTOs:
DB vert plastic bumpers
OEM Keys
MTech1 docs
88 ix Lach/Card
91 ic Calypso 3.1
86 Cosmo 2.7
OEM+ or bust!
reelizmpro: I will always be an e30 guy.. I still do all of my own labor
TrentW: There's just something so right about a well-built M20 in an E30
e30m3s54turbo: I save my money for tuner parts.Comment
-
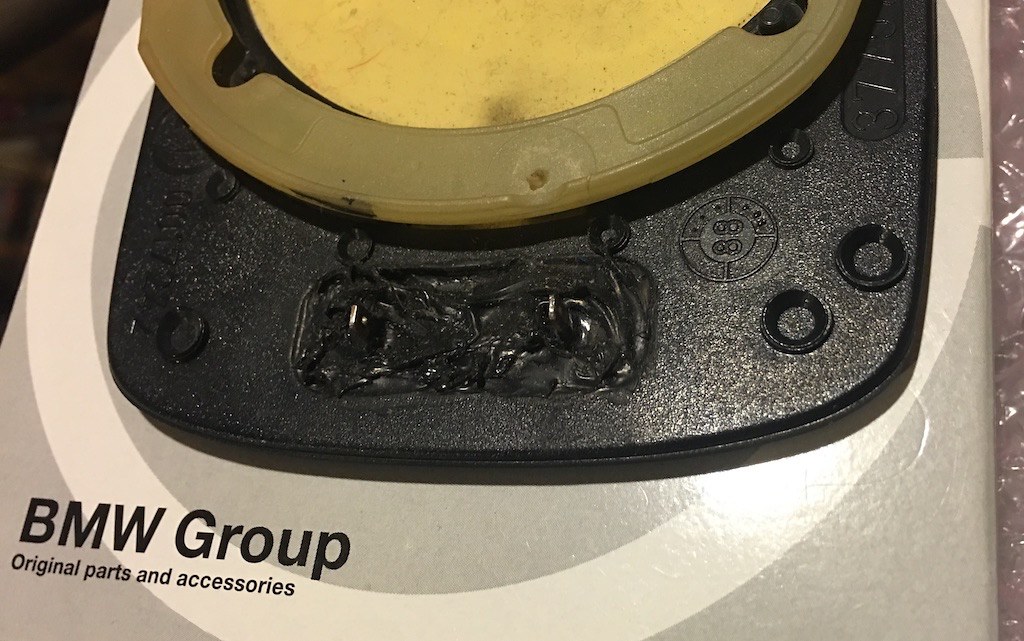
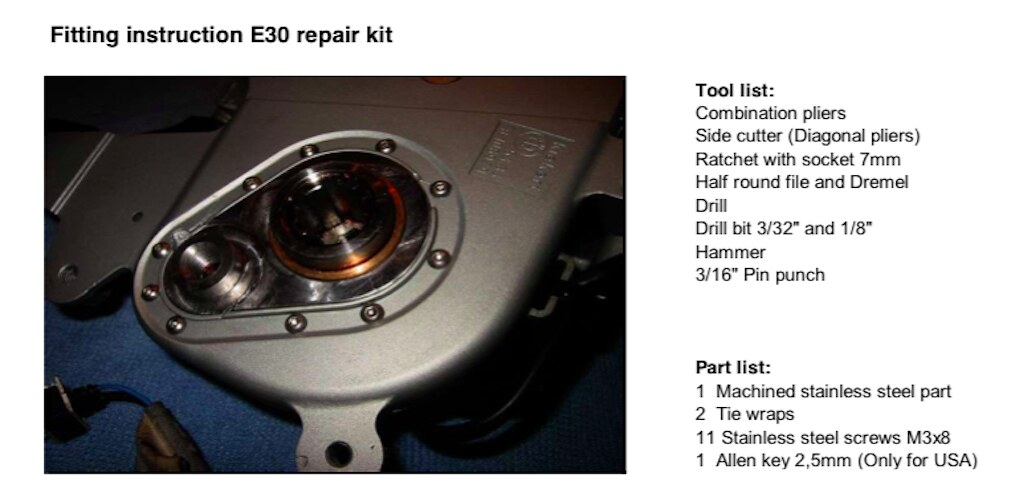
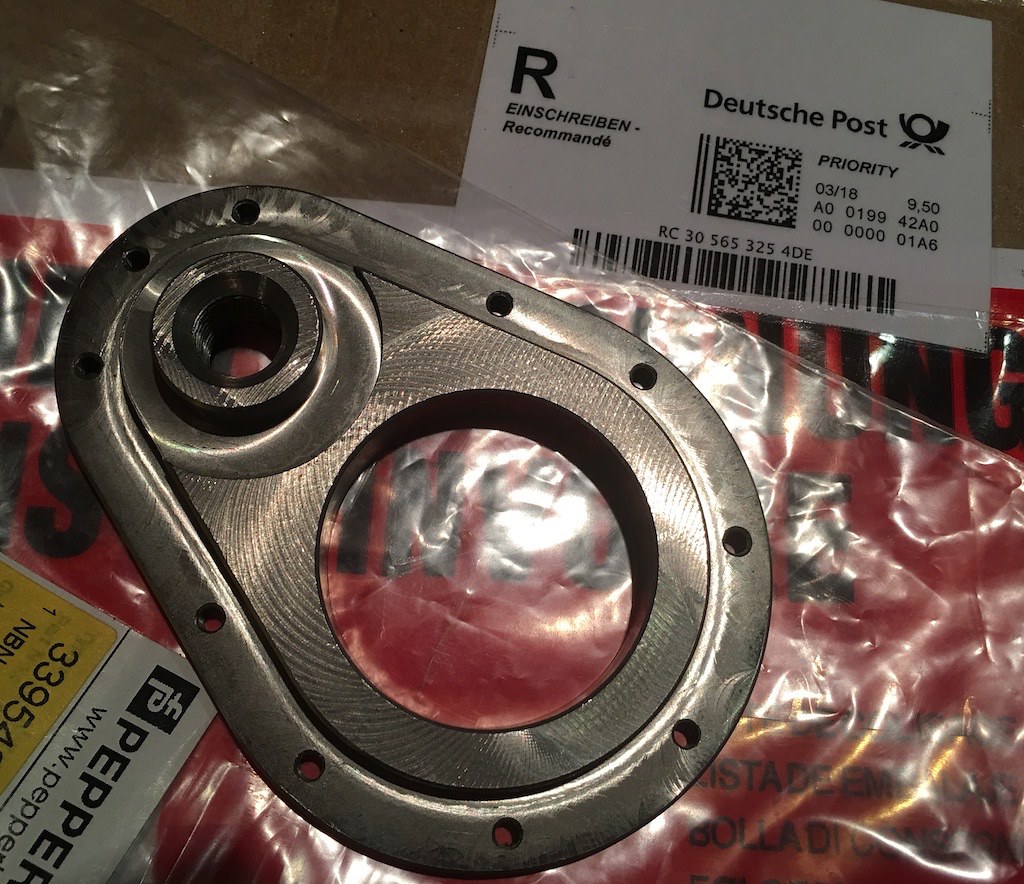
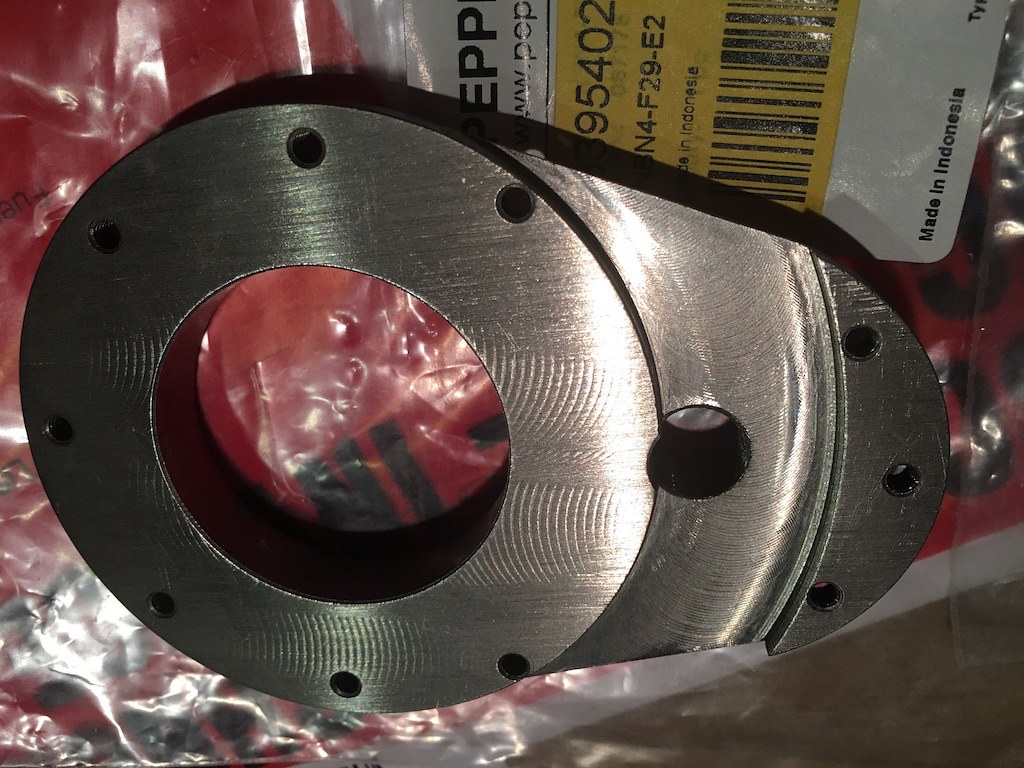
I was finally able to contact the company in Munich that makes a machined stainless steel top motor repair part. They will be shipping this week so should finally have a decent top motor to install.

Also connected with a bfc member and bought a spare motor for parts.
Repair of the top motor housing is pretty involved, but quality is excellent.
One of their US customers posted this top motor repair part install guide
 Last edited by bradnic; 03-07-2018, 06:32 PM.I BUY/SELL REFURBISHED CM5907s & CM5908s
HOWTOs:
DB vert plastic bumpers
OEM Keys
MTech1 docs
88 ix Lach/Card
91 ic Calypso 3.1
86 Cosmo 2.7
OEM+ or bust!
reelizmpro: I will always be an e30 guy.. I still do all of my own labor
TrentW: There's just something so right about a well-built M20 in an E30
e30m3s54turbo: I save my money for tuner parts.Comment
-
Love seeing updates on this threadSimon
Current Cars:
-1966 Lotus Elan
-1986 German Car
-2006 Volkswagen Jetta TDI

Make R3V Great Again -2020Comment
-
Love your car, a total inspiration for my Calyspo vert.
I have wondered the same thing. I came across this:

It looks kind of junky and is a bit too small for the trunk though. I was thinking about maybe diy'ing something. I did buy super bright LEDs for my normal tails and brakes though.Thank god, R3V was getting boring since the ginger kid wrecked his car. - StoneaComment
-
ha thanks Simon. yeah getting cabin fever here in Chicago. eager to get the top conversion finished.
I received the top motor from the bfc member. It too needs the German housing repair, and so isn't better than what I already have. So I'm going to keep it for parts, repair one of my existing motors with the kit.
The other top motor just needs the vertical tab straightened, so I may just find an aluminum weld shop locally and have them straighten it. That will be my fully functioning spare motor.
ha thanks man. Just saw a pic of a Calypso E30 IX Touring that looked amazing.
Yeah there's definitely some potential for a lit up roundel as a 3rd brake light, replacing the trunk lid wart. Agree those look terrible though ha. Thanks for posting the link!
 I BUY/SELL REFURBISHED CM5907s & CM5908s
HOWTOs:
DB vert plastic bumpers
OEM Keys
MTech1 docs
88 ix Lach/Card
91 ic Calypso 3.1
86 Cosmo 2.7
OEM+ or bust!
reelizmpro: I will always be an e30 guy.. I still do all of my own labor
TrentW: There's just something so right about a well-built M20 in an E30
e30m3s54turbo: I save my money for tuner parts.Comment
-
A lift, a puppy and a top motor repair kit
Welcome Finn :-) He came home last weekend, just turned 8 weeks and has already put on over a pound.

Our 6 year old golden wouldn't even look at him for the first 4 days lol. She's coming around though.
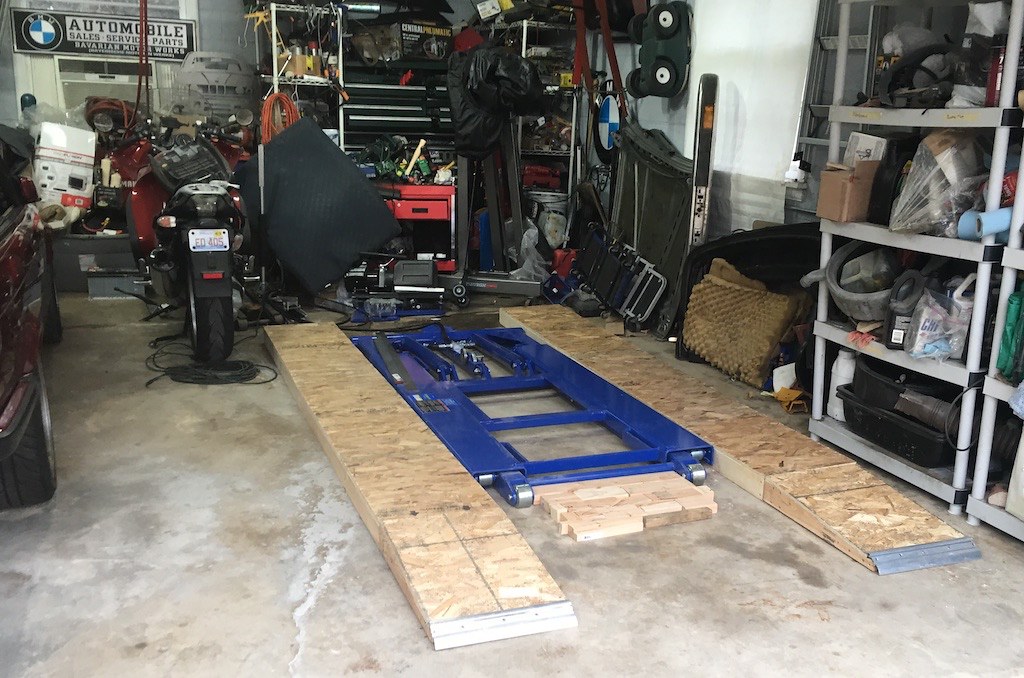
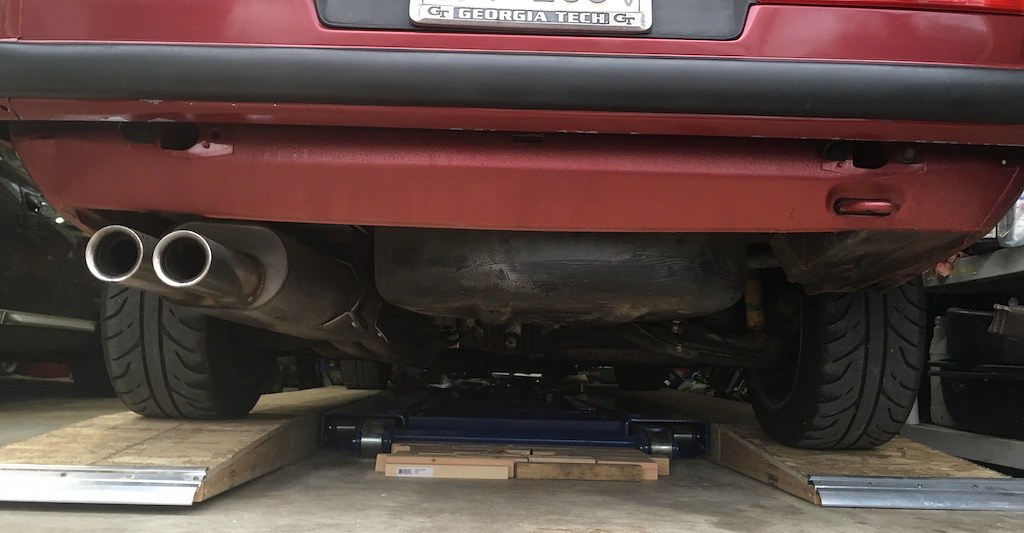
I also finally picked up a lift.
Lost out on a used Bendpak SP-7X, a sweet 2 piece scissor lift that gives you full access to the undercarriage. $4600 new (no-go), but $1k. only downside was lots of surface rust because it was installed outdoors. Some dude swooped in and bought it from under me before I could inspect it. oh well.
Check out a few other used ones and it just wasn't worth the risk. Ended up with a brand new Harbor Freight 6000 lb 91315 for $1400 delivered. Same exact setup as two of the used lifts I check out, for not much more. Best Youtube vid here. Gonna build the same ramps he did.
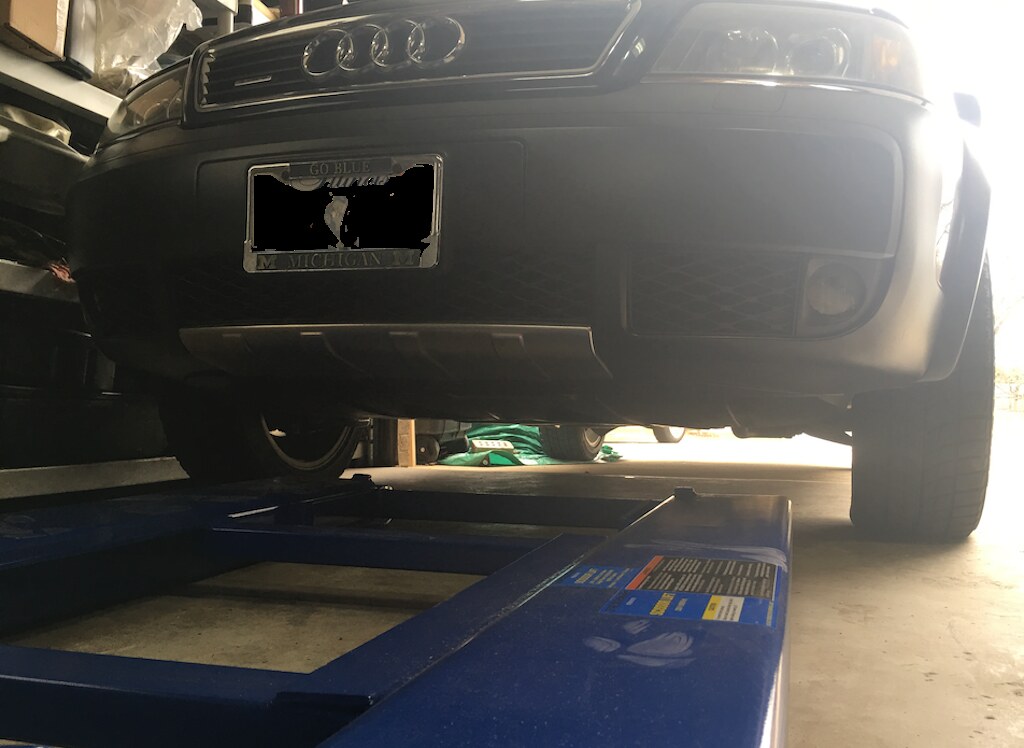
So after finally getting 1,000 lbs of lift positioned properly, tried to get Callie over it. no go on clearance due to the X-brace, no surprise.
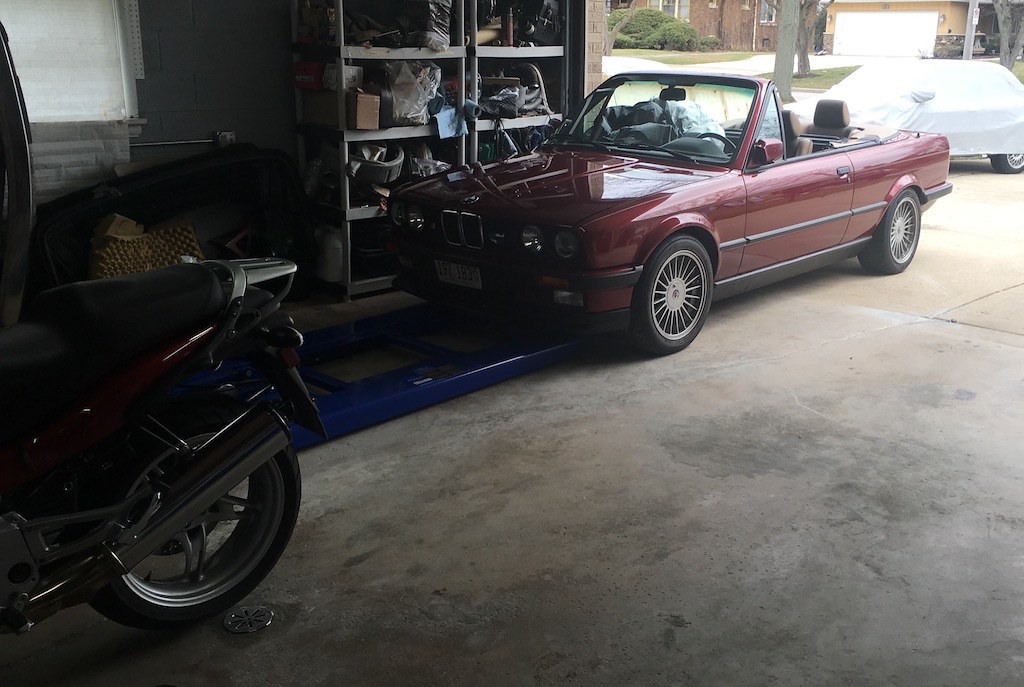
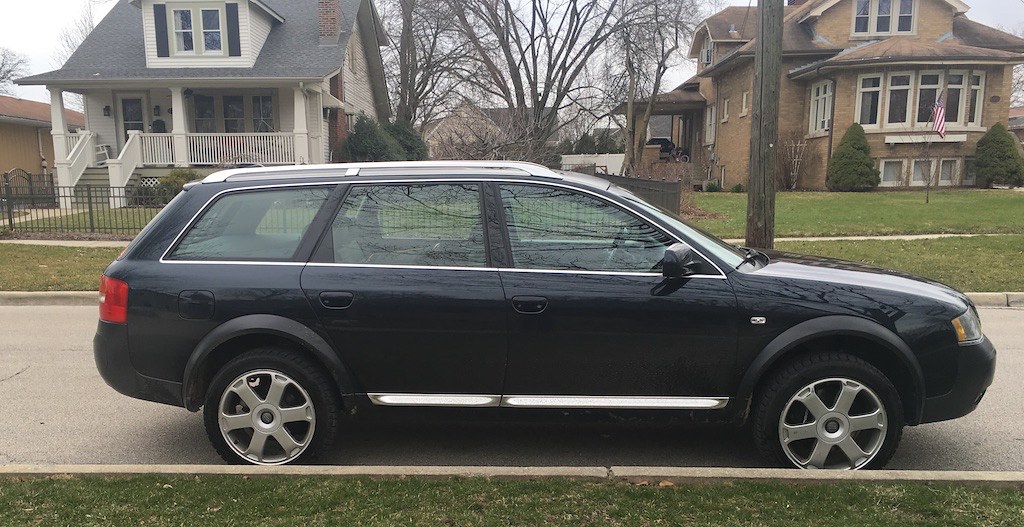
No problem for the Allroad though, especially if put it on level 4 lol
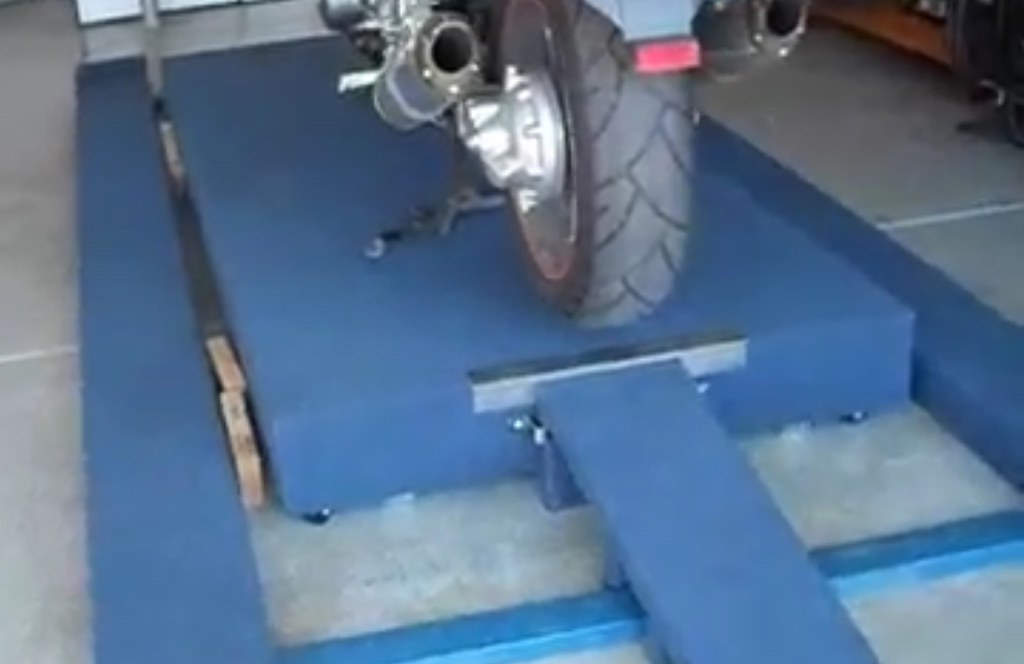
So ramps are definitely necessary, nice weekend project. I also thought about building a cover so I can lift my K1200GT to work on. Not an original idea it turns out.
Very pleased with the German top motor repair part. Very high quality machining. Need to get the ramps done first, then I'll jump to that project.
Now that I finally have a lift, gonna finally take apart the IX parts car. Also getting the itch to swap out the 5 speed for a rebuilt unit from Drive Gear. Hopefully they're still doing that stuff. Since the tranny will be out I'll get the stroker work started too. No convertible til later this summer I guess... Most folks would do this over the winter huh.I BUY/SELL REFURBISHED CM5907s & CM5908s
HOWTOs:
DB vert plastic bumpers
OEM Keys
MTech1 docs
88 ix Lach/Card
91 ic Calypso 3.1
86 Cosmo 2.7
OEM+ or bust!
reelizmpro: I will always be an e30 guy.. I still do all of my own labor
TrentW: There's just something so right about a well-built M20 in an E30
e30m3s54turbo: I save my money for tuner parts.Comment
-
Nope. got an email from Drive Gear saying they weren't in the business anymore. CA Tuned also says the OEM tranny bearings and synchros are on 90 day backorder. Only tranny rebuild I could find are full race prepped jobs from DiffsOnline and some others. They're super sweet but pricey..
well got the ramps all set. same height as the lift which is sweet. Still need to be locked down so they don't slide when driving up on them.
Gonna add an A/B switch and a separate cutoff switch for the lift to my 240 welder circuit, then some shelving and I should finally be good to go garage wise.
and oh yeah spent all my time on the ramps this weekend so no vert progress :-(Last edited by bradnic; 04-09-2018, 06:05 AM.I BUY/SELL REFURBISHED CM5907s & CM5908s
HOWTOs:
DB vert plastic bumpers
OEM Keys
MTech1 docs
88 ix Lach/Card
91 ic Calypso 3.1
86 Cosmo 2.7
OEM+ or bust!
reelizmpro: I will always be an e30 guy.. I still do all of my own labor
TrentW: There's just something so right about a well-built M20 in an E30
e30m3s54turbo: I save my money for tuner parts.Comment
-
Been busy as heck on a bunch of house projects.. even the motorcycle maintenance was on hold.
finally getting some wrench time.
@MPoser swung by with his 92 100k mile laguna vert. dead electric top after a long winter. ugh. and this after we adjusted it for several hours last summer til it was perfect.
checked the electricals, everything's got juice where it should per the 92 cabrio schematics
so next step is troubleshooting control box and microswitches... what little info you can find (e30ic.com) is crazy vague and confusing. so engineering hat on.
all of the top microswitches basically complete circuits to ground. There are 5 of them.
Two on the top motor (RH side of the trunk S1 and S2), two on the lid motor (center of the trunk S3 and S4), and one on the pass side windshield header.
without the microswitches adjusted properly, the control box won't let the top and lid motors run. Unfortunately the schematics and docs are severely limited.
step 2 after checking for battery voltage on 3 control box wires was to confirm the control box itself was not the problem. Swapped it out with Callie's - no change. so control box isn't really the issue.
step 3 was to follow the e30ic power top adjustment procedure described on this page - good luck interpreting it.
after a while it dawns on me there's no way to manually adjust the top lid motor, because the lid motor shaft doesn't have the hex opening for the trunk toolkit Allen key. This is basically a hard stop, because per the writeup the lid microswitch needs to be closed for the lid motor to initiate. BMW introduced some design change to the lid motor assembly, but didn't change the part number. wonderful.Top motor re-sync procedure>>
To the left of the motor that controls the top (far right motor) there is a black control box that has (4) relays (coils). Check these (4) coils with a 12v tester for power with the ignition key on. If all of these have power then it is possible to get power to the micro switches. If these relays do not have power, then you'll need to either swap out the control box or troubleshoot the wire harness by doing some continuity checks.
The reason the top does not work is because there is no power to the micro-switches, I'll explain.
Power to the micro-switches is controlled by the lid motor lock mechanism. The lock mechanism is controlled manually by the allen wrench. When the lid is locked and the lid motor engaged the switches will have power (you'll notice that when you lock the lid, the lid motor assembly swings in and out slightly). When the lid is locked it swings the motor closer to the body of the car and completes the ground for the micro switch. The problem is, it is very difficult to get both the lid locked and the lid motor engaged. They must be done simultaneously. If you have power to the relays, here is how to get power to the micro-switches.
This is easier with two people....also make sure the ignition key is on
Disengage all the motors (unlock the lid mechanism, disengage the lid motor and the top motor)
Undue your top from the front window and push it up like your going to put the top down with the switch
These have to been done in this order.
Re-engage the top motor (far right) have someone slowly lift the back window until you can seat the top motor in.
Now the hard part...
You have to lock the lid mechanism with the allen wrench and engage the lid motor at the same time. It took me several tries at this. Try locking the lid half way, then pushing in the motor half way and play with it until the motor pops in and the lid locks at the same time.
If you were successful you can turn the micro switch adjustment screw (located to the left of the allen lid lock point). When you turn the adjustment screw you'll hear a click when the switch turns on or off, you'll have to listen carefully. If you don't hear a click then you have to disengage the lid motor and unlock and try again. If you do hear clicks while turning the adjustment screw, turn the screw all the way to the left and slowly turn to the right until you hear a click. Then test your top, does it work? If not turn the screw all the way to the right and slowly turn to the left until you hear a click. Then test your top again, it should work and may require further adjustment using this adjustment screw.
This is a difficult procedure to explain, but it is fairly easy to do yourself. The micro-switch will not get power if you are unable to lock the lid and engage the lid motor simultaneously. My dealer could not even do it. So it will take some playing around with until you get the feel for it. Once all the motors are engaged and there is power to the micro switches you just have to turn the lid micro switch to the position the tells the system the lid is down and locked. Then the top should operate normally.
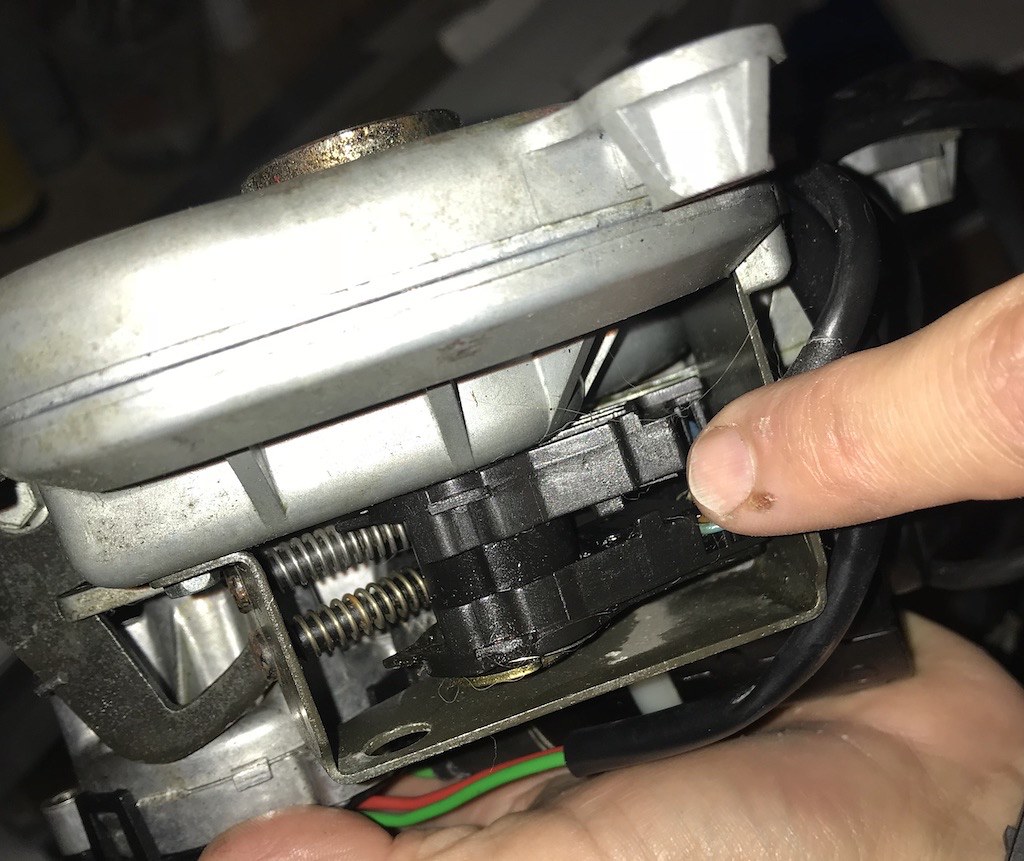
hit my stash of lid motors, and sure enough, the newer lid motors can't be manually adjusted with the Allen key. If we take the bracket off we can force lock the lid by turning the shaft manually. Since the shaft has a notch it's not hard to make a collar and key that will work. what a pain though - you will lose the position calibration for the S3 and S4 microswitches on the lib motor when you take the bracket off.
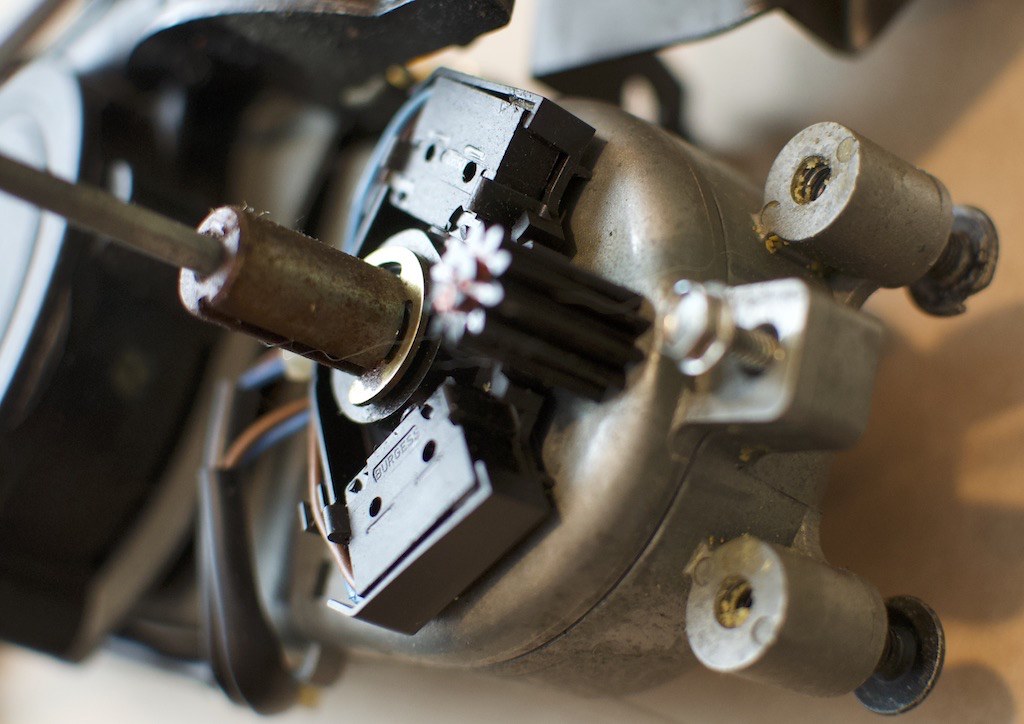
two lid motors side by side - you can see the S4 and S3 microswitches on the left (top) and right (bottom) of each motor
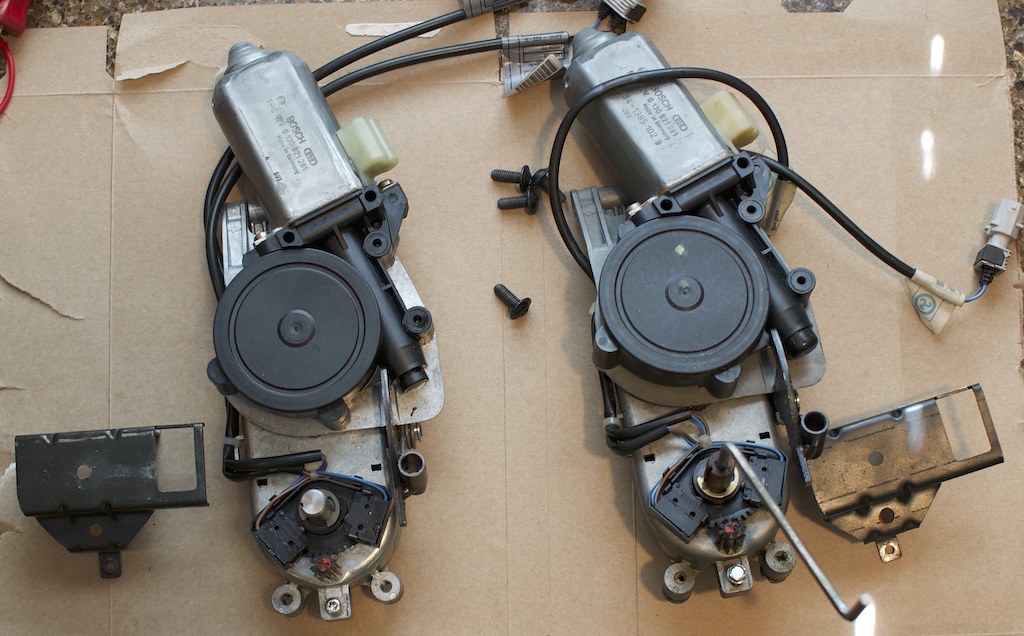
Flat end of lid motor shaft, no hex key hole. can't use the trunk tool.
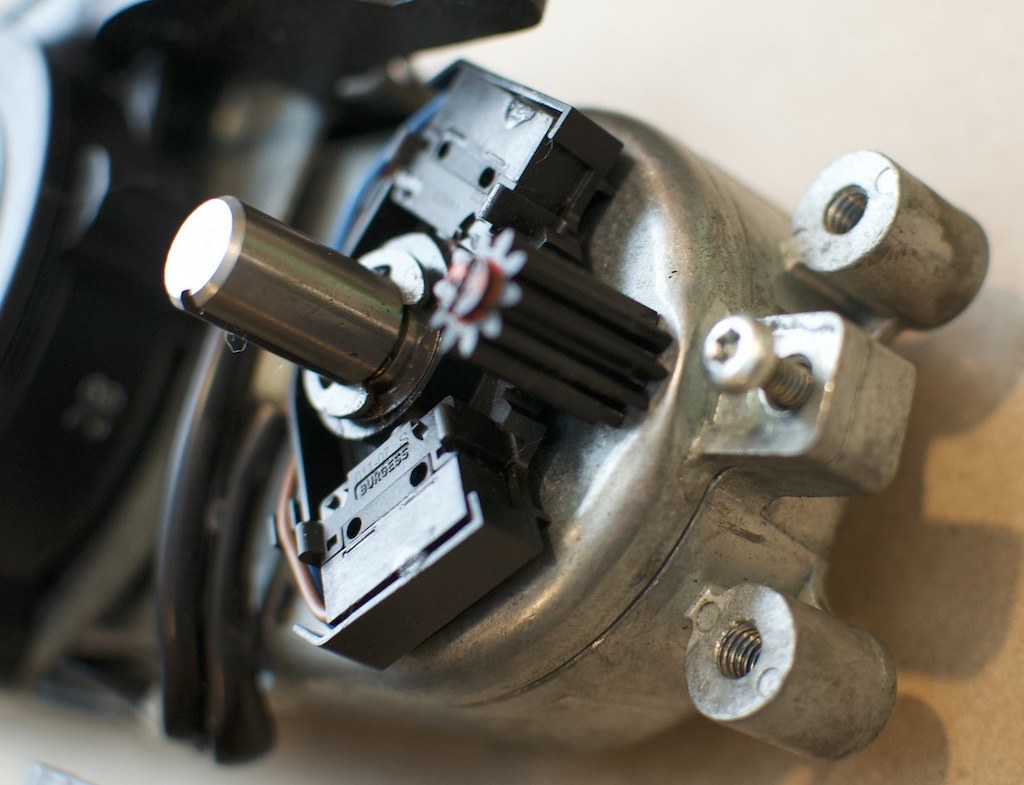
Hex key opening present - can use the trunk tool
more to come.Last edited by bradnic; 05-26-2018, 06:26 PM.I BUY/SELL REFURBISHED CM5907s & CM5908s
HOWTOs:
DB vert plastic bumpers
OEM Keys
MTech1 docs
88 ix Lach/Card
91 ic Calypso 3.1
86 Cosmo 2.7
OEM+ or bust!
reelizmpro: I will always be an e30 guy.. I still do all of my own labor
TrentW: There's just something so right about a well-built M20 in an E30
e30m3s54turbo: I save my money for tuner parts.Comment
-
more details on the motors and microswitches
So the top schematics are useful but incomplete.
- where are all the microswitches?
- which microswitch does what?
- how do I figure out what's supposed to be going on and not happening?
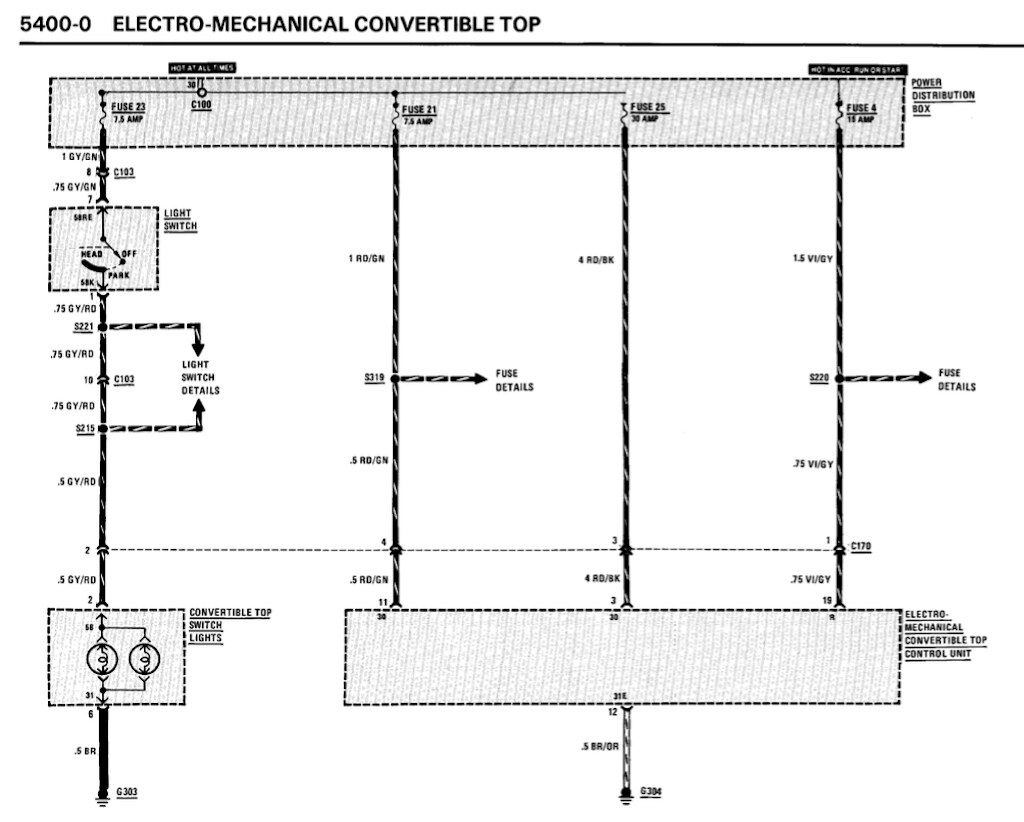
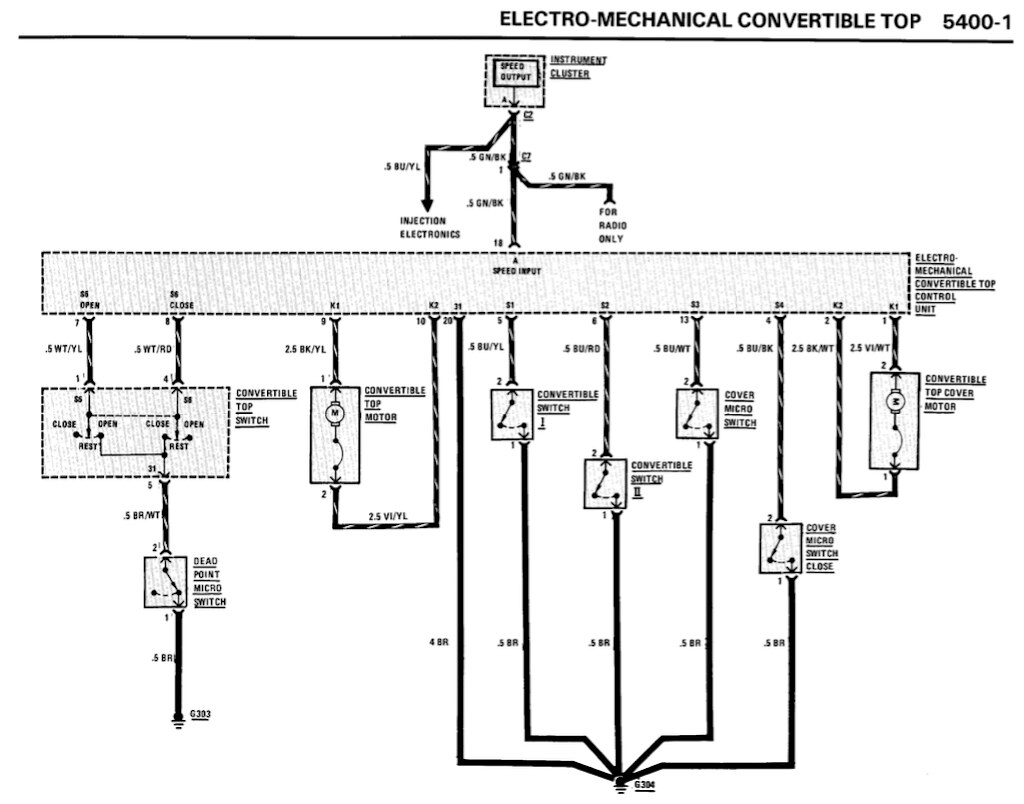
Let's get everything in one place, starting with the two schematic drawings showing the top control units, microswitches and wiring
This schematic shows how power top control box / control unit gets power. It also shows the box itself is grounded.
There are four relays in the box and a microcontroller. The relays power the top and lid motors.
The microcontroller tells the motors when to turn off based on the status of the five microswitches mentioned in the previous post. Again the motors will NOT turn on if the microswitches aren't in an expected state of open or closed.. That state depends on the position of the lid and the top at any point.
So let's take a closer look at the microswitches, including
- where they are located
- what they are supposed to detect
- when they turn on and off (e.g., close and open)
S5 - "Dead Point Microswitch"
You can see this one on the left side of the 5400-1 schematic. it's connected between the convertible top switch in the dash and ground.
Wire colors: Brown/White to the dash switch, Brown to ground
Location: Above the passenger sun visor on the window header, right where the right pin from the top rests when the top is closed. Look in the hole and the switch is at the bottom.
pics pending
What it detects: Check if top is locked in the closed position.
Effect on top operation: The switch will disable both the lid and top motors if the top is closed. It does this by opening, which breaks the path to ground for the top switch in the dash.
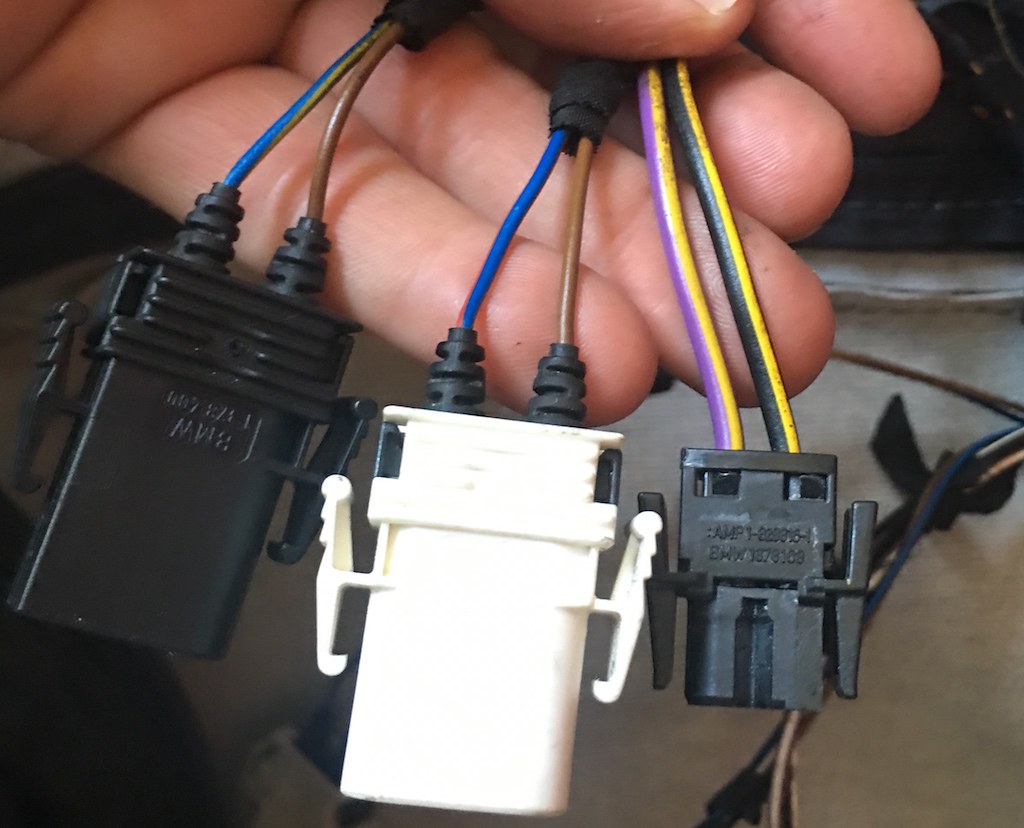
Testing operation: You need two people. Disconnect the top control box. Find the White/Yellow (open top) and White/Red (close top) wires on the control box connector (next to each other in center of pic).
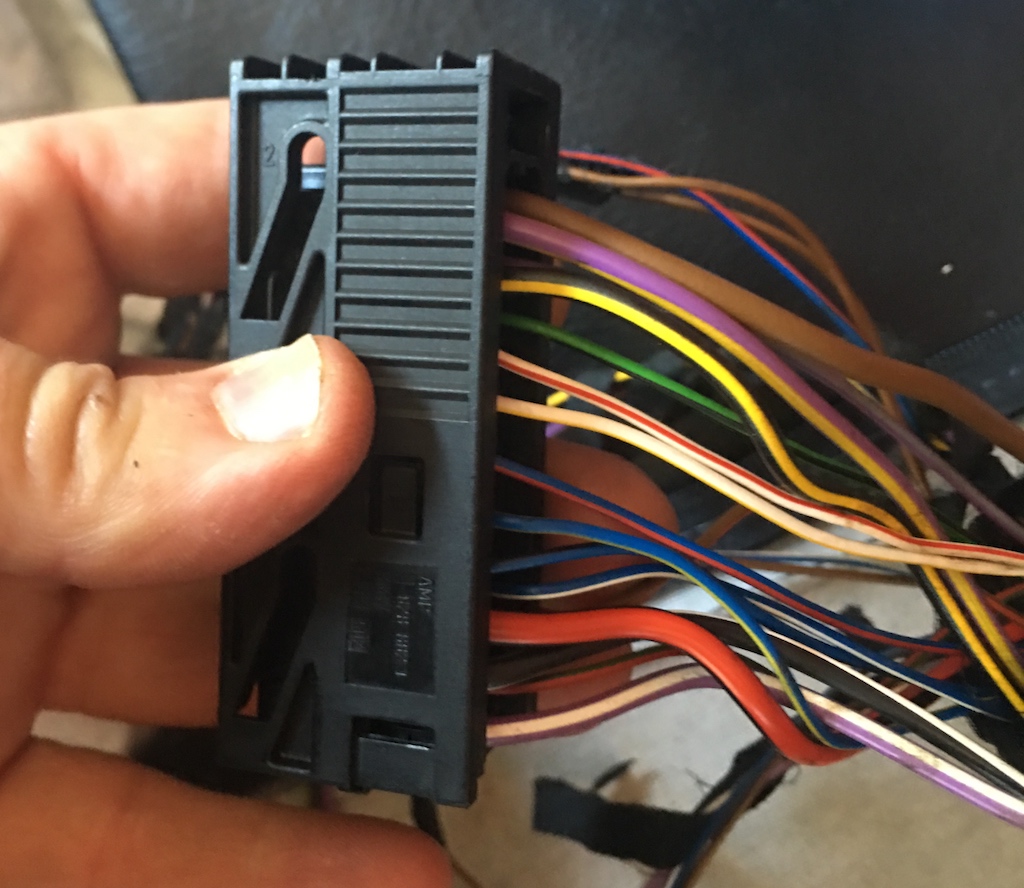
connect a voltmeter to one of them and ground. Turn on the ignition and press the open or close button based on the wire you chose. Voltage should go from 0 to something in the range of 0.75 volts. While the button is down and meter connected, use a small screwdriver and click the S5 microswitch. You should see the meter voltage go back to zero. Repeat test with the other white wire and switch.
S4 and S3 "Lid (aka 'Cover Flap') Microswitches"
These are mounted on the lid motor as shown in the pics on the previous post. "Lid" is the cover for the soft top storage compartment. BMW calls the lid a "Cover" in the schematics and "Cover Flap" in the top retrofit instructions.
Wire colors:
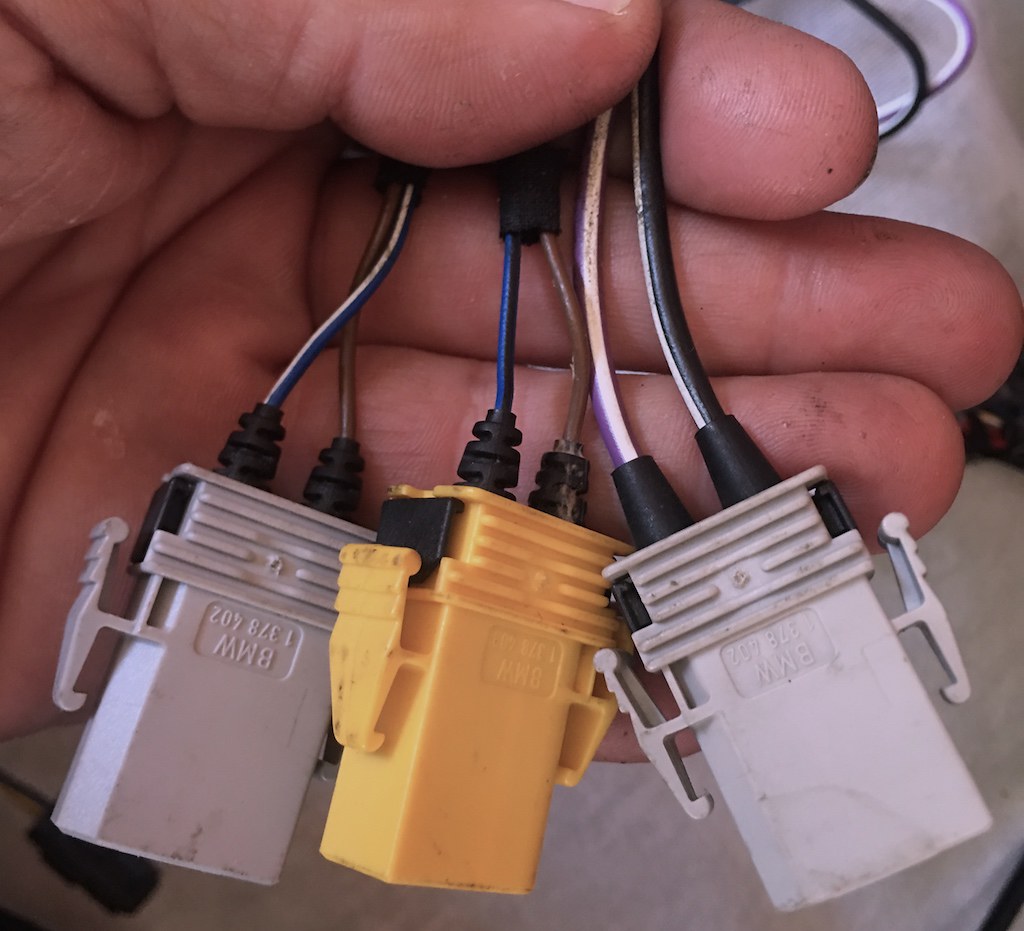
-- S3 microswitch is Blue/Black and Brown, Yellow Connector
-- S4 microswitch is Blue/White and Brown, Grey Connector.
-- Lid motor has thick Black/White and Violet/White wires and a grey connector
Location: On the lid motor, mounted in middle of trunk center section
The S4 and S3 microswitches are located on the back of the lid motor. They are normally held in place with a black bracket.
What it detects: The S4 microswitch indicates when the lid is fully closed. The S3 microswitch confirms the lid is fully open.
Effect on top operation: pending
Testing operation: pending
S2 and S1 "Top Microswitches"
Wire colors:
-- S1 microswitch is Blue/Yellow and Brown, Black Connector
-- S2 microswitch is Blue/Red and Brown, White Connector.
-- Top motor has thick Black/Yellow and Violet/Yellow wires and a small black connector
Location:
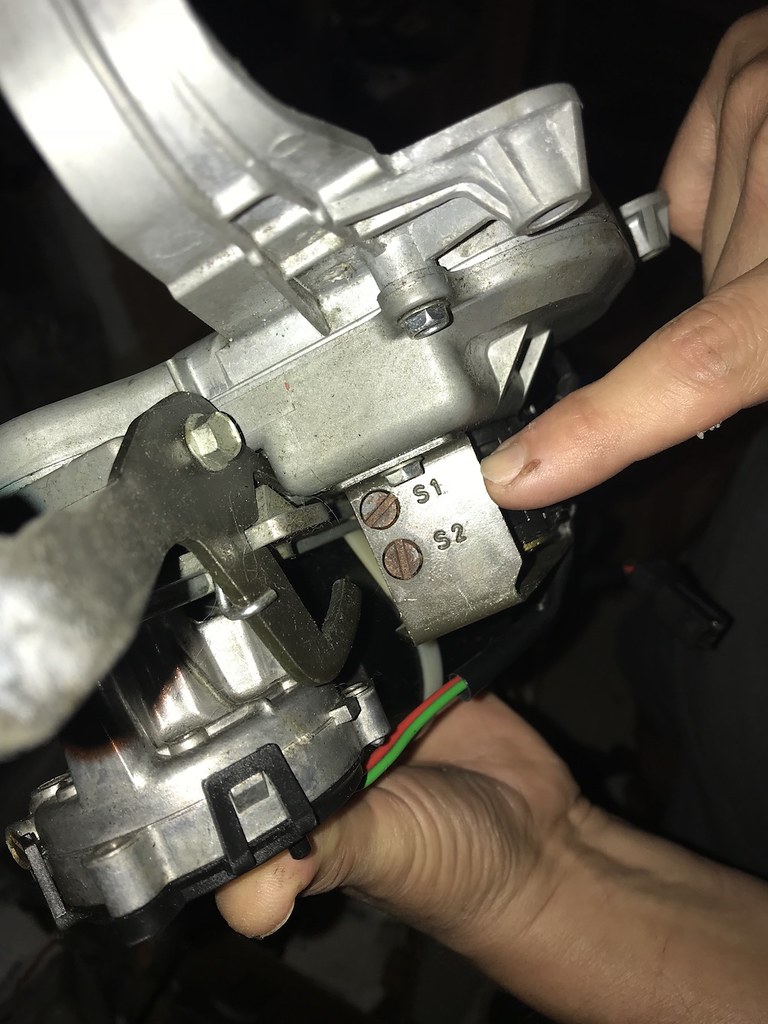
What it detects: The S1 microswitch indicates the top is up.
Effect on top operation: The S1 microswitch enables raising the top, if S3 (lid open) is active. S2 enables lowering the top, if S3 is active
Testing operation: pendingLast edited by bradnic; 07-08-2018, 11:02 AM.I BUY/SELL REFURBISHED CM5907s & CM5908s
HOWTOs:
DB vert plastic bumpers
OEM Keys
MTech1 docs
88 ix Lach/Card
91 ic Calypso 3.1
86 Cosmo 2.7
OEM+ or bust!
reelizmpro: I will always be an e30 guy.. I still do all of my own labor
TrentW: There's just something so right about a well-built M20 in an E30
e30m3s54turbo: I save my money for tuner parts.Comment
-
Dissecting the e30ic.com top sync procedure
So I did a bunch more digging today in between other projects. Let's take each part of the alignment procedure and figure out what the author was getting at.
Recall we took 2 steps ahead of the power top procedure
step 1 checked for battery voltage at 3 wires on the top control box OK
step 2 swapped the box to confirm it didn't fix our problem NO CHANGE BOX OK
step 3 annotated
This is good advice. If you look at the schematic diagrams on the previous post, you'll see that on the first diagram power comes through 3 lines to the control box. So check each of those wires for power at the control box connector, You can find them by matching the color code.Top motor re-sync procedure>>
To the left of the motor that controls the top (far right motor) there is a black control box that has (4) relays (coils). Check these (4) coils with a 12v tester for power with the ignition key on. If all of these have power then it is possible to get power to the micro switches. If these relays do not have power, then you'll need to either swap out the control box or troubleshoot the wire harness by doing some continuity checks.
For power to flow it needs to reach whatever thing consumes the power, and that thing has to reach ground too. From the first and second schematics you'll see that the top and lid motors as well as the microswitches are all connected to ground. The control box won't power the motors unless the appropriate microswitches are closed when the motors need to run.The reason the top does not work is because there is no power to the micro-switches, I'll explain.
This is absolutely not correct. each microswitch has 2 wires, one from the control box and the other to ground. the lock mechanism is NOT part of the electrical circuit at all!Power to the micro-switches is controlled by the lid motor lock mechanism.
The Allen wrench has nothing to do with the top and lid motor lock mechanisms. You do stick something pointy into the roundel metal portions of the lock mechanisms to move the motors away from the gears that drive the top and lid mechanisms. You could use the Allen key for that, but anything pointy will work including the wheel alignment pin in the toolkit. The Allen key is really to turn the lid motor so you can re-engage it - and you can't even use it for that if you have a later version of the lid motor that is missing the key hole on the trunk side of the motor shaft. Pics two posts above explain this.The lock mechanism is controlled manually by the allen wrench.
This is not true at all, and not relevant.When the lid is locked and the lid motor engaged the switches will have power (you'll notice that when you lock the lid, the lid motor assembly swings in and out slightly). When the lid is locked it swings the motor closer to the body of the car and completes the ground for the micro switch.
There's a control box involved here, and if you open it (super easy to do without breaking) you'll find an old school Motorola processor in it. Simply put, the controller will only enable and disable power to the motors when the appropriate conditions exist. I'll post about this later when I get it all sorted out, but it's not simple.. The sequence of operations when opening the top are reversed from when closing the top. So the "initial conditions" for opening and closing are completely different.
1) If you're opening the top after it's been unlatched from the window and the front part lifted upward, the rear of the top needs to be lifted, then the lid needs to be open, then the top lowered into the tonneau / top storage compartment, then the lid closed.
2) If you're closing the top from its stored position in the top storage compartment, the top won't move until the lid is first opened. then it will move forward and stop, then it will lift the rear and stop, then the lid will close and latch, then the rear of the top will drop.
3) If you try to push the top down button with the top stored nothing should happen. Ditto top up button with the top up.
4) If you interrupt the opening or closing operation in any way, then maybe shut off the car for some reason, then try to hit the top up or top down button, the car needs to know what it was doing before you push that button! What happens when you press up or down at that instant depends on which microswitches are open or closed, and whether they make sense to be open or closed that way.
Bottom line: the relative position of top lid and top have to be determined by what state all five the microswitches are in. If they are in an unexpected state the control box won't let anything move to prevent damage. The top mechanism needs to be re-synchronized, but for that to fix things you should understand what caused it to go out of sync to begin with.
Rest of the re-alignment instructions from e30ic.com tell you how to disconnect the motors, move the top around and start the re-sync process for the microswitches. The dealer had a box that helps them do this work. I've never seen one but definitely wish I had access to it. You plug harness control box connector into the tool.
Remember at this point you've confirmed there is power to the control box, and the control box isn't a problem. So it's got to be that the 'right' microswitches for the top's current position are open when they should be closed. What's the right combination of microswitches? it depends on the relative positions of the lid and top.The problem is, it is very difficult to get both the lid locked and the lid motor engaged. They must be done simultaneously.
again this isn't why you do it. you're trying to put the lid and top in a "known good" position relative to each other, and you may be forced to adjust one or more of the microswitches too.If you have power to the relays, here is how to get power to the micro-switches.
All of this is simply the procedure to re-engage the top motor and lid motor if you've unlocked them from the top and lid mechanisms - which you HAVE to do if the top isn't working. So it's all good, but it probably won't correct whatever is causing your top not to work just by doing this.This is easier with two people....also make sure the ignition key is on
Disengage all the motors (unlock the lid mechanism, disengage the lid motor and the top motor)
Undue your top from the front window and push it up like your going to put the top down with the switch
These have to been done in this order.
Re-engage the top motor (far right) have someone slowly lift the back window until you can seat the top motor in.
Now the hard part...
You have to lock the lid mechanism with the allen wrench and engage the lid motor at the same time. It took me several tries at this. Try locking the lid half way, then pushing in the motor half way and play with it until the motor pops in and the lid locks at the same time.
There's also a catch - some of you won't be able to use the Allen key. More on that below. If you can't use the Allen key you need then how do you re-engage the motors if you've unlocked them and moved the top, lid etc.? GOOD QUESTION.
Here's the money part - if you somehow get everything re-engaged this MAY get your top working again. It did not help us today though.
This sounds all mysterious, but basically you're moving both the S3 and S4 microswitches around the lid motor shaft to get them back in sync with the lid mechanism. Pics 2 posts back show more detail on these switches.If you were successful you can turn the micro switch adjustment screw (located to the left of the allen lid lock point). When you turn the adjustment screw you'll hear a click when the switch turns on or off, you'll have to listen carefully. If you don't hear a click then you have to disengage the lid motor and unlock and try again. If you do hear clicks while turning the adjustment screw, turn the screw all the way to the left and slowly turn to the right until you hear a click. Then test your top, does it work? If not turn the screw all the way to the right and slowly turn to the left until you hear a click. Then test your top again, it should work and may require further adjustment using this adjustment screw.
this part you can ignore.This is a difficult procedure to explain, but it is fairly easy to do yourself. The micro-switch will not get power if you are unable to lock the lid and engage the lid motor simultaneously. My dealer could not even do it. So it will take some playing around with until you get the feel for it.
This is good info. So which switch "tells the system the lid is down and locked"? S4. So where is S4? it's the one on the upper side of the lid motor.Once all the motors are engaged and there is power to the micro switches you just have to turn the lid micro switch to the position the tells the system the lid is down and locked. Then the top should operate normally.Last edited by bradnic; 05-27-2018, 10:18 AM.I BUY/SELL REFURBISHED CM5907s & CM5908s
HOWTOs:
DB vert plastic bumpers
OEM Keys
MTech1 docs
88 ix Lach/Card
91 ic Calypso 3.1
86 Cosmo 2.7
OEM+ or bust!
reelizmpro: I will always be an e30 guy.. I still do all of my own labor
TrentW: There's just something so right about a well-built M20 in an E30
e30m3s54turbo: I save my money for tuner parts.Comment
-
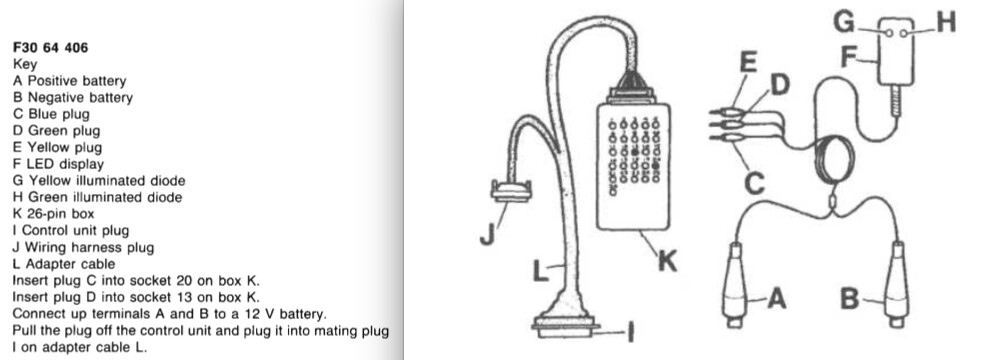
The dealer top diagnostic tool
Taking a closer look at that dealer tool, there are 2 parts that are kind of obvious:
1 and 2) A harness and breakout box. There's not much to this really - it taps into the control box connector, and has a matching harness connector that lets you plug in your own control box into it.
3) Another harness with a couple of batter connectors on one end and a little box with a couple of LEDs on it. The LEDs are used to know if a given microswitch is grounded or not.
Pretty obvious that harness connector drawing is wrong btw. the harness connector is too small.
Should be pretty darn easy to clone this thing, assuming it was not available from BMW anymore, or at least restricted for sale to dealers only. I happen to have a spare convertible top harness I acquired last year, and a spare control box. Will look into the dealer tool first. I did find the part numbers and drawings of the 2 parts in the same document. The harness pic in this graphic looks legit. I added the English descriptions to the pic, and dropped an email to Samstag to see if they can procure one (it's not on their website).
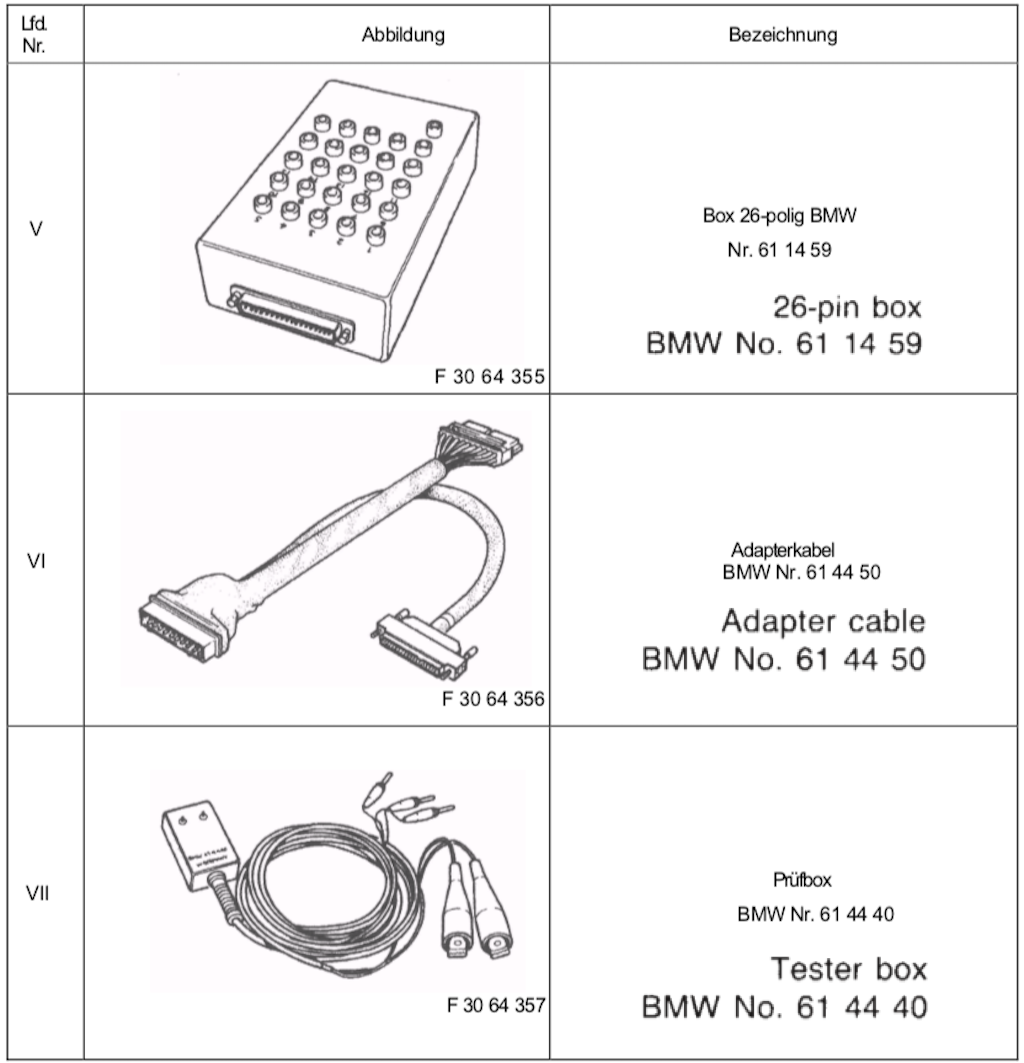
and looks like this is a perfect breakout box. found the same box on ebay new for $40 shipped
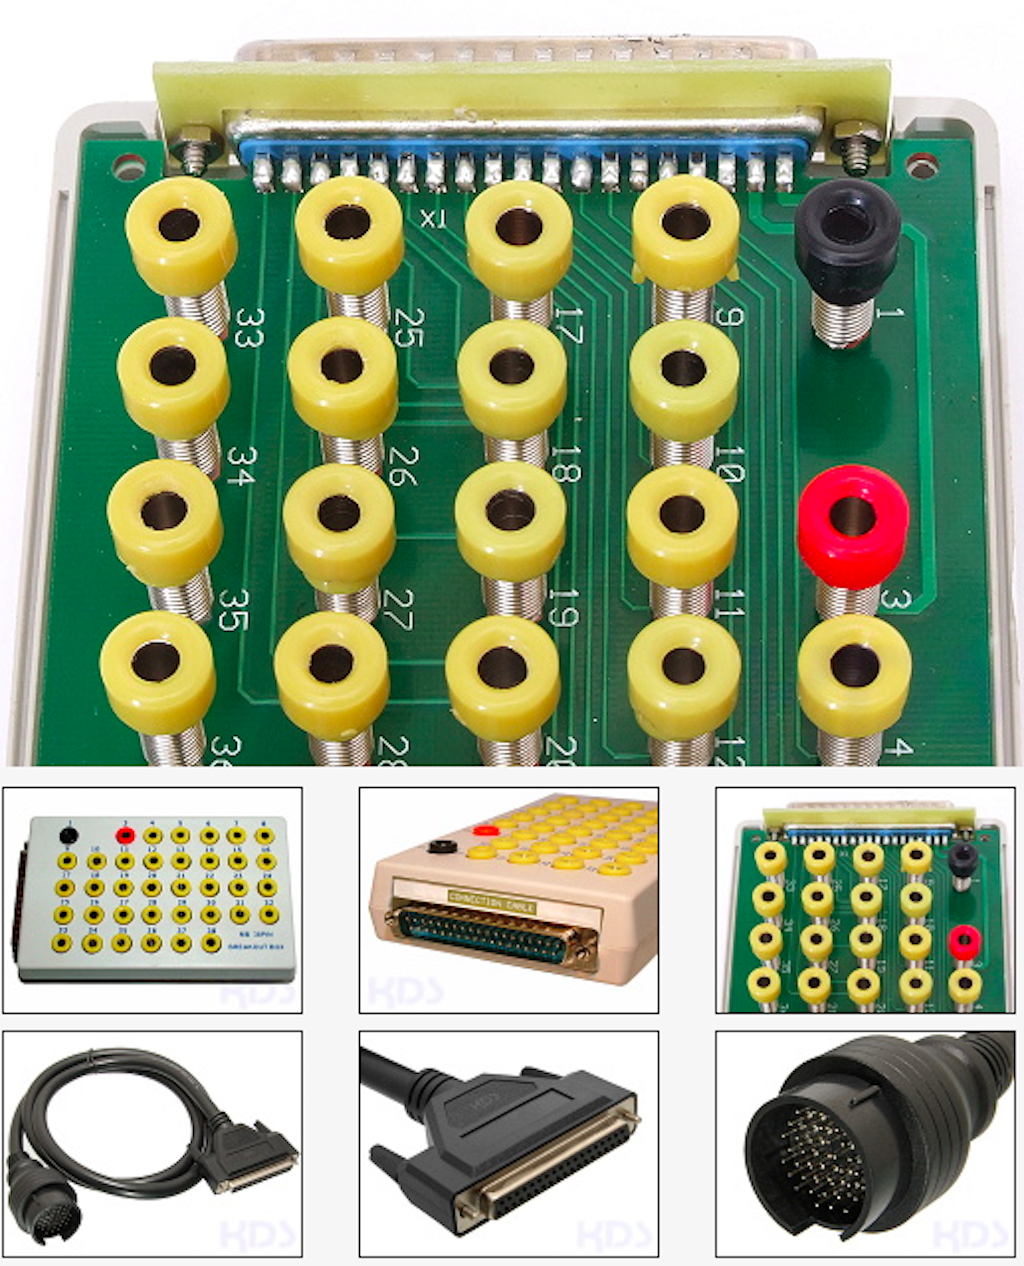
Rest of it is damn easy. Shame to cut off that round OBD connector lol.Last edited by bradnic; 05-27-2018, 06:10 AM.I BUY/SELL REFURBISHED CM5907s & CM5908s
HOWTOs:
DB vert plastic bumpers
OEM Keys
MTech1 docs
88 ix Lach/Card
91 ic Calypso 3.1
86 Cosmo 2.7
OEM+ or bust!
reelizmpro: I will always be an e30 guy.. I still do all of my own labor
TrentW: There's just something so right about a well-built M20 in an E30
e30m3s54turbo: I save my money for tuner parts.Comment


Comment