-
Made a 1/4" steel spacer for the passenger side motor mount. Along with grinding back the turbine housing flange, this gives sufficient clearance for the engine to torque over on the rubber E28 mounts.
It is to be determined how this affects clearance in other places. So far I've had to shim the driver's side of the transmission mount with washers to get things lined up. (Will be replacing washers with a 1/4" plate for that mount before I drive the car.)
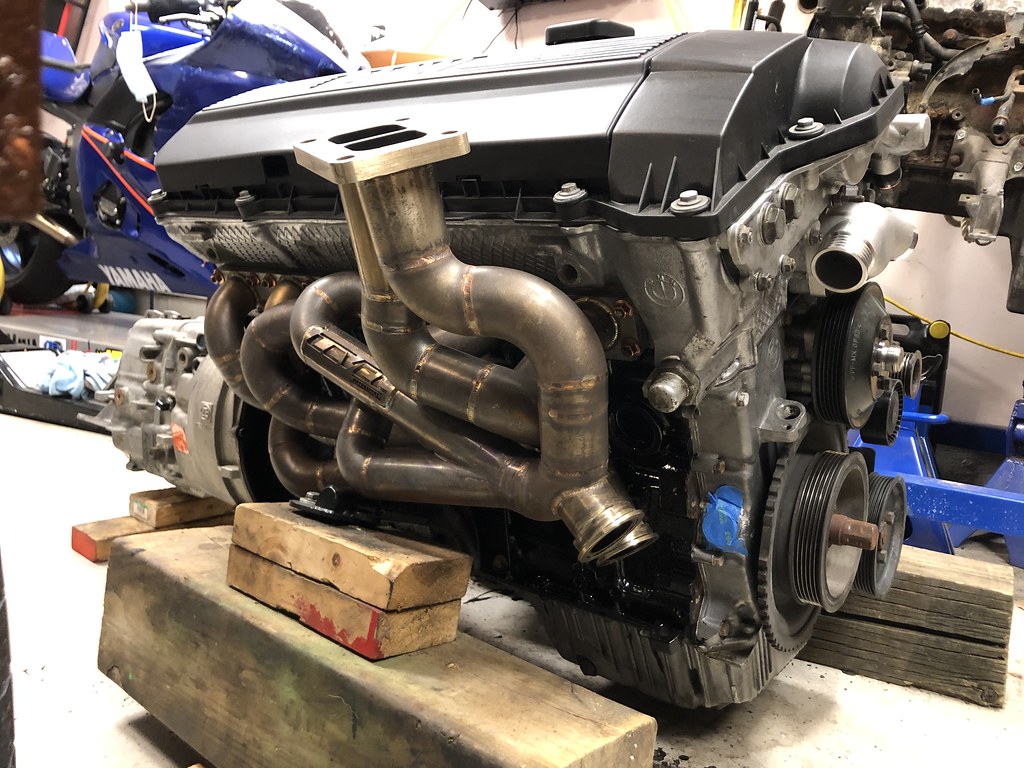
Did a test-fit of the downpipe, and found it to hit just about everything. Some light hammering and I can at least mount it flush to the turbo. Going to need some heat and serious smashing to get some clearance. I'm also looking into which heat wrap is best for the downpipe.
Installed the brake booster, plumbed up the brake & clutch system. This included installing the front calipers and swaybar. (Chase bays soft brake line for the passsenger side front runs along the swaybar.) Added some DEI heat shielding to the brake line on the exhaust side of the engine.
Cleaned up the glovebox ECU wiring.
Changed the ECU output pin for the Main relay to Pin 34 (INJ2). This powers the Coil packs, Fuel injectors, FPR, ICV.
I left the Wideband O2 controller on Pin 20 (INJ H) of the ECU so that I can delay the sensor (heater) powerup until the exhaust has a chance to heat up.
This will prevent thermal shock to the sensor and increase it's lifespan.


 Last edited by Panici; 06-12-2022, 01:32 PM.
Leave a comment:
-
Haven't done a whole lot of work directly on the E30, however have a lot of supporting work happening.
Waited on parts to arrive & warm weather for what seemed like forever.- New ZF320 shift shaft seal
- New ZF320 reverse light switch
- New (used) driver's side interior door handle.
- Thank you forum member brutus!
- New RaceGerman exhaust manifold stud kit installed.
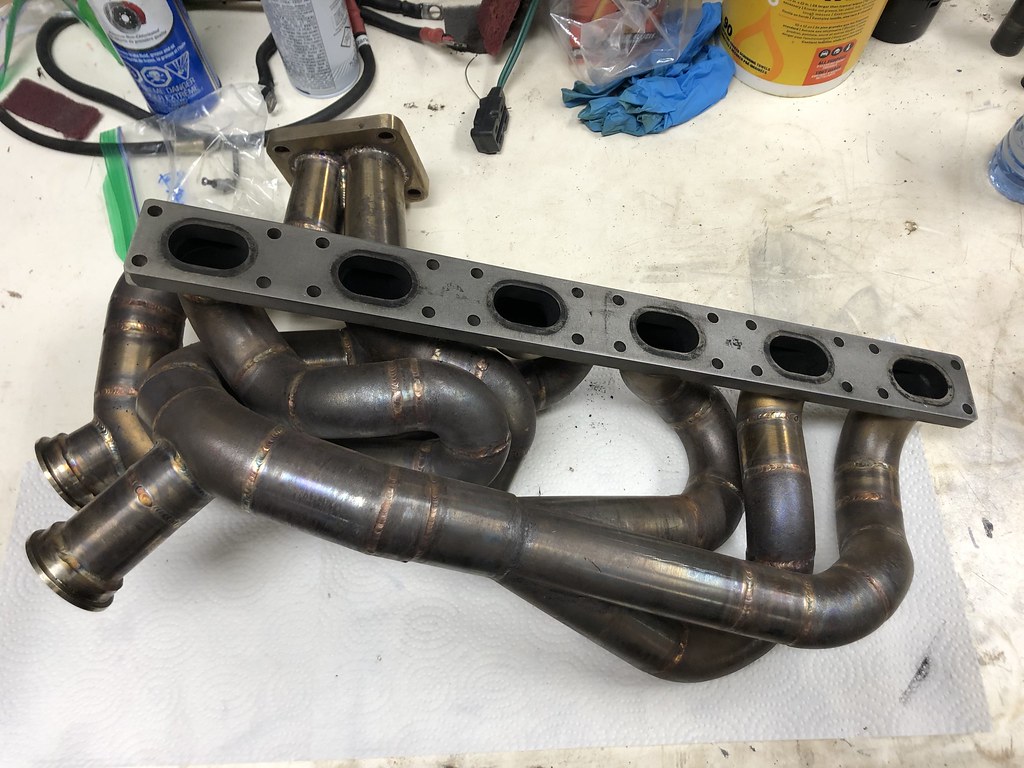
- Level Motorsports twin scroll manifold installed with new gaskets.
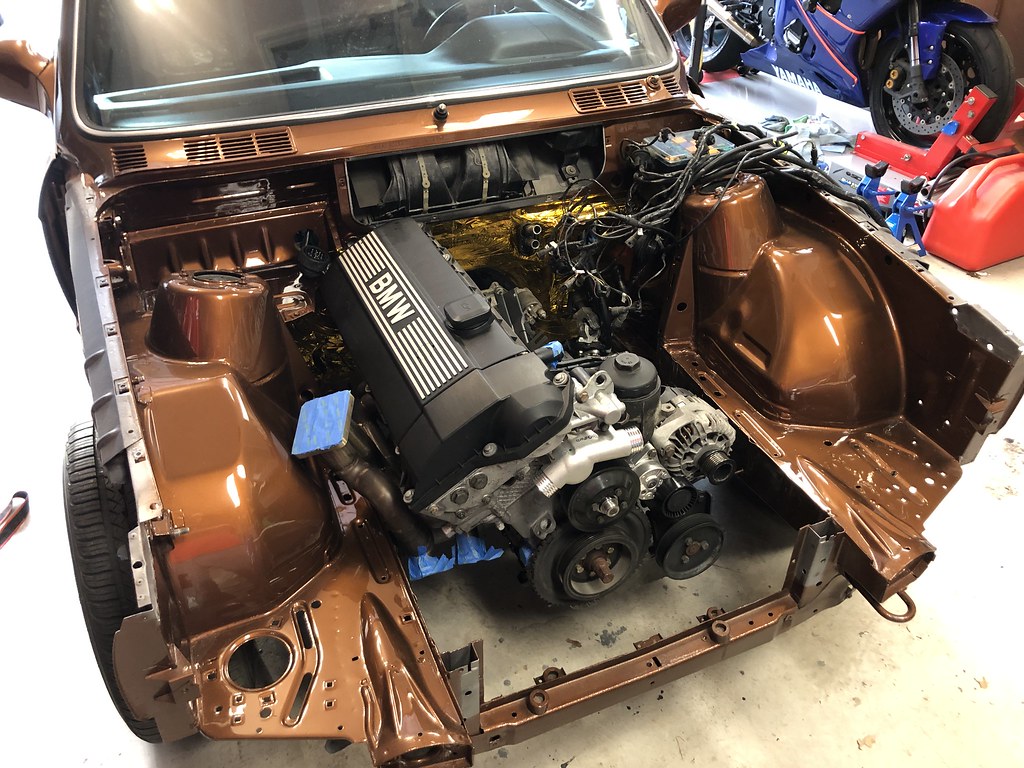
- Motor and Transmission physically sitting on their mounts! Managed to not scratch the fresh paint!
- Going to try a 1/4" motor mount shim on the driver's side to give me a little more clearance. I'm betting the motor will torque over enough to hit the (pristine & freshly painted) wheel well.
- Scuttled the M52B28 I had sitting since 2014 and PAGE 1 of this thread.
- You can see the damage from sitting outside with the intake manifold loose for the better part of a year. This is why I didn't use this motor for the swap.
- Kept all the parts as spares.
- Gave away the block as I don't have space to store it.
- Pulled the M52B28 from my E36 parts car. This will be the new "spare motor" to sit on the stand once I remove (and throw out) the awful automatic trans that is attached.
- This one fought me on removal, auto trans lines hung up on the steering rack and I took the trans cooler to the face when cutting the lines. Glad I was wearing safety glasses!
I was also working on my Miata this month refreshing & upgrading the cooling system, which ate up some wrenching time.
Before I forget: Shout out to my sister who is the MVP of engine installation/removal!


 Last edited by Panici; 05-01-2022, 06:55 AM.
Leave a comment:
-
With the M52 stock bottom end, it seems 50/50 whether you obliterate ring lands or bend rods, but for 400whp you should absolutely be fine with stock rods/gap.
ba114's previous turbo build would be a good example of the ringland issue and power level you'd encounter it.Leave a comment:
-
Good suggestion, will keep it in mind if/when I do a full engine build for the car.
This one I didn't touch the bottom end on purpose. Thought to keep it simple since it's my first time opening up an engine.
It will be fine with stock ring gap and 400WHP. Realistically that is plenty of power for such a light chassis.
If I turn it up from there it will be at my own risk.Leave a comment:
-
If using your stock bottom end, Id consider opening up the ring gaps. Seem like they'll touch and seize, that'll be your issue before something snaps.Leave a comment:
-
I definitely have mechanical sympathy in general. But that said, I do enjoy a good clutch kick from time to time.
The car will be used for long-distance roadtrips, and see occasional track use when it's back together. For these reasons I always keep reliability in mind.
I'd rather overbuild, knowing full well that the desire for more power will always be there.
For now I figure the limiting factor will be the Spec Stage 3+ clutch rated at 493ft.lbs, closely followed by the M52b28 stock bottom end.
But I do have a spare engine from my E36 328i parts car to play with...
Leave a comment:
-
Excellent, can't wait to be seeing a similar sight on my garage floor.
Never heard of 400WHP worth of torque being an issue with a G260, and I've tens of thousands of miles on that sort of combo. I do not, however, beat on my car. I don't clutch kick, I have very good clutch control, and the car is not set up for drag so is very traction limited from a stop. Most of the stress I put on my drivetrain is roll racing, and the occasional drag strip trip. My wagon is a special case - it'll make 500ftlbs+ when done and I don't feel like finding and adapting a G260 just so I don't have to use a 2.93 or lower rear end ratio, only to break it.Last edited by varg; 02-25-2022, 08:12 AM.Leave a comment:
-
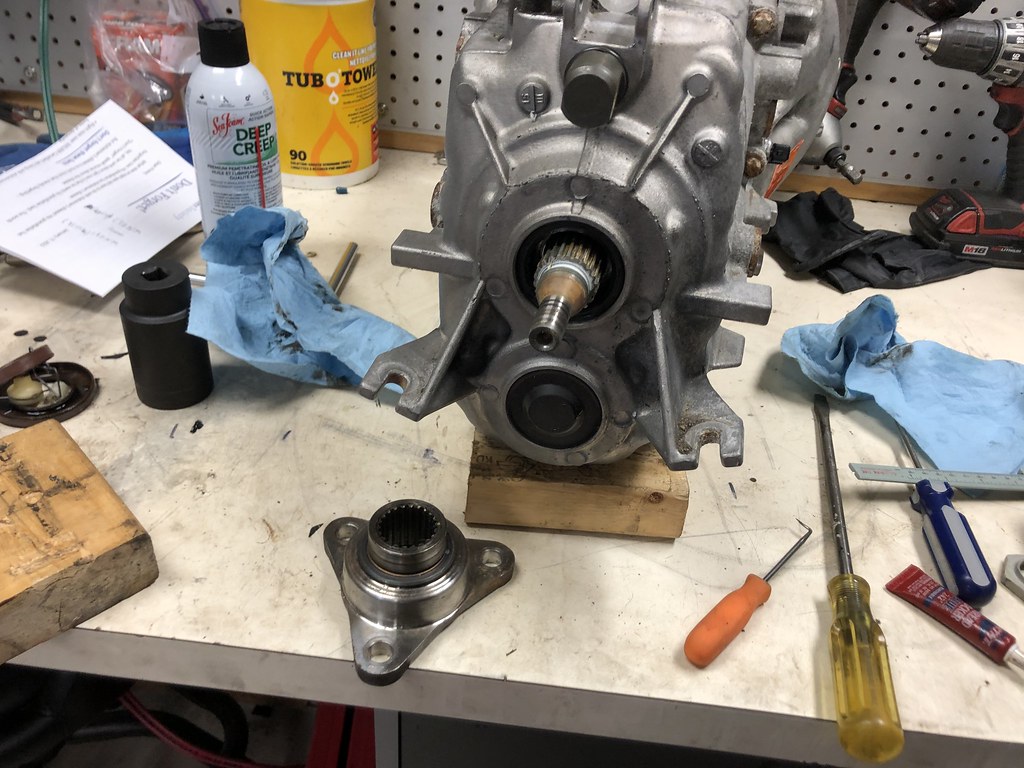
Some wrenching progress. This lump is almost ready for installation.
Also got to use my press again. Sure beats using a vise like I did with the last differential bushing!- Crankshaft bolt torqued to 300ft.lbs(?!) with my custom crank holding tool.
- Old (smaller) G260 pilot bearing pressed out with some bread. New (larger) ZF320 pilot bearing installed.
- SPEC Stage 3+ Street/Track Clutch Kit installed with new Genuine BMW pressure plate bolts.
- New throwout bearing installed. New clutch slave cylinder installed.
- ZF320 transmission mounted to engine.
- Starter installed.
- Genuine BMW differential bushing pressed into cover. Cover installed with new gasket.


Leave a comment:
-
-
I dig the color. I may have missed it in the thread but if you have the option to, why use the ZF320 on the engine when you have a G260 available? The G260 has better ratios and you don't have to go through the hassle of finding such a low ratio diff if you use it. I had a hell of a time finding a diff to use with my E34 and I only did it because I'm not sure a G260 would hold up to my power goal.Leave a comment:
-
Yeah it's the little touches that make the difference!
Unfortunately I forgot to get the (full hood) hood-side rollers colourmatched, but I'll be running the quarter hood the majority of the time anyways.
It's a very dynamic brown. Especially in the sun it really pops!
------------------------------------------------
Progress has been slow on the E30 this winter.
I started a new job in December, but if I'm honest the real reason is that I don't enjoy working in a cold garage with cold tools. Much rather have the door open and the sun shining!
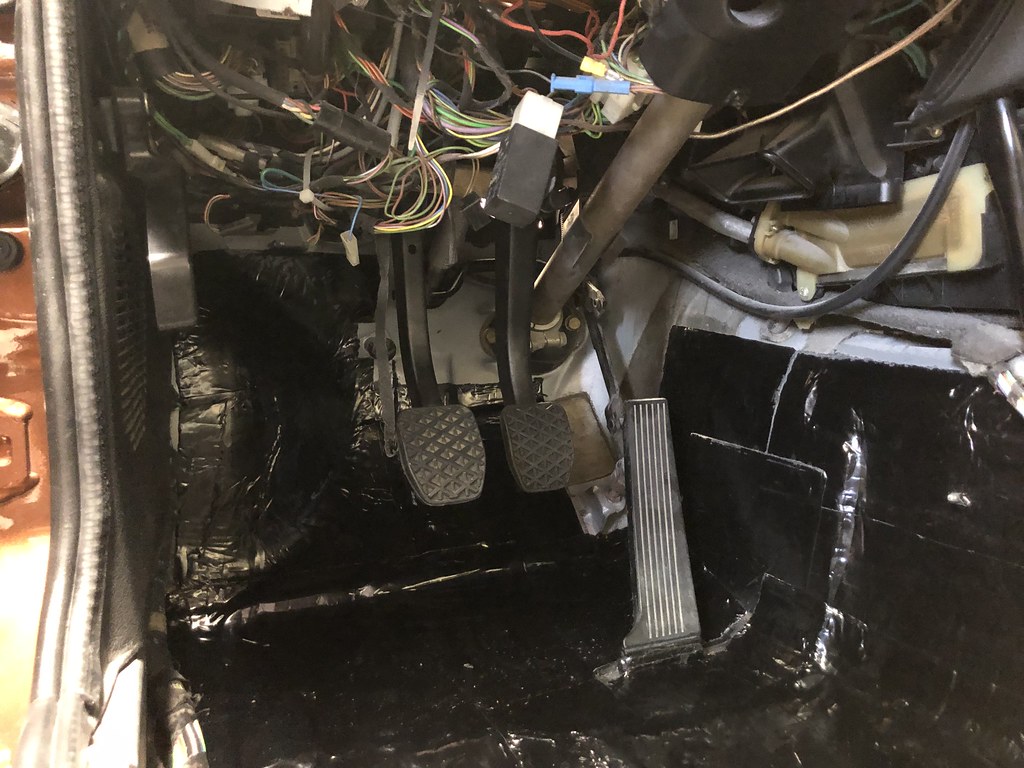
Laid down some Hushmat sound deadening / heat attenuation mat in the interior. Will need to order some more of this next time I have the interior apart so I can finish the job.
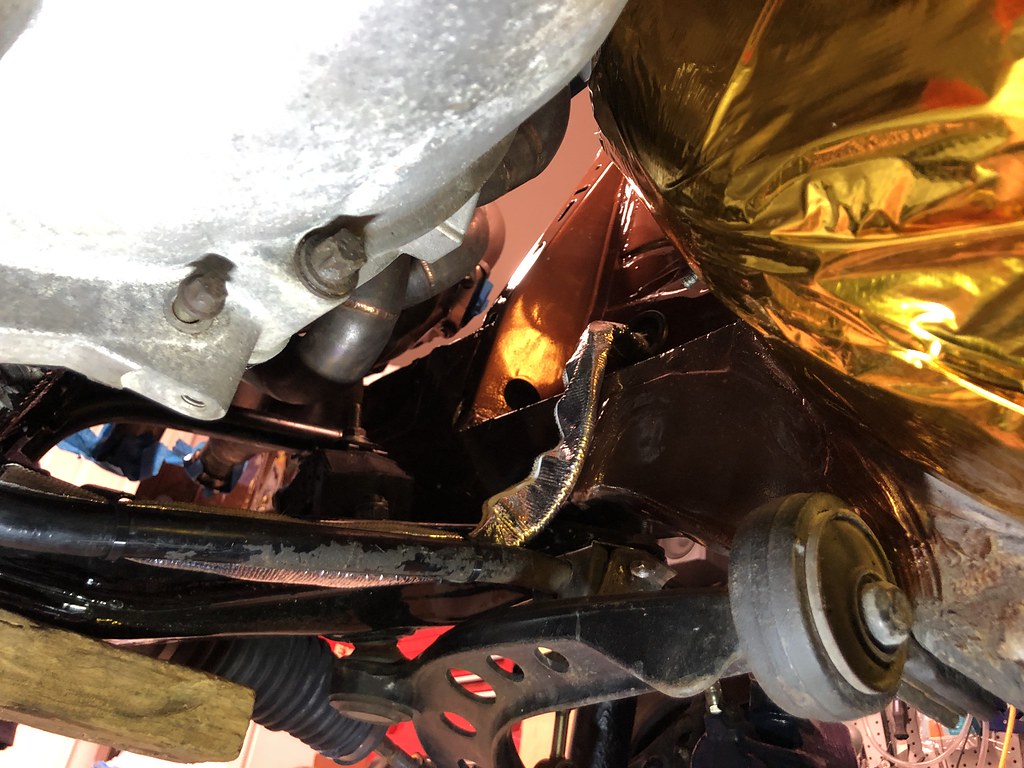
I have the front end apart now. Replaced the DEI Reflect-A-Cool on the firewall with the fancier DEI Reflect-A-Gold purely as an aesthetic measure.
Replaced the heater core grommet and front brake grommets with new OEM while I was in there.
Mounted the clutch master and pedalbox. Waiting for the seal behind the brake booster to come in the mail.
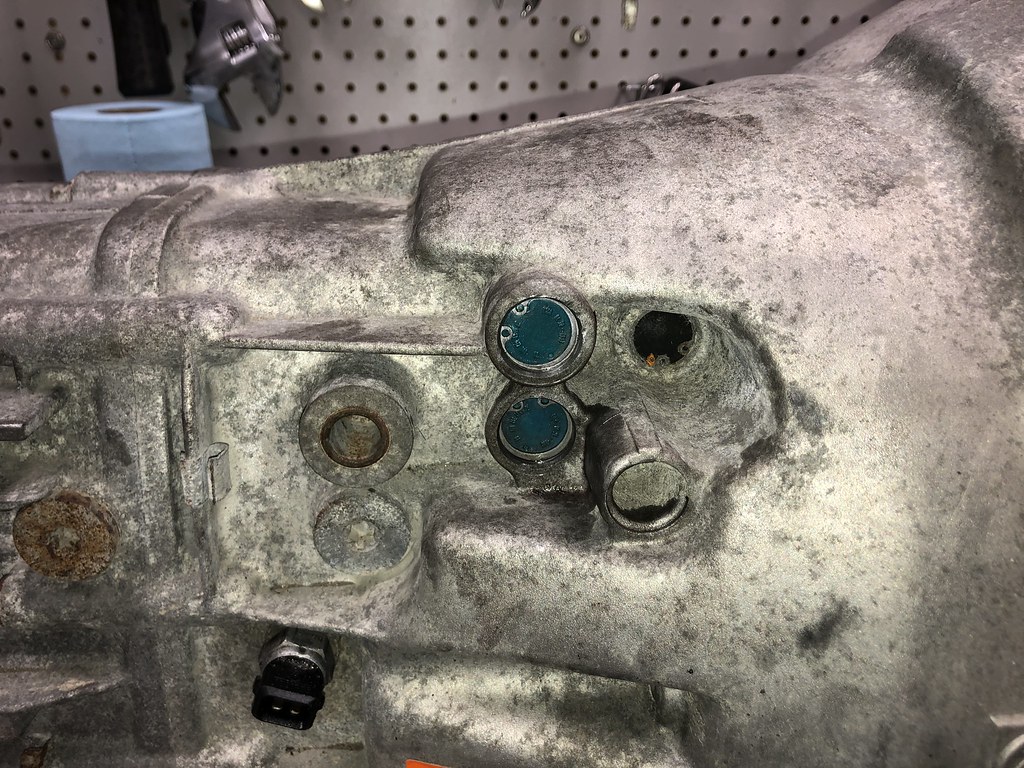
Changed the detents, input/output shaft seals, and pivot pin on the ZF320 transmission. Waiting for the shift shaft seal to come in the mail.
Changed the 2.79 LSD differential carrier (side) o-rings and output shaft seals. Getting deja-vu as I already did this job on my 3.73 LSD!
Have to order a new differential bushing. Thought I had one on hand but it turns out it was the Corteco bushing (defect, outer diameter too large) from Post 120 (Page 8) of this thread.
Took the Getrag 260 box off the engine, took a look at the shiny new SPEC Stage 3+ Street/Track Clutch Kit and realized I need to order some new pressure plate bolts.


 Last edited by Panici; 02-19-2022, 05:57 AM.
Leave a comment:
-
I usually hate brown but that is a HOT colour. Man I'm so glad you fixed it and didn't just re-shell.Leave a comment:
-
Saw you post this somewhere on facebook and meant to comment. I like the idea of painting some additional stuff in/around the engine bay body colour.
Really interested to see it all come together like that. Paint work looks spectacular.Leave a comment:
-
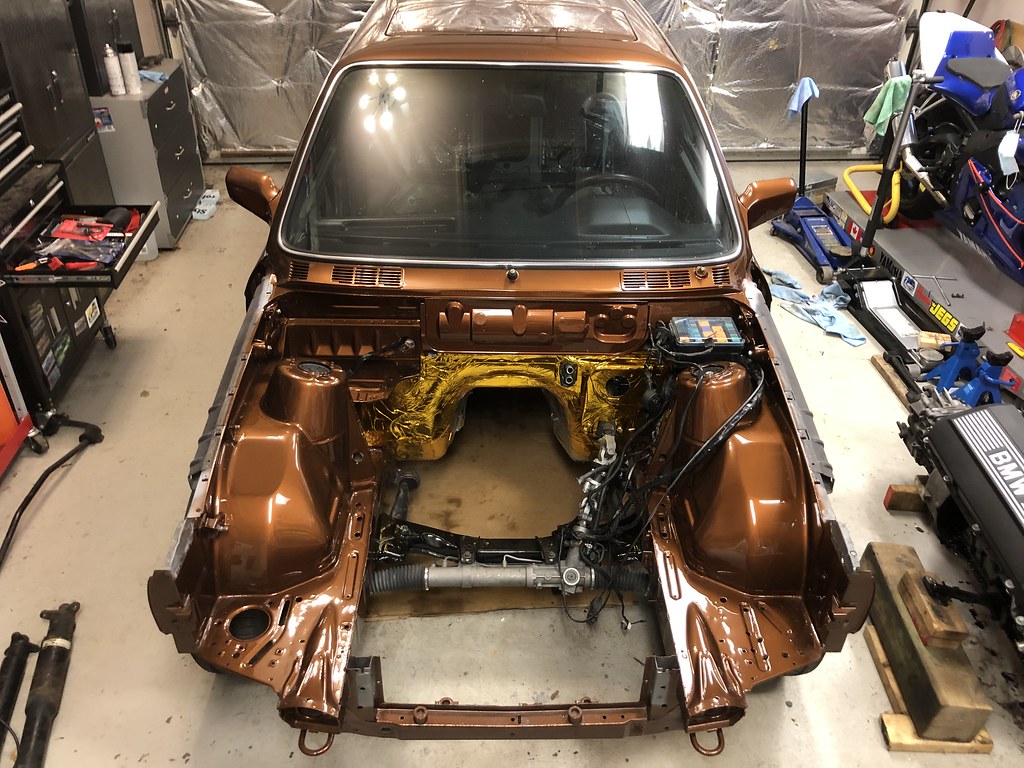
The E30 Is Home!
Brought the car back from the bodyshop today. Managed to give it a good wash (with new mitts) before the rain started.
Took some pictures of the new colour and some of the details.
Note that this is how the paint looks with Overcast lighting.
The gold/bronze doesn't really pop until it's hit with direct light (sunlight or artificial). Really makes the colour dynamic!
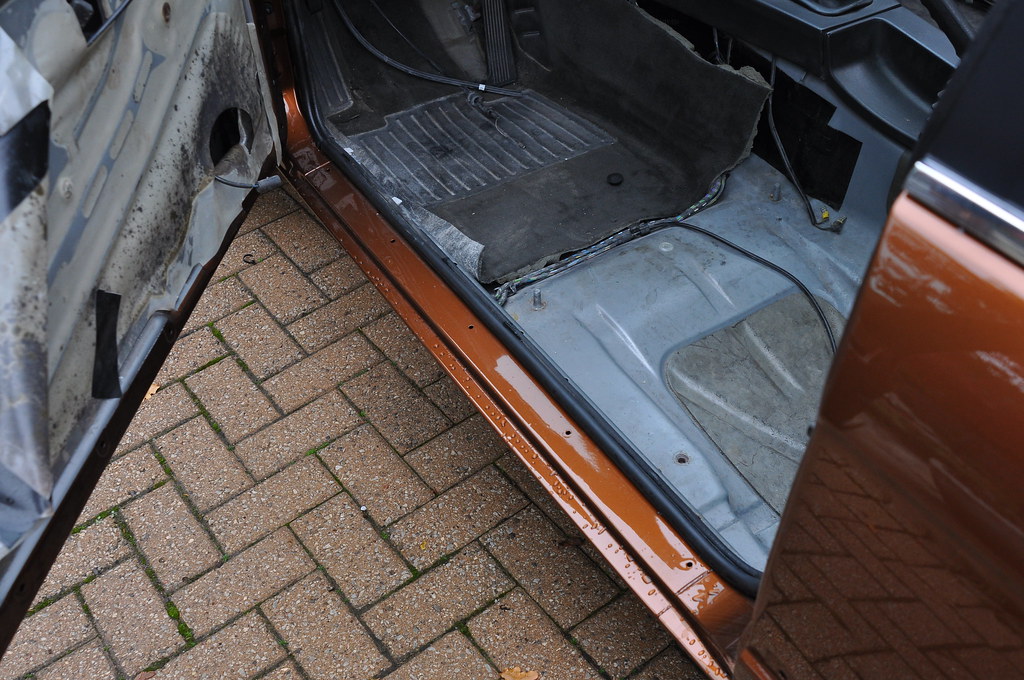
You can also see some of the finer details of the paintjob:- Colourmatched bumper trim, cowl vents, brake booster, blower motor cover, and Kamei rear valance.
- Colourmatched & smoothed rocker panels and rear sheetmetal under the diving board bumper.
- Careful attention in the engine bay, including all seam sealer redone by hand.
- Quarter hood w/ shaved badge.
Full credit and massive thanks to Rob & Domenic at Delta Park Auto. I couldn't have picked a better shop to get the car back in shape.
These guys are passionate about what they do, and have that same attention to detail that I have always used when restoring my E30.
They fixed so many little imperfections I've been looking at for the past 7 years, and even a few I didn't know about like the license plate light area.
The rear quarter was expertly repaired, you would never know it was hit looking at the outside.
The bodywork was done in metal as much as possible, with very minimal body filler usage. The whole car is laser straight.
For longevity they sprayed on three heavy coats of clear, which will be cut & buffed in the springtime when the drivetrain is reinstalled.


 Last edited by Panici; 11-09-2021, 02:26 PM.
Leave a comment:


Leave a comment: