-
Finally getting around to posting last weekend's festivities:
To start, I wanted to get the windshield wiper linkage and motor back into the car before I finished polishing everything up since I was sure I'd end up scratching something along the way. Getting it out was not easy, I removed it a few months ago prior to the repaint and have waited until now to write it up just to keep everything in the same place.
I didn't find great writeups on how to remove the linkage other than people saying it can't be done without either removing the IHKS (not gonna be doing that again) or bending the windshield cowl slightly (also not gonna be doing that).
To start, remove the windshield wipers and unscrew the 22mm nuts that bolt the wiper linkage to the cowl. Inside the cowl, there is also a 10mm bolt just under the wiper motor that bolts the lower part of the linkage to the firewall.
Then, remove the top blower motor cover, blower motor, and top IHKS cover:

It's in there super tight, and even after removing the blower motor and top cover of the IHKS it won't fit out of the access panel in the firewall. With the bolts for the linkage completely loose and the linkage/motor just "floating" in there, it gets hung up on the top of the IHKS:

I torqued and twisted for over an hour and almost gave up, then just decided to separate the windshield wiper motor from the linkage while still inside the cowl. This did the trick, you have just enough room to slide the motor out once detached, and with the motor off of the linkage you have a little more wiggle room to slide it out without too much issue.
In order to get the motor separated from the linkage, there is 1 10mm nut connecting the motor drive gear to the linkage crank, as well as 3 10mm bolts that attach the motor to the linkage bracket. I took pictures of this after I got everything removed, with everything still in the cowl you can't really see the bolts or nut since they're underneath. You have to go by feel. You do have pretty good access to them though and they weren't that hard to get to.
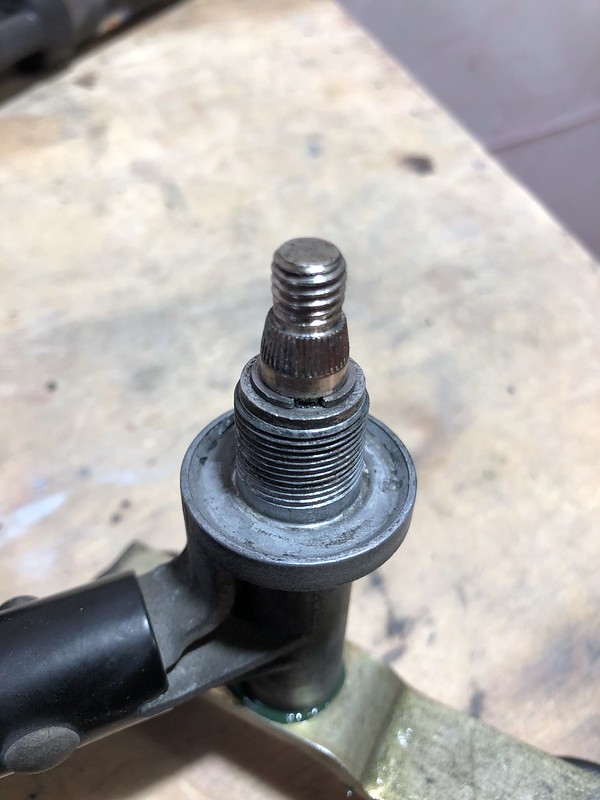
Before you loosen anything, the Bentley recommends marking the position of the motor linkage crank arm in relation to the bracket so that you can attach it at the same angle upon reinstall. Here is the motor linkage nut:

Once the nut is off, the linkage crank is press fit onto the drive gear and you'll have to use a screwdriver to pry it off:


Then, you can remove the 3 10mm bolts holding the motor to the bracket.
Then, I separated the 2 halves of the linkage to clean them up and regrease them. To do this, there is a c-clip, a washer, and a small rubber O-ring (in that order) on each side. Be careful not to lose the O-ring:
Remove the c-clip:

Then the washer:

Then the O-ring:

There's also a small metal ring that fits over the threaded portion, this fits into the rubber gaskets on the windshield cowl to help it seal out moisture:

All apart:

All the parts sat in a box until this weekend. I wanted to replace all the rubber components as they were worn, and also wanted to regrease the linkage and inside of the motor itself. I also cleaned and regreased the antenna motor since that was out too:

Inside of the motor, a little dirty but not too bad:

And inside the antenna, pretty clean:

I used some plastic-safe silicone grease similar to what I did with the window motors in an earlier post. I will also be cleaning and regreasing the antenna staff as well, will post that up. For more info on this and for why it's important preventative maintenance to keep the antenna motor from wearing out, check out MercedesSource on YouTube or MercedesSource.com, the Hirschman antennas in our cars are essentially the same as those in the same era Benz's. He's got some other really helpful videos that can be applied to BMW's as well.
Next I went about replacing all the worn out rubber components:

To separate the linkage pivot points, there is simply a ball and socket joint that you have to pop off with a screwdriver:


Old vs new:

There are 3 total of these gaskets. I cleaned and regreased the ball joints before putting it all back together.
I also replaced this rubber dampener at the bottom of the bracket, this is where that other 10mm mounting screw I mentioned above attaches the linkage to the firewall:


Then I regreased the linkage pivot points and got everything put back together:


New gaskets for the cowl:

Side the linkage back in and get the wiper bolts and 10mm lower bolt snugged up. Then slide the motor in and get the 3 10mm bolts that attach it to the linkage snugged. Don't forget to put the cover back on the motor first before sliding it into place as the cover wont fit once the motor is installed. You'll be screwing the motor back in blind twice, ask me how I know :
:


Then, get the motor linkage crank lined up with your mark and press it onto the motor gear. Snug down the last 10mm nut.
New plastic covers, and we're done:

This all took about an hour or two. I then got the doors and strikers reinstalled. Then I cleaned and regreased the door latches and trunk latch:

I might have forgotten to mention it, but remounted the trunk and the new MTech trunk springs. They were VERY hard to install, really busted my knuckles trying to get those suckers in.
Next, I installed some new vent window gaskets, trunk seal, as well as OEM door seals, they ain't cheap:

Fresh:


Both of the vent window gaskets were actually tough to get it, they both seemed like they were about 1-2cm too long at first:


The last things I had left to paint were the side mirror covers, knocked that out:


Then got some plastic trim pieces freshened up:


Last, I got to work color sanding down the rest of the car. I decided it best to do all the sanding first, then all the cutting/buffing. I got the driver door, both rear quarter panels, and the rear trunk panel all down to 3000 grit:
Starting out with 1500 grit on the top:

Then 3000:


The paint looked good prior to sanding, but what a difference between the unsanded trunk and sanded quarter/rear panels:

And that's where I finished the weekend, not bad! Should have the rest of the car color sanded and maybe even cut/buffed this weekend, then I need to get to work on the MTech kitLast edited by Albie325; 11-05-2020, 07:27 PM.Leave a comment:
-
There is, I did my best to mitigate this (all edges were taped, all cracks filled with gap filler, the entire garage is covered and taped in thick plastic sheeting, etc). There's only so much I could control with my setup and I did the best I could. There's definitely some dust in the clear but most, if not all, has been coming out with wet sanding/buffing. I never planned for the paint job to be concourse quality as I don't want to be afraid to drive the car and have never painted before, but I've been pleasantly surprised with just how well things have come out. Definitely some learning (read: mistakes) along the way, but all things considered things are looking good!Originally posted by LateFan
I'm sure you could, although I'm note sure you're in the mood to de-trim the whole car again. I'd love to see an engine swap on your car, I'd at least wait to address the paint until after an engine swap as I'm sure there will be some dings/scratches along the way.Originally posted by Melon
Leave a comment:
-
-
OK, I see, the filters on the exhaust is what had me confused. But yeah, you don't want red paint all over the man's slab! So it's slightly negative pressure in there - is there any danger of sucking dust in through cracks in the building. Some nice sawdust in that new paint, ugh!Leave a comment:
-
There's always time for a cut and buff brother! Makes a world of differenceOriginally posted by Melon
Well when you put it that way it sounds awful so... neither. I'll call it "venting"Originally posted by LateFan
In all seriousness, as rzerob said they're both exhaust vans blowing out. I know a proper booth should have an intake and exhaust fan for proper flow. but because the garage is only a single car bay I felt like an intake fan was too close to the items I was painting and I didn't want to risk messing up the fan pattern or blowing any debris directly into the fresh paint. I put the filters there more to catch any overspray and prevent getting red paint all over the exterior of the garage, which I rent and would have to fix if I screwed it up.
Have knocked out a few tedious but yawn worthy items since my return from CT but nothing worthy enough for a post. That should hopefully change this weekend!
Leave a comment:
-
Great work as always, Albie.
Question -
Are you sucking in or blowing out through these paint booth fans? You put filters on them, so I assume they're sucking clean air in.
Then where is your exhaust?
Leave a comment:
-
All the locks in the car were the original locks, so they already matched the ignition and glove box. When rebuilding the locks, you're essentially using the numbered tumblers from the new kit and matching them in order to the old tumblers already in the car, so they should still match the ignition and glove box since the numbers/order will be identical to what they already were. You're not rebuilding the locks based on the old key, you're rebuilding the locks based on the old locks. When people run into trouble with rebuilt locks not working, it's usually because they are still using the old worn out key with newly minted locks. Since the new locks are not worn, the old key may not fully engage the tumblers enough to allow the lock to turn at which point you'd need a newly cut key. If your car is original and the locks/ignition are the ones from the factory, getting a VIN cut key is the way to go. Your issue is if the ignition isn't original to the car and therefore won't match your VIN, it may be hard to make a new key based on the old, worn out one.Originally posted by Paynemw
It isn't necessary to replace all the locks to make them match, most people end up having an issue with just one lock (usually the driver door) and replace that one alone but since I already had all of them out of the car I just did them all. I don't think I've ever locked the glove box so that lock should have been pretty much brand new anyway. The old trunk and door cylinders worked fine, but since I got new keys I wanted new locks to match. As for the ignition, I don't think it's as easily rebuildable as the doors and the last I read, I don't think you can order a new one keyed from the factory using your VIN anymore. The newly cut keys turned the ignition over without any trouble so I just left it alone.Last edited by Albie325; 10-12-2020, 08:20 AM.Leave a comment:
-
Leave a comment:
-
Glad you enjoy it, hope you find it helpful. Good luck with the build!Originally posted by OBD2
Thanks brother!Originally posted by Tzantushka
With a 15% CCA discount the keys were:Originally posted by Vincenze
Lighted Master: $124.41 ($143 list)
Spare: $60.61 ($70 list)
For the keys, I needed to present my driver's license and title of the car. For the new VIN sticker I had to present a picture of the old one on the car and fill out a form explaining why I needed a new one. I don't think you'll have to do that for just a new key though.Leave a comment:
-


Leave a comment: