
the other thing is with a say 1.74mm gasket the pistons need to sit above deck by 0.74mm to have a 1.00mm squish. it doesnt look the pistons are set up that way probably because the gasket overhang prevents that, which another bonus of a MLS. the CR will go up but its often said the CR increase is offset by the superior mixture motion so knock resistance is actually better.
-
89 E30 325is Lachs Silber - currently M20B31, M20B33 in the works, stroked to the hilt...
new build thread http://www.r3vlimited.com/board/showthread.php?t=317505

-
For some reason I want to see your last sentence written as a haiku.
CR will go up
offset by mixture motion
knock resistance highComment
-
not visit Metric
weather bad squid is busy
go later in year
There was a period of time when Bimmerforums' off-topic was doing it. The good old days, when we were all a lot younger and dumber.
Also, it looks like I am NOT going out to MM next week. Sssquid is pretty busy, flight options with my miles are not optimal and it'll probably be 2x the driving time versus later in the year. So instead I sent MM an email with a list of specific questions from topics in this thread, and I'll plan to hit up KC a bit later in the year to visit Sssquid and MM. They could hold off on assembling my engine until I am ready to get out there, but neither they nor I want that since it's a pain in their ass and I want the car running again.Last edited by bmwman91; 01-24-2020, 09:12 AM.Comment
-
Quick update...
MM is going to have my engine all finished up by the end of the week. It turned out that my pistons and rods were totally fine, and while they are not the most-current design that MM uses, they are actually a newer design that they had just started using at the time. They had assumed that I was using some older stuff than I was, so they cleaned all of it up and installed new rings of the design that they currently use. The pistons and rods are not quite as light as the current stuff, but they are close enough to not be worth replacing and the crown profile / valve reliefs are current.
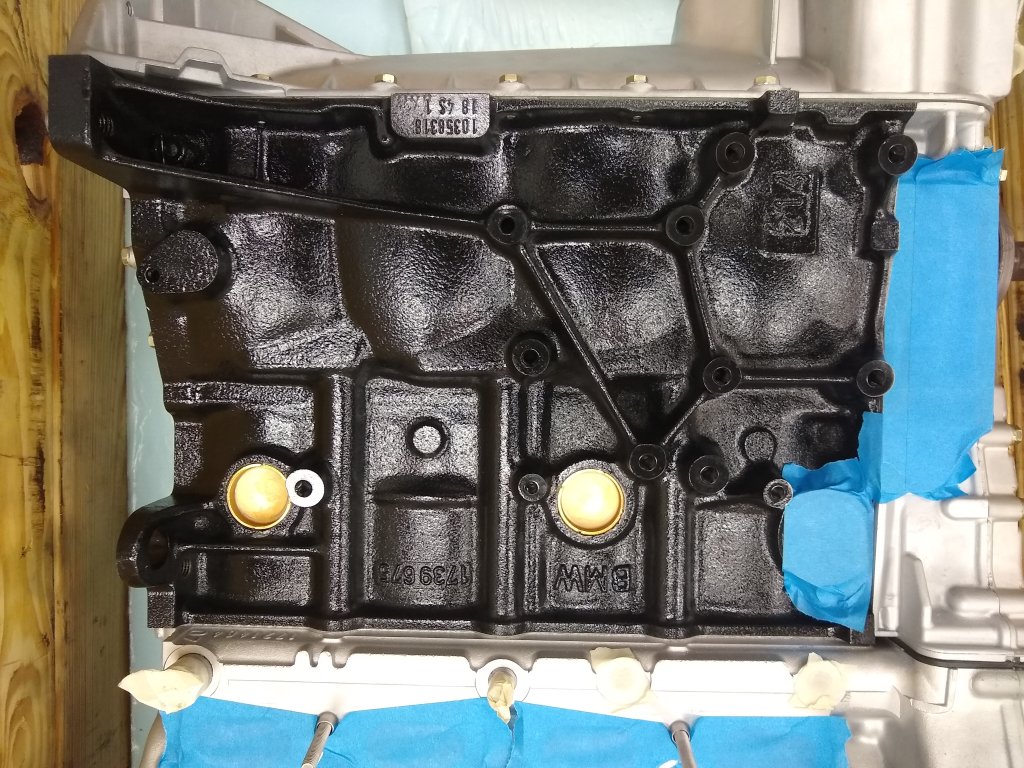
My previous block was not reused. I had run it pretty hard and it was out of round by around 0.001", although the failing HG may not have helped and the break in oil I had used initially could have caused excessive wear. Re-honing would have led to me either needing new custom pistons for the slightly larger bore, or burning more oil if the pistons were reused. So MM machined up a spare block for me to hit the desired clearances (0.0029 - 0.0032 all around), and add all the stuff my previous one had (windage tray, oiling mods, etc), plus changing over to use ARP head bolts with a larger shank and finer thread pitch. They have found that they get the most consistent bolt torque with these, versus the stock & Victor Reinz ones that were used on the previous engine (unknown if blown HG was related).
The head was fully pressure tested. There was no bubbling at all that could be found anywhere, which is a relief. Valve seats got replaced and have a new multi-angle grind that MM had come up with since the first engine was made. They believe that it increases flow slightly, so we'll see I guess. It needed a few thousands shaved off to get the deck perfectly flat. The inter-cylinder sections, particularly between #2 & #3, had a little galling from the shredded metal gasket, which has been surfaced out. Everything else looked good inside, with no damage to journals or lifters. Although the oil definitely had some coolant in it, I caught it well before anything resembling a milkshake formed.
With any luck, I will have this thing back in a couple of weeks and be on the road again. I need to finish refreshing my spare wire harness (trim ignition leads for COP + crimp on new SPT terminals, integrate WBO2 controller into harness, integrate MAF into harness) and reinstall all of my data logging goodies into the ECU (a fair bit of soldering), order EGT probes and decide whether or not I actually want to use the RHD engineering flywheel. The lightweight flywheel in there now (11lb M20 FW) idles fine, but taking another 4lbs off is tempting. For now I may just get it all back together and swap flywheels in the future after all the tuning is done.Comment
-
Sounds like MM got this done relatively quickly. Looking forward to seeing some reinstallation photos and hearing your impressions of the newly built motor.Comment
-
sounds like a bit of common sense prevailed with the rod and pistons as money is better spent elsewhere IMO. how come it needed new seats vs just a new VJ? 0.0029 to .0032 seems like a decent amount for a 4032 slug?
https://metricmechanic.com/wp-conten...ance-Chart.pdf89 E30 325is Lachs Silber - currently M20B31, M20B33 in the works, stroked to the hilt...
new build thread http://www.r3vlimited.com/board/showthread.php?t=317505
Comment
-
That document is fairly old, and a lot of the parts and techniques they use have changed since then (such as no longer honing with 400 grit in most cases). The 0.0032 - 0.0029 values were verbal over the phone, so either they go a little looser these days or Jim misspoke. The PDF you linked has the Rally M42 listed as 2.0L, which indicates that it is probably based on obsolete bottom end assemblies and techniques that they have moved on from. Back in 2012 when they built the first one for me, the 2.1L Rally engine was listed as having a 0.003" nominal clearance IIRC, and it was noted that it was about 0.001" more than the Sport engine since they had cranked up the compression ratio on the Rally engine at that time. The Rally M42 bottom end parts started evolving pretty rapidly back around that time, and I guess I ordered things up late enough that I got in on much more updated parts than they had been using for their first Rally M42 design for Sam (FebiGuibo, RIP). Anyway, Jim had mentioned that they need to update some documentation, which is tough when they are always at 100% just building their product.
The existing valve seats were OK, but MM has come up with some new shape that they claim a 2% increased flow with. It was more of a "hey we also did that for you" thing.
As far as I can tell, they want to see this engine again about as much as I want to have to ship it to them again, and they have been going through to make it 99% match what they would ship today if I had placed a new order.Comment
-
Yup, it has been fast. When I shipped it out there in November, they had 17 engines already queued. We lost a month or more to the holidays (they close some of that time, Wiseco and other suppliers close other times, etc) and they needed to clear part of the backlog while we planned everything out. I believe that they fully disassembled my engine around a month ago while they worked on other builds and got stuff ordered. Once my engine was on deck for inspection, machining and building, it was all hands on deck. They prefer to go 100% on a single engine at a time to keep up momentum and focus I guess.Comment
-
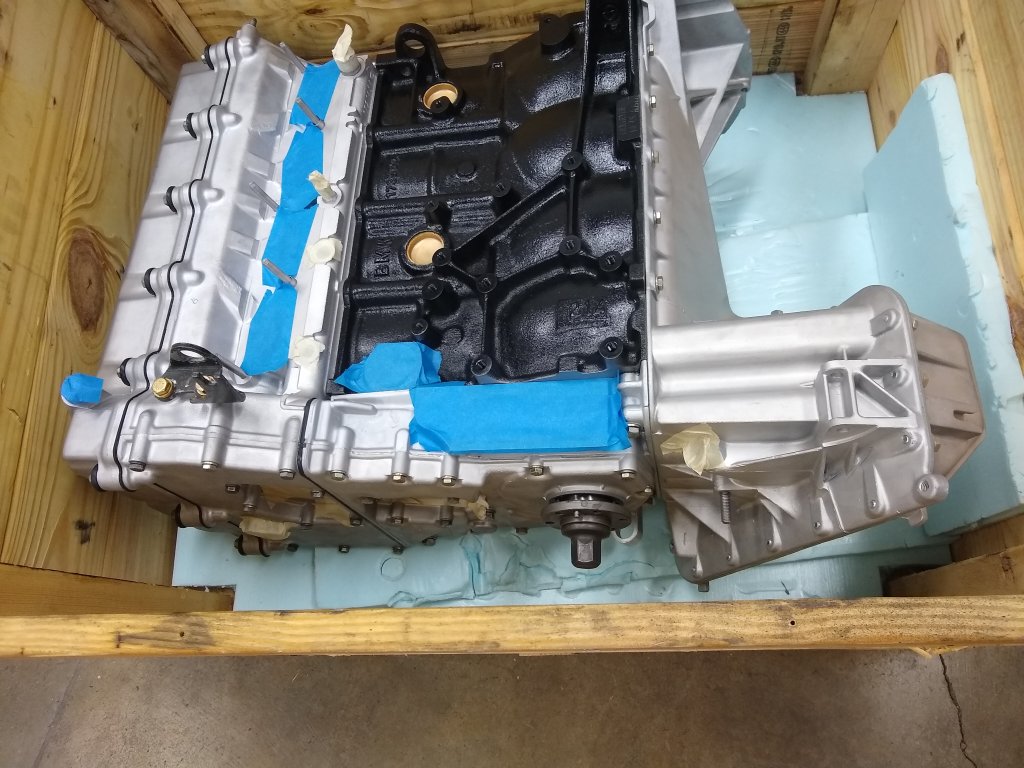
OK, holy shit, months have passed. I JUST picked up the engine from the freight depot today (had the forklift operator dump the crate straight into the hatch of a 2004 Golf TDI lol). MM had finished the thing a couple of months ago and got side-tracked or was waiting for me to call or ???. I was waiting for them to call, so it turned into everyone getting busy and forgetting about it, then a global pandemic hit and yeah. Anyway, here we are. The eagle has landed.
I have parts on order from like 8 different places to complete the reassembly and install. New hoses, radiator, mounts, PCV/vacuum lines, smaller rubber odds and ends that wore out, ignition coils, ground straps, various chassis electrical and a host of other stuff I am already forgetting lol. Basically, an additional half of what I paid for the engine in parts. Since I am in there, I want to refresh as much as I can while it is easy to do. The entire suspension and drivetrain got overhauled 3-4 years ago, so I gotta keep the engine and related stuff in similar condition.
Also, I ordered the RHD 7.4lb flywheel and a new M20 clutch kit. Other M42'ers with this setup don't report any issues other than tranny rattle, which I already had. Another 3.5lbs off of it (had an 11lb M20 flywheel before, versus 7.5 from RHD), almost all from the outer diameter of the flywheel, is going to make this even more fun.
Nice and clean. I removed the packing and gave everything a good looking over on all sides. From the outside everything looks to be in order.

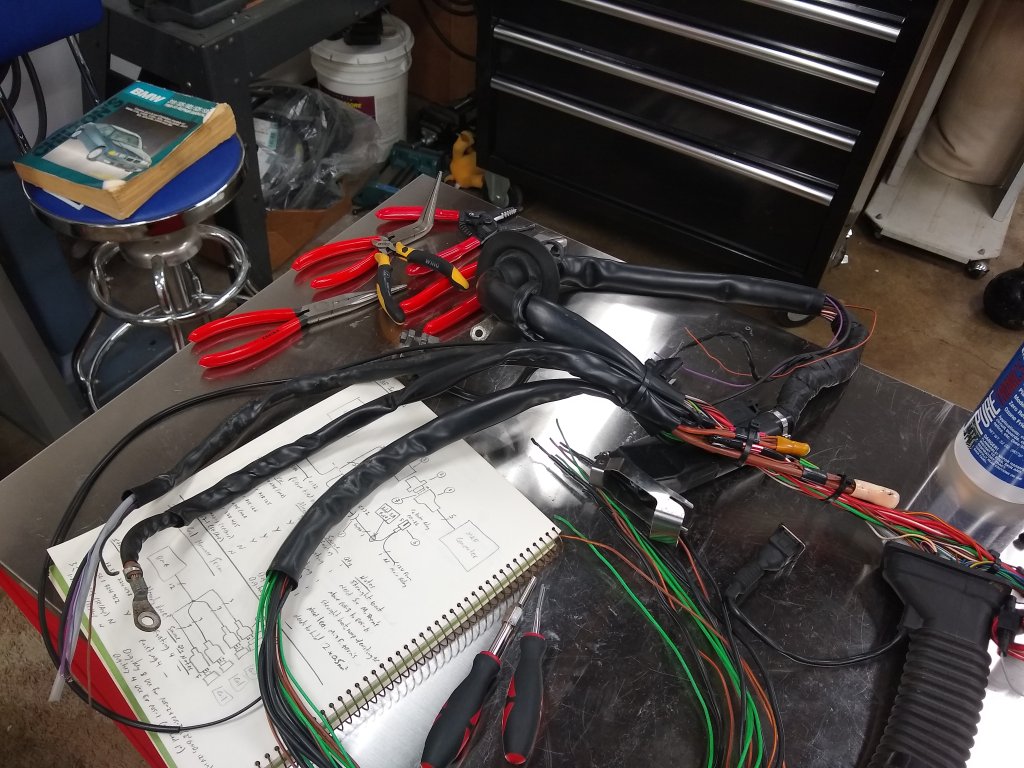
The other major project is the engine wire harness. The original one in the car was a little hacked-up from past projects when I was less meticulous and a lot younger. It worked fine, but I was always bothered by the splices and crap that I had added. Over the last few years, I amassed a collection of 3 extra full harnesses, which I had planned to use to build an improved OEM-quality one for aftermarket engine management integration. I will probably stick with the Motronic since everything runs great with it, but this is my chance to sort out all the "additions" I have made. The new one I am making will fully integrate my Spartan SLC2 wide band O2 sensor control, MAF conversion and have properly trimmed coil wires for the COP kit (at the time, I reused the old connector terminals that I had pried off of the wires, which I am amazed survived this long, and I had wrapped the wires in electrical tape which is awful). I have found all of the correct TE/Amp terminals for the 2.5mm round and JPT/SPT connector housings used in these cars, so I can get those on Digikey for half of what the "BMW" equivalents sell for. Anyway, the harness is a work in progress and I won't finish all of it until the engine is back in the car so that I can get the lengths for the ignition coil leads set properly before crimping new terminals on.
As anyone who has dealt with these harnesses knows, the old TESA tape adhesive has turned to terrible goo. The only reliable thing I have found to get it off is 99% isopropyl alcohol. After removing the outer wrapping in the big middle section, I had work to do to get it de-goopified.
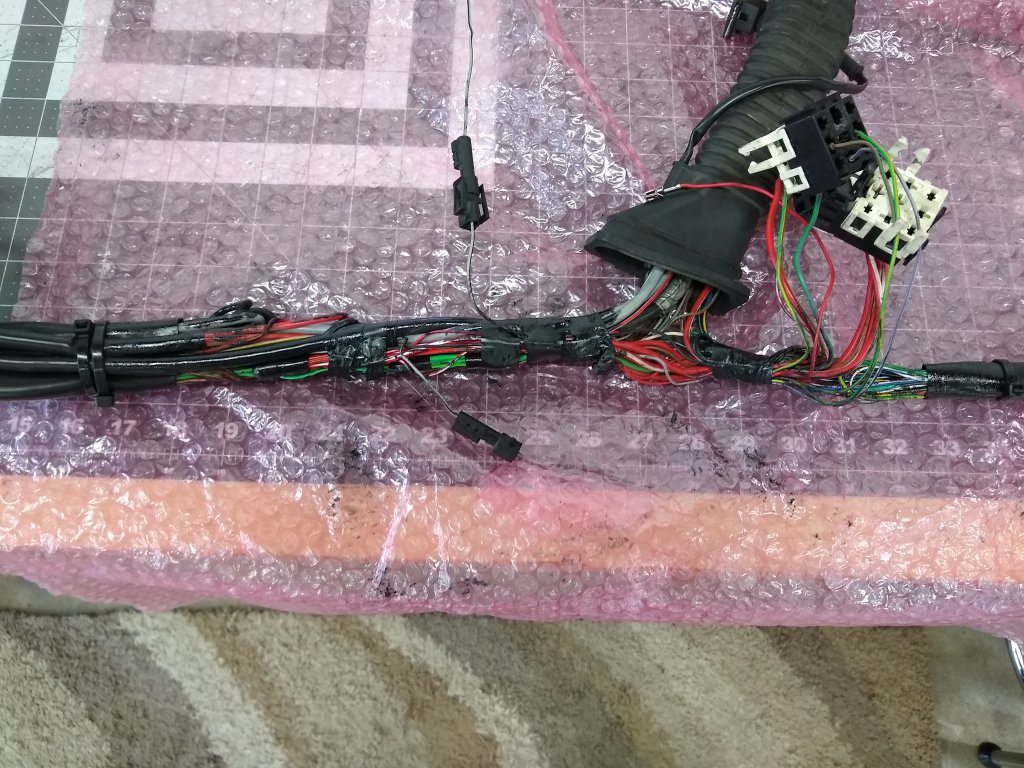
Hours later, with it free of goop, I spent a few more hours reorganizing the wire routing. Many of the wires running to the relay sockets were looped chaotically through the middle section, which works fine, but I hate seeing wires being put into tension like that. So I de-pinned the sockets one wire at a time and re-ran them so that there were no overlapping lengths except where necessary. This actually reduced the overall diameter of the cable bundle noticeably. However, I still need to do the same thing with C101 and the diagnostic connector since a number of those wires are haphazardly routed through the rest of the bundles. I want to get them separated so that all of their wires are essentially their own separate sub-bundles within the whole thing. While I do not anticipate needing to do maintenance on this thing again, I like having the wiring neat and tidy for the future if I go with different engine management.
All zip ties will be removed prior to final taping. They are just there to keep things manageable at the end of the day. Things will be re-wrapped with TESA 51036 tape, which is basically their latest and greatest harness tape.
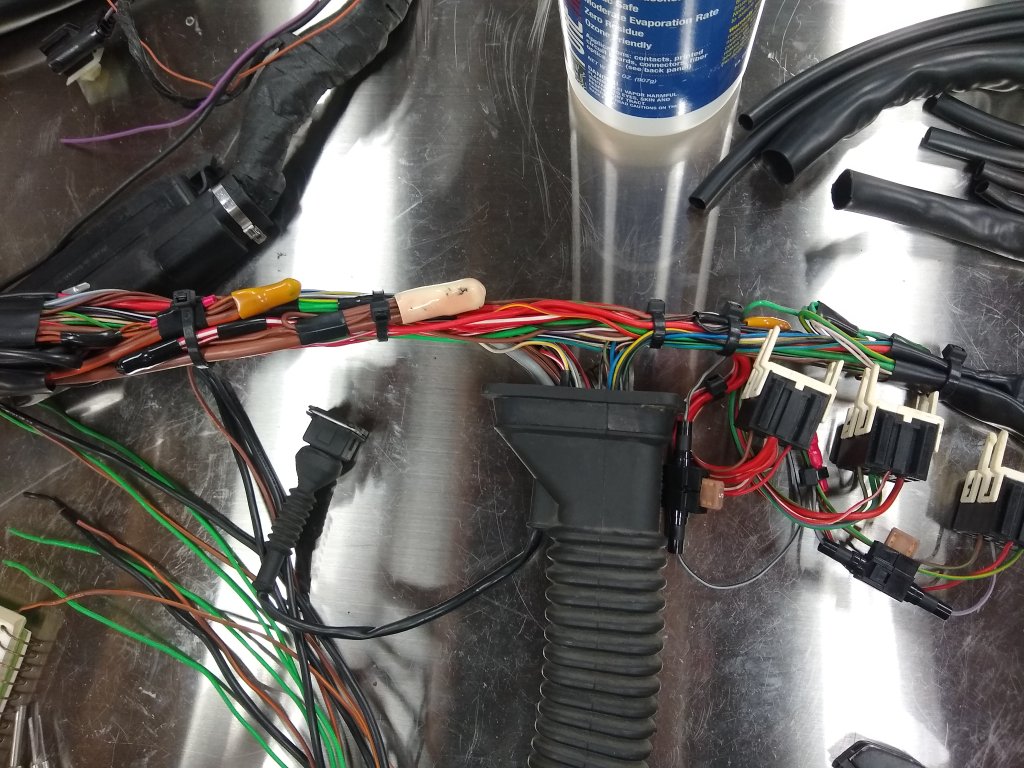
The 3 relay sockets and re-organized wires. I added two 5A inline fuse holders for the MAF converter and the wide-band O2 controller. The fuel injection system basically has no fuses on it except for the 50A inline fuse back by the battery, so if any of these non-OEM items take a shit I don't need them frying any other wiring. I still feel a little dirty using a butt splice anywhere in this thing, but I have the proper crimp tools and they are perfectly acceptable when used properly (or at least I have to tell myself that to quell the OCD).
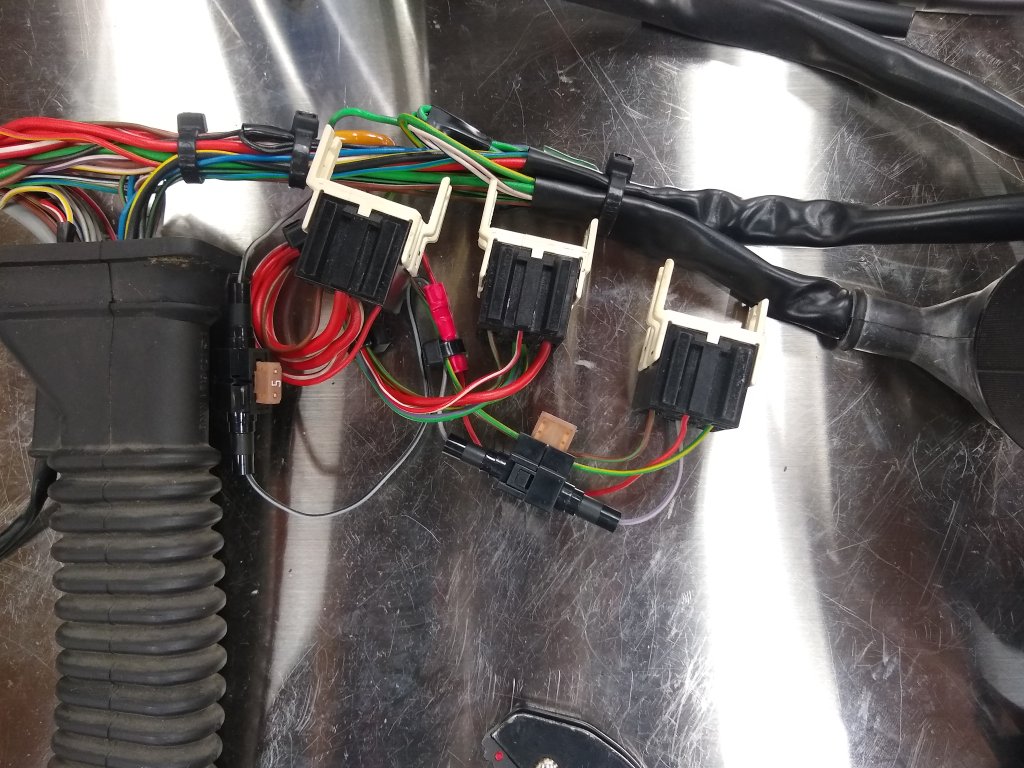
Another BIG change in layout is the right-most part that sits on the firewall. The original setup had one big sheathed bundle from the ECU come in, and then a second big bundle come back out for the ignition coils + O2 sensor + ECU ground. One of the hassles with the COP ignition coils is that the original wires are long enough, but the shared sheath had to be cut to allow them to actually reach well. Since I have all those spare harnesses, I harvested sheaths (and connectors, boots and wires) to make all of these things exit separately. Everything is going to work out a lot more cleanly now since all of these things can route to where I need them without tugging on one another.
Also as part of the wide band O2 system, I routed the extra full-scale output up near the ECU connector, plus its diagnostic LED output. I yanked an ignition line from a spare harness (because it is shielded) for the full-scale analog signal and will terminate its shield the same way and in the same place as all of the rest of the shielded lines in the ECU connector. That is the one other place where a butt splice had to be added lol...the existing shield wire for the cam+crank cables. It was either that or run it to the main ground point and use a ring terminal on a separate wire, but a central goal is to not have that nonsense. The only ring terminal involved here is for the WBO2 sensor heater which will ground at the hood retaining bracket, at the recommendation of the controller manufacturer.

For the MAF converter, I previously had a separate wire running from the sensor to the 12V coil input to the O2 sensor relay. That was fine, but I have now completely integrated that into the stock harness. The stock AFM has an unused wire at pin 3 for the LLCO signal, which is not used on cars with cats / O2 sensors. Some of you know about C132, the single pin connector up on the firewall that people see and think was unplugged by mistake. After connecting it they find that the car runs like shit. Anyway, since pin 3 of the AFM connector has a wire which runs all the way up to the main loom already, I just removed C132 and ran it to the 12V line of the O2 relay coil as before, and moved that wire from position 3 to position 6 in the stock AFM connector just in case I ever have to plug the AFM back in for SMOG testing. No more extra wire in the engine bay! I also removed that wire from the ECU connector and ripped that half of it out of the main harness entirely.
What I really need to do is document these changes properly so I don't forget and get confused in the future lol. I have a giant SVG file I made last year with a full-color diagram of the entire system and every splice, connection, etc. It involved referencing the official diagrams plus a spare harness that I completely disassembled and inspected (fun fact, the official diagrams contain a couple of mistakes!). Time to roll in these changes.
Phew, that is a lot of typing. With the COVID situation I have been able to devote the right amount of time (or way too much) to this...can you tell?!Last edited by bmwman91; 04-13-2020, 10:30 PM.Comment
-
Comment
-
Very nice! Glad to see you getting back to it.Comment
-
Ha, yeah just an expression. The crate had maybe 2" of clearance between the headliner and lower lip of the hatch. We slid it off the forks and it did plop maybe 6" as it slid off of them. MM packed it well and it was ratchet-strapped to the crate, and it landed on the flimsy VW interior which absorbed it lol. The blown shocks in the car also helped.Comment
-
Comment


Comment