
Haha that is certainly one way to do it! 😆
On my car I hijacked the ebrake switch, so I just have to pull it up one click and launch control is activated. Turns off automatically with wheel speed after I drop the clutch.
I also repurposed the dash light for the ebrake, in addition to the check engine light. Have both configured in the standalone ECU to indicate knock sensing/timing pull, AFR safety, and coolant overtemp.
-
Sorry to hear about the injury Panici. Hope all goes well.
I remember the first time my friend Mitch showed me his custom launch control in his turbo'ed 318. I thought it was the coolest thing ever. Temporarily set r3vlimiter to 3,500 rpm and then type 7k in the appropriate field. As soon as he dropped the clutch I'd mash the Enter button to get us back up to 7k. So much fun.Leave a comment:
-
Thanks. Yeah this is a double-wammy, because wrenching is a big mental health thing for me.
I have parts piled up for multiple projects on various cars and can't physically do anything. 😑
Bikes are out of the question for now. (Maybe if I had cruiser-style instead of sportbikes I would have a chance?)
I have been taking it really easy to not make things worse. I was able to get credit for next year on all the preordered track events, which was lucky. New sets of tires should be fine if I store them somewhere warm and dark.
On the bright side, I can at least drive the E30 now without pain.
I did go for a nice drive on Saturday, and got a little tuning in as well.
Speaking of which ...
...
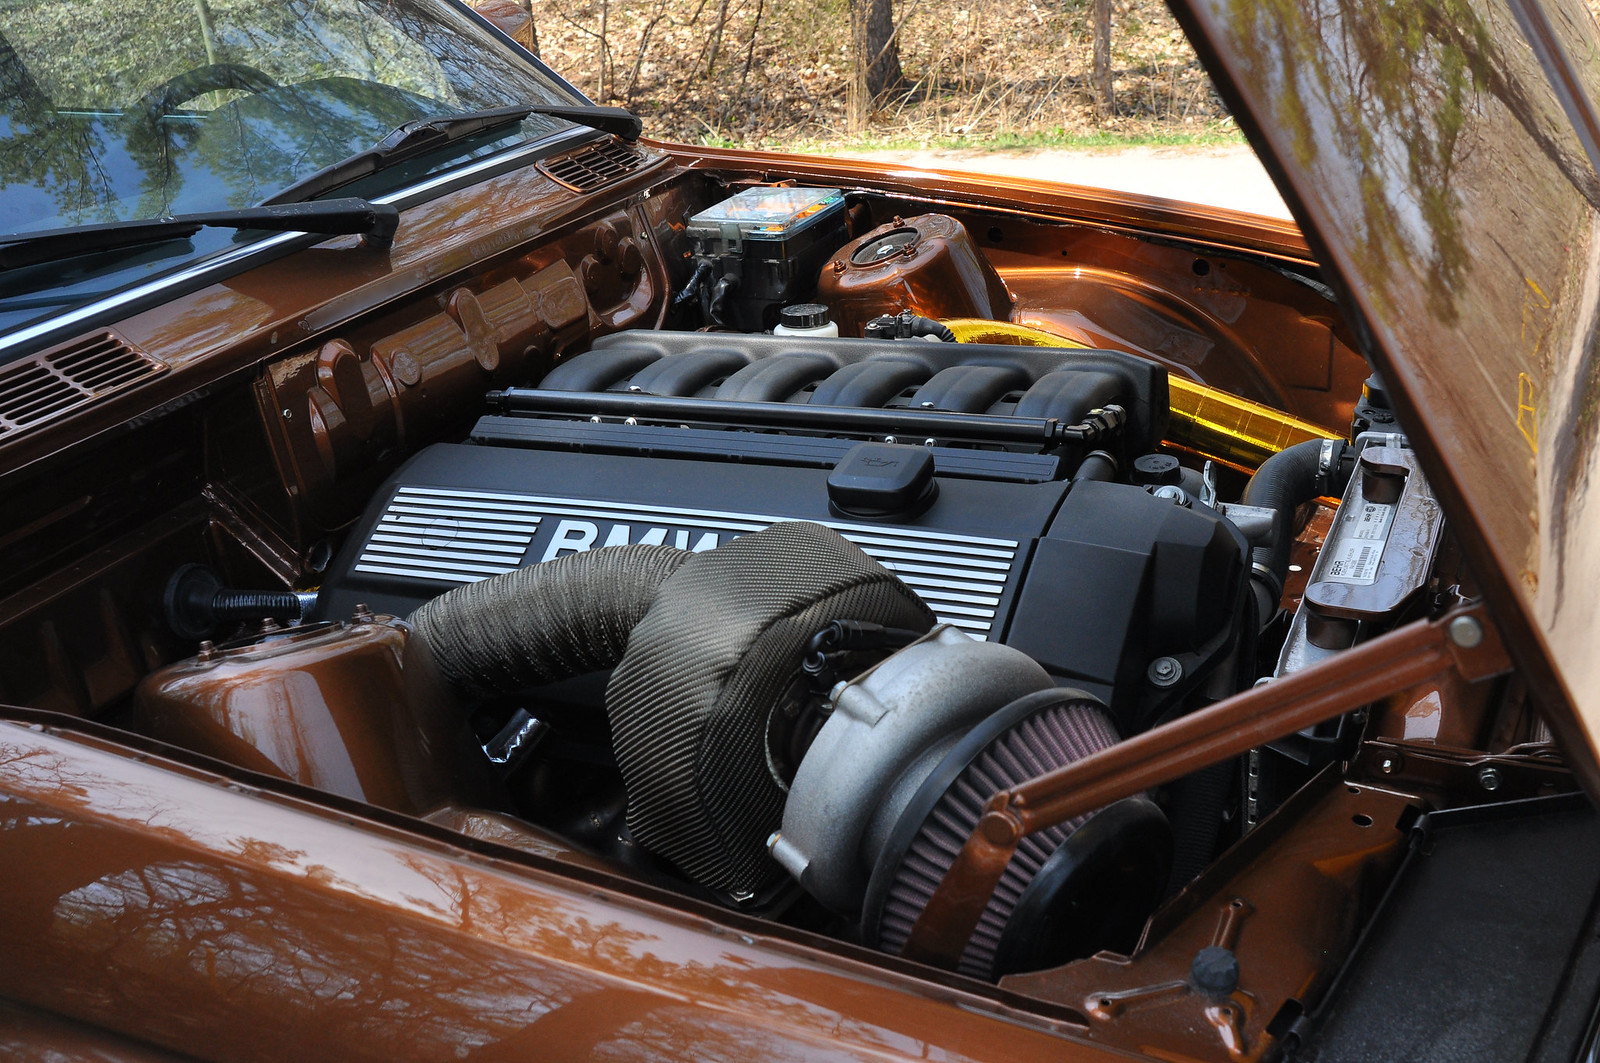
I tested the 2-Step launch control for the first time with the turbo setup.
Builds 3psi @ 3000rpm set on "Random Progressive" with -3° timing (same settings as when it was N/A). Still have the green Tial 4.35psi springs in the wastegates so I thought that was a decent result.
I didn't get to WOT as it started to pop and bang, so it may have built more boost.
I'm trying to keep this turbo alive for the long-term so need to experiment building boost with less aggressive 2-step settings.
Also, since I have my knock sensing dialed-in, I sprinkled in some timing after peak torque to try and flatten out the power delivery. Nothing crazy, think I added an additional 1.5deg at most. Will see if I can feel a difference next weekend.
I haven't been able to find many boosted M52 timing maps online, but from what I can tell I'm still quite conservative.Last edited by Panici; 06-12-2023, 09:36 AM.Leave a comment:
-
Very sorry to hear man, while that is a blow to the self-esteem, like you said, now is the time to heal and get checked out so you can do what you enjoy after you're sure you have healed.
Gotta look out for number one (your physical and mental health) first.Leave a comment:
-
Crap, that sucks, sorry to hear! I can relate to that too, pushing to hard on a project while not being in the best of shape physically in the past... I learned it makes you find a boundary of how far to push, because you can't enjoy the toys when you're compromised... take care of yourself, dude!Leave a comment:
-
I was registered to come with my turbo miata, and unfortunately had to cancel.
Really sucks as I attended last year as a spectator and was psyched to get on the big track for myself.
Without going into details; I managed to hurt myself about a month ago. I've made the injury worse since then by trying to do more then I should. On the bright side, I'm still able to do my day job, but my season of planned trackdays (both car and motorcycle) is likely done.
Seeing my doctor next week to discuss surgery (who knows how long the wait times are for that.)
Hoping I am at least able to get some wrenching done before summer's end. I have a replacement gas tank for the Miata ready to go. And my E36 needs a bunch of front end work before the winter hits. I really hate all this sitting around.
Would be nice to get back on an R6 even if it's just street riding, but I'm not holding my breath.Last edited by Panici; 05-31-2023, 10:36 AM.Leave a comment:
-
Hey dude, I saw the other day you were registered for lapping at Mosport during the Vintage Festival weekend. Are you bringing this car out for that? Come and hang out, we'll have a few BMWs in our space in the paddock area!Leave a comment:
-
My E30 was featured for "May 2023 Car of the Month" on here! 😁
Link to the thread
Here are the pictures which haven't been posted yet in here.


Last edited by Panici; 05-29-2023, 08:47 AM.
Last edited by Panici; 05-29-2023, 08:47 AM.Leave a comment:
-
When I'm ready for some extra bass, I'm going to get a set of subs from e30dreamin/john_e_a on instagram. He makes boxes which tuck in the rear quarter panels (empty spaces under the rear popout windows).
Invisible when everything is together and doesn't take any trunk space.
For now I don't even have a head unit installed in the car. Only music comes from the turbo 😅Last edited by Panici; 05-29-2023, 05:24 AM.Leave a comment:
-
Keep it and use it for a subwoofer is my advice, you don't need to be a basshead to appreciate the rounding out that a subwoofer gives your stereo. You could always trace the opening and have a piece of metal cut to fit it, then lay some interior color vinyl over that after tacking or gluing it in place.Leave a comment:
-
Thank you! This is the first car I've ever had with nice paint.
Since I'm not much of a wax-on-wax-off type guy, I figured it was a good idea to get it coated.
And the PPF will help with rock chips while I'm out driving & enjoying the car!
Speaking of which, made a little video this weekend. 😁
Car ran great except for the clutch which is still nearly ON/OFF.
When trying to drive casually it takes away from the experience, and the shock-loading has to be hard on the drivetrain.
Waiting to hear back from Northern's thread about Slave Cyl with Part No 21522282056 (24mm), which should hopefully give me a wider engagement point.
In-Car VIDEOLast edited by Panici; 12-05-2023, 06:00 AM.Leave a comment:
-
Freaking gorgeous! Stunning reflections. I still think yours is my fav brown E30 I've seen to date.
Some day when my E30 gets a paintjob PPF will happen as soon as possible/recommended afterwards. And the ceramic coating is so worth it.
I've only had one car PPF'd and coated, but the difference is night and day.Leave a comment:
-
E30 is back from PPF & Ceramic coating!
Big shoutout to Norbert @ APShield for taking care of the car. He really has an eye for detail and a passion for the craft.
Xpel Ultimate Plus PPF was applied to the air dam, front bumper trim, front fenders, hood, bodywork behind rear tires, mirror caps, license plate, rockers, and doors (from the moulding down). It's 8.5mil thick and has a 10 year warrenty.
Exterior, glass, and engine bay was treated with SystemX Diamond Ceramic Coating. This stuff has a lifetime warranty.
He addressed some of the pre-existing paint/clear issues with a polish (and light cut?). He also cleaned all the overspray off the glass. No paintjob is ever 100% but this is about as close as I'm going to get!
Check out how the car is absolutely SHINING in these photos, even though they were only taken with my old iPhone 8.
Now I can drive without worrying about stone chips in the fresh paint.


 Last edited by Panici; 05-16-2023, 11:44 AM.
Leave a comment:
Leave a comment: