

That 918is great.
-
-
Are you venting to atmosphere? In that case the vanos plug would work but not offer much benefit. Most of the oil vapors would be in the oil pan. Some oem cars even have an oil pan vent.
Comment
-
You better
?
For now it's vented to atmosphere, though part of this is also planning for the future/boost. Eventually I'd like to add some sort of vacuum pump along with the supercharger rigged to pull vacuum when boost builds and possibly revisit the exhaust evac setup as well. For that reason I haven't really looked into venting the oil pan, but maybe I will look into it. Shouldn't be too hard to thread a fitting into the pan somewhere up high.
Made a lot of progress over the weekend. The warm weather and sun helped put me in the work mood.
High pressure PS hose assembled.
Feed line from the res to the pump
Test fitting stuff
Hole in the side for the return line to the res
Assembled with res test fitting
Forgot how nice this paint looks with sunlight on it. Been a while since I got to see it like this!
More test fitting.... getting there
Mocked this up just for fun. I've had the mesh sitting around for ages and the idea in my head even longer. It would be trimmed to fit just the opening and painted black. Thoughts? I think it looks cool and "finishes" the front. I really dislike open ducts that aren't finished behind and you can kinda see through to uncovered parts.
I've been cutting the hose with my dremel. Works very well to make a nice smooth flat cut. It's especially nice with the nylon covered tube because it doesn't so much cut the nylon, but more kinda melts it a bit so the nylon fuses and there's no fraying at all.
Found a creature living under my work bench
Pulled the radiator plug to drain coolant, magnetic plug looked like this. Not sure what to think. I've never had a magnet on the radiator before so I'm not sure if this is normal or not.
Finished refurbishing the oem sliders. Of course the two sliders I spent the most time on (because they were the worst looking) wound up looking the best and they are an inside driver and outside passenger, so I won't see them ever :P
High pressure line mounted
Return line going into the res
Feed line from res to pump
Return line going through the fender into the res
Return line routing from rack, going under the frame rail towards the cooler
Made a bracket to mount the catch can
Mocked it up with fittings
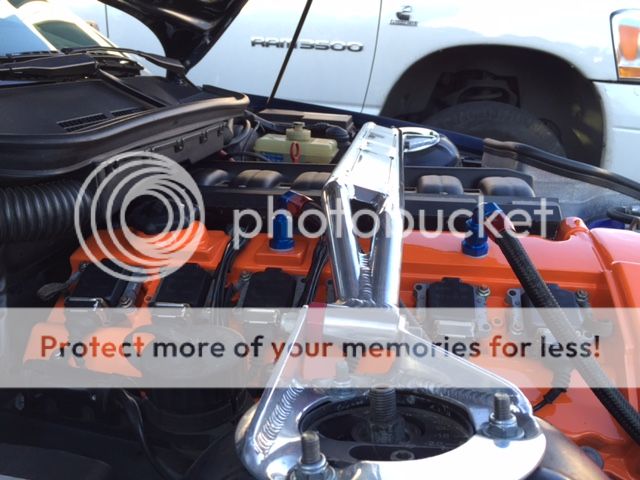
Driver's side of the engine bay is more or less complete
The finished PS cooler brackets. Had to trim and reinforce the driver side bracket to give clearance for the hoses.
Cooler and lines mounted and finished.
Here's how the line routes behind the valence, under the headlight towards the fender where it loops, goes through the fender and into the res
That's it for now. Next up I pull the cams and all the lifters. I will be installing the ARP studs, cleaning/refurbishing/replacing lifters and adding the -10AN fitting into the valve cover.Last edited by Sh3rpak!ng; 01-30-2017, 10:06 AM.Comment
-
Your power steering setup came out great, I am going to keep Red Horse parts in mind when it comes time to plumb up the system for my swap.Comment
-
Comment
-
Venting your crankcase at the oil pan versus the Vanos plug will make "not one single bit of difference". It's one system/atmosphere. Any pressure that forms in the oil pan will be the exact same as that at the Vanos plug. You should make a baffle to go near the Vanos plug inside the Vanos unit though. Otherwise you'll get a lot of oil from when you brake hard and the oil in the head comes charging forward into the timing cover area.Comment
-
I dig the PS cooler, that's pretty sweet.
PS when did you order those seat mounts from Massive? I've sent him several emails and PMs trying to order a set with no response.-AlexComment
-
Thought so. I pulled the vanos off last night and took a look. Seems possible to do a little baffle.
Thanks! I ordered the brackets Dec 23rd, shipped on the 28th, arrived on the 3rd. Weird, I usually get a response same day. Got an email from him 6 days ago in response to a question I had.
Updates
After work I dropped off a shitload of fasteners and random hardware to get cadmium plated
Spent most of the evening's free time prepping the underside of the hood for paint. This had bugged me for a long time so I am happy to finally get to it. Had to first do some serious degreasing and scrubbing since it was filthy. Then wetsanded it, especially the sections that got overspray from when I primed and painted it. Then covered the top with paper and taped the edges. By then it was dark and too cold to spray so I'll do it tonight. I got some rustoleum professional flat black that I'll spray with my $6 HF cheapo gun... same gun I painted the car with, and my buddy painted his with :P
All the mods I've done to make things easier to disassemble are really starting to pay off! I drained the coolant with no mess in 5 mins, pulled the rad out a minute later and zapped all the coil packs out with the milwaukee impact. I knew the valve cover had been slow leaking around the front most center stud. You can see it kinda moist with oil residue. Not sure why, but whatever.
This is the first time I've had the valve cover off since I built the motor. Looks fine in there as far as I can tell. Kinda with I had the cam trays hot tanked along with the head. Makes it look dirty Oh well.
Looking at the vanos area, I think I can make some sort of baffle to cover the opening to the vanos vent pretty easily. There's just enough space to put two studs/bolts through the cover sandwiched on the other side with some nuts/washers and sealant (thinking hondabond or curil-T). They should protrude enough to provide a short stud, but not too much that they interfere with removing the vanos unit. I can make a small aluminum plate that will mount over the studs with a short spacer and secured by a nut (locking nut? or loctite?). Simple and effective :)
I marked the potential spots on the inside of the vanos unit with an x
Left it like this for the night (put the cover on after). Tonight I should be able to spray the hood and pull cams, lifters, install the ARP studs and do the first torque sequence and start cleaning the lifters.
Comment
-
I'm super excited to see/hear how your lifter cleaning goes. I started doing some spares I have. I've done 4 so far. Not particularly difficult, but long and tedious. I'm most interested in what you do to prime them and the outcome on 1st start.
Don't worry too much about the baffle interfering with the front of the Vanos (can't let it touch, that's all). You'll need to take the baffle off to be able to access the screws on the exhaust chain sprocket anyways to set everything anytime you take the Vanos off and the baffle being in place will block that access.Comment
-
The stock vent is part of the same system, so with that logic the additional vent on the plug would not make a difference either. The point of venting the oil pan is to remove the oil vapors from the source and reduce windage on the crank shaft. Hence why oems sometimes vent from the oil pan.Comment
-
We'll have to agree to disagree. The reason for the extra port (in both Sh3rpak!ng's case and mine) is to provide additional venting for a motor that is being asked to produce a significant amount more power that the OEMs intended the stock crankcase ventilation system to handle. It's working a treat on my motor, and I'm sure it'll work great for Sh3rpak!ng.
 Last edited by Jaker; 01-31-2017, 06:59 PM.
Comment
-
I kinda figured out a good process last night.. afterall I have 24 to do (I've never had any serious issues, just ticking after autox). Ill post pictures later. Basically smack them on a block of wood to get the valve out. Blasted compressed air into the valve hole in the lifter to get all the old oil out. Soak them in berryman chem dip overnight to melt any varnish etc. Reassemble. Priming is also pretty easy. Fill the valve, assemble it. Dunk it in oil with needle nose pliers, squish it a bunch of times until its hard and no more air comes out. Fill the lifter with oil, install valve in lifter.
Regarding baffling the vanos, I've got an idea, should be pretty easy. Im more concerned about making sure the holes through the vanos plate don't leak. But I guess the only way to know that is to try something. I'm thinking sandwiching the aluminum between washers, the head of the bolt and nuts should do well along with a sealant.Comment
-
Yes. I don't know what the inside of the obd1 valve cover looks like leading into the original ccv port, but on the obd2 valve cover, there is a large baffling structure. I don't know how effective or restrictive it is, or how much it might be clogged after ~20 years of use but I don't want to take a chance especially considering I am currently not pulling vacuum on the crankcase.
Basically the extra vent certainly can't hurt and will set me up going forward with extra capacity to habdle more power aka more blowby. If anything I probably could've increased the size of the exit tube from the catch can.
Jaker - awesome setup. That's perfect imo. I've been considering switching to an alloy cover specifically so I'd have an easier time adding ports like that (and also so I could powder coat it :) ). Dude, you really need to start a build thread if anything just to have a place to post your specs and your solutions to various systems. You have definitely experimented with and apparently solved many typical issues with these motors and I'm sure there are a lot of people who'd love to read about it and learn from you.Comment
-
I can bring my OBD1 valve over this weekend if you want to see it up close. I think I'll eventually get it installed on the car.
@Jaker PLEASE make a build threadSimon
Current Cars:
-1966 Lotus Elan
-1986 German Car
-2006 Volkswagen Jetta TDI

Make R3V Great Again -2020Comment
-
For my purposes, the plastic cam cover was all the baffling I needed. Spinning the motor to 7,800 in 2nd gear, running extra pump pressure (shimmed oil pump pressure relief) and hard acceleration/braking for autocross meant that my OEM PCV system was pumping a significant amount of oil into the intake tube/boot/TB/IM/engine.
I completely blocked off the OEM port on the valve cover. With the install of the 2 -8an lines (I think, cant remember for sure anymore) in their "high" placement, the OEM intake cam plastic cover and the hand made oil separator tank, my intake system is now "bone dry". At 1st I ran it with a simple filter on the top of the can. I was getting blow-by smells in the cabin during day to day driving. Once I put the -12an line from the top of the can to the bottom of the intake tube the smells were gone and their is NO oil being sucked back into the intake.Comment


 -
- 


Comment