-
Wow that was an awesome save. Having the agreed value policy really paid off. Seem like a perfect time to get some euro bumpers on there! -
That is great news! A agreed value policy is definitely the way to go on these cars.Leave a comment:
-
We Can Rebuilt It!
I have some fantastic news for everyone!
After a month of back-and-forth with insurance, they cut me a cheque for the value of the damage.
Since my agreed-value policy was $20k, the car wasn't totaled out (still has a clean title).
I found a local-ish shop called Delta Park Auto specializing in E30s, and they managed to pull the body and chassis back into car-shape again! Something I didn't think possible with the extent of the damage.
E30 went on their alignment rack, and the rear end tracks true! Doors open properly again, and car feels normal driving down the road.
I asked them to straighten the car with the idea that I'll take it from there. The plan is to cut the quarter panel off and weld on a doner panel.
I can't properly express how happy this makes me, I went from basically mourning the loss of the car, to full rebuild mode!


Before I dropped the car off at their shop, I stripped the entire interior and put in a spare driver's seat. Made their job easier and I didn't have to worry about my Houndstooth cloth getting dirty.
This was the first time I've had the parcel shelf out, so I set about refinishing. Fabric paint for the carpet, Trim paint for the plastics, and a little VHT Niteshades for good measure inside the third brake light.
Interesting thing to note, is that the vents from my spare '86 325e parcel shelf were smaller and IMO better looking then the ones from this car. So I refinished the spare and used those.


I threw a spare taillight back in and drove the car back home on Friday.
This morning (Saturday) I broke out my set of bodywork hammers & dollies and spent a little over an hour working on the panels (until my forearms got too sore to continue).
Considering I've never done this before, I'm pretty pleased with the progress so far.
I don't know if I'll be able to get this back into passable condition, but I've got nothing to lose.
Couple more hammer sessions and i'll re-evaluate how everything looks.
Worst case I'll cut the quarter panel off and replace it like I had previously planned.
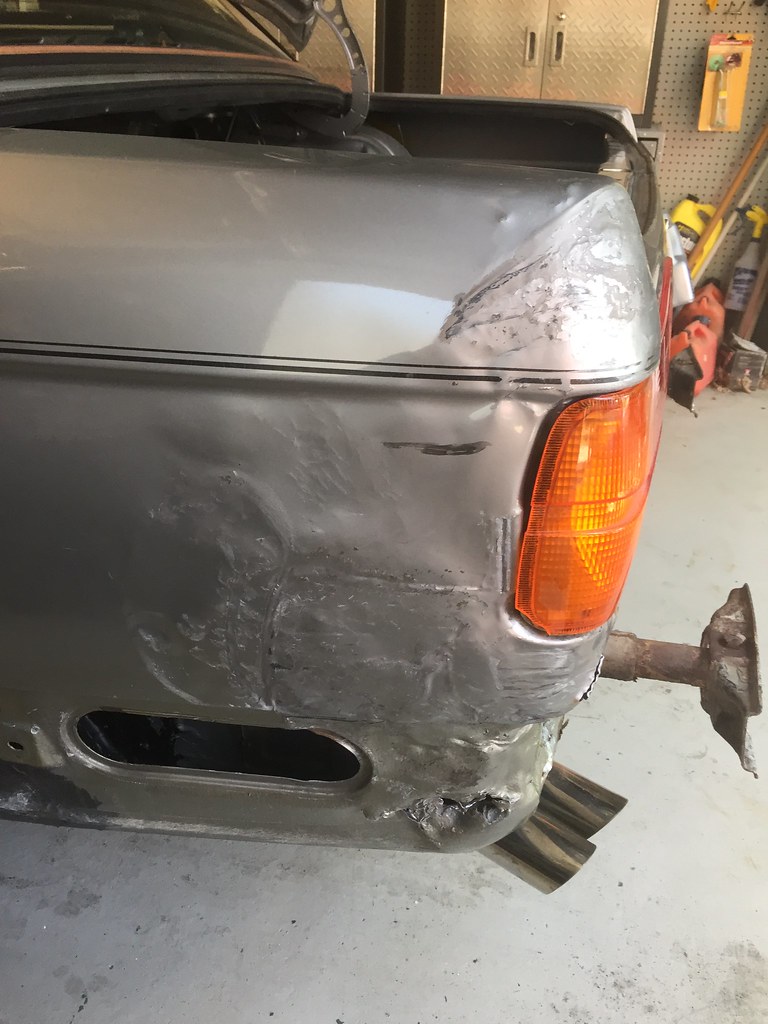


I also attempted to straighten out the diving board bumper with my jeep, but found it to be beyond salvageable.
Hoping to find one locally ASAP and enjoy driving the car a little for the remaining 2-3 weeks we have of nice weather.Last edited by Panici; 09-28-2020, 06:41 PM.Leave a comment:
-
Argh - that's the worst. Sorry to see the car hit like that.
As much as you want to fix it for sentimental value, I'd take the pay out and buy a stock 318i with a good body & paint and swap everything over.Leave a comment:
-
Damn dude! Time for a part out, or slow methodical breakdown to save parts for a new car.Leave a comment:
-
I saw this on Facebook and will say the same thing: if the shock tower isn't totally destroyed, it can be saved. Insurance will total it, take the payout and go to an old school body shop, one that doesn't just hang panels on new cars, take cuts off a donor shell and they'll fix it.
Never lose hope, never give up.Leave a comment:
-
Oh no .... that's horrific news, so sorry this happened to you. I really really really hope they don't total it out and the right shop will be able to repair it.
Glad you weren't injured though!Leave a comment:
-
Damn, sorry to see this. A few years ago my buddy's car was totaled by similar damage, thought he rear of the wheel arch was touching the tire. Your car is nicer than his was, and values have continued to climb, so hopefully not.Leave a comment:
-
Fack!
That is devastating news Panici.
I remember tuning into this thread years and years ago. Just finished reading from where I left off. An unfortunate surprise at the end here.
=(Leave a comment:
-
This is terrible news. Fingers crossed it isn't totalled out. Definitely fight for it, I imagine it's reasonable that the right shop could repair this.Leave a comment:
-
ughhhhhhhhhhhhhhhhhhhhhh so sorry for your loss here. Don't give up. Find another chassis and swap over. You've done some solid work and made a great collection of parts.Leave a comment:
-
Ugh. I'm so sorry to see this happened. Glad you're OK (physically at least).Leave a comment:


Leave a comment: