Announcement

Collapse
No announcement yet.

Panici's '87 325is E30 - Boosted In Bronze

Collapse
X
 
  • Filter
  • Time
  • Show
Clear All
new posts

    Originally posted by varg View Post
    Do you mind sharing the OEM ECU dwell compensation?
    Table I used was from Haltech's website.
    https://support.haltech.com/portal/e...les/m52-engine
    I went with a base dwell of 3ms and my own multiplier table to be conservative.

    If that old forum post is to be believed, it looks like the original ECU dwells the coils longer then 3ms (until 7000rpm) so I am satisfied I won't burn out my coilpacks with my numbers.


    Click image for larger version  Name:	Dwell.png Views:	0 Size:	160.3 KB ID:	10079885


    And an old forum post for more reference info:
    https://www.bimmerforums.com/forum/s...il-dwell-table
    Click image for larger version  Name:	Dwell2.png Views:	0 Size:	147.4 KB ID:	10079893
    Last edited by Panici; 01-09-2023, 06:35 AM.

    Comment


      For what it's worth, here's the dwell table from MS41.2 for the S52.

      Click image for larger version  Name:	MS41 Dwell.png Views:	38 Size:	7.0 KB ID:	10080646

      MS41.0/.1 on the M52 uses the same physical configuration, so probably the same, but nobody has added the address to the ECU definitions so I can't be sure.

      Hard to compare between different ECUs, but with these settings, stock (Edit: and original from 1997) Bremi coils, BKR7E gapped to 0.020", I get some breakup under boost at higher RPM and 10-14psi.
      Last edited by Northern; 01-17-2023, 10:33 AM.
      Originally posted by priapism
      My girl don't know shit, but she bakes a mean cupcake.
      Originally posted by shameson
      Usually it's best not to know how much money you have into your e30

      Comment


        Nice. Thanks guys, another box checked in the pre-tune configuration. Not encouraging to hear about the stock coils giving out so low with a tight gap, but I'll have to cross that bridge when I get to it.

        IG @turbovarg
        '91 318is, M20 turbo
        [CoTM: 4-18]
        '94 525iT slicktop, M50B30 + S362SX-E, 600WHP DD or bust
        - updated 3-17

        Comment


          Progress has been slower then I would have liked. I caught Covid just after Christmas and spent my week off work being sick instead of working on the car.
          Last couple weekends I've gotten some wrench time in, so things are looking up.
          • Split the rear subframe, differential, and trailing arms.
          • Pressed out the subframe bushings, which was challenging as they were in like-new condition.
          • Pressed out the like-new trailing arm bushings with the table vise.
          • Prepped the subframe for welding, welded in differential reinforcement plates.
          • Reinstalled the driver's side Hoffmeiser Kink with brand new gaskets and clips. It sits perfectly now!
          • Removed the brake lines from the trailing arms. Stripped a hardline fitting on one side.
            • Had to cut the hardline to get a socket on the fitting.
            • Bought some new fittings (and more hardline just in case) this afternoon.
          • Prepped the rear trailing arms for welding in reinforcements.
            • Need to buy some 1/8" steel to fab some additional support.


          Comment


            This weekend's project was reinforcing the rear trailing arms.
            I've grown to love welding with a little fabrication mixed in.

            Used the garagistic swaybar reinforcement tabs, and trailing arm wing & tube kit.

            I went further and picked up a square foot of 1/8" steel to box in the shock mount reinforcements. Fabrication isn't my strong suit so the two aren't identical, but both are stronger then the garagistic parts alone. Haven't ruled out true rear coilovers in the future so wanted these mounts as beefy as possible. The picture of the stock arm beside the reinforced arm really highlights how much structure I added.

            Someone posted on my insta that I should have welded these in a jig, as his came out warped (although he did use a different style of brace). I hadn't heard of people using a jig before. Think I will be fine as I was aware of and managed the welding heat going into the arms.

            Next step is applying the POR15, which I recall is a bit of a process. Have to check my supplies to see if I have enough materials to do the job.


            Welding blanket to protect the E30!


            Last edited by Panici; 01-30-2023, 05:51 AM.

            Comment


              Yes very common for them to warp, make sure they're straight before you go further
              sigpic

              (clicky on piccy to get to thread)

              Comment


                Originally posted by econti View Post
                Yes very common for them to warp, make sure they're straight before you go further
                Well that’s not good news. Hadn’t read anywhere that they were prone to warping.

                Any suggestions on how to check them?
                Last edited by Panici; 01-30-2023, 05:43 PM.

                Comment


                  Best way is to get some bar/tube stock the same OD as bushings, it should pass through both holes very easily. That, with a few bolts, is a very easy jig to make sure they definitely don't move when welding.
                  sigpic

                  (clicky on piccy to get to thread)

                  Comment


                    Originally posted by econti View Post
                    Best way is to get some bar/tube stock the same OD as bushings, it should pass through both holes very easily. That, with a few bolts, is a very easy jig to make sure they definitely don't move when welding.
                    Okay, good to know, but it’s too late for that now.

                    How do I measure them up to make sure they haven’t moved?

                    Comment


                      Same bit of pipe, if it passes through then you're good. If it binds up more than a little, you're done. Typically the bushing points will move towards each other but they can go any way. If you were careful with the heat management it's probably OK, but better to check now than continue with time and money on assembly and then find out that they're out of alignment when its all back together
                      sigpic

                      (clicky on piccy to get to thread)

                      Comment


                        Originally posted by econti View Post
                        Same bit of pipe, if it passes through then you're good. If it binds up more than a little, you're done. Typically the bushing points will move towards each other but they can go any way. If you were careful with the heat management it's probably OK, but better to check now than continue with time and money on assembly and then find out that they're out of alignment when its all back together
                        Noted, thank you. Will have to find some pipe.

                        I didn't run long stringers, and went evenly side-to-side while working on other areas in-between. If I had known ahead of time they were prone to warping I would have built a jig and/or given even more cooldown time between passes.

                        ----

                        So the main concern is warping of the "A" shaped arms in relation to each other, not so much the knuckle?

                        I wonder if some of these reports of warping were 30+ year old arms already out of spec before welding.
                        I find it hard to believe they are able to withstand decades of suspension cycles while supporting the weight of the car and remain in spec if they are so weak.

                        Comment


                          Thanks econti for the pipe trick. I took the end off an old snowbrush as it was the exact diameter I needed. Both trailing arms check out straight! 😃
                          Last weekend I gave all the reinforced parts the POR15 treatment. Hung them in the shed with the 240v heater on, and by the end of the week they were cured rock hard.

                          Made some decent progress today, subframe assembly is almost ready to go back into the car.

                          Pressing the Revshift 80A Polyurethane bushings into the trailing arms, subframe, and differential was uneventful. I was able to put it together mostly by hand.

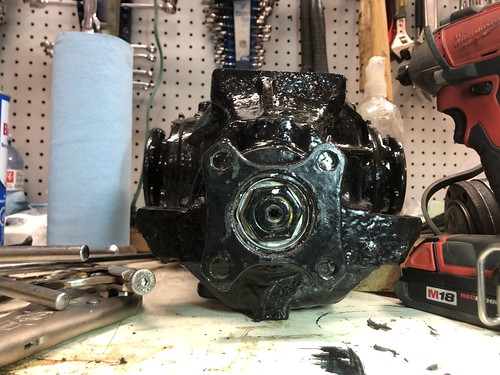
                          Replaced the differential input shaft seal & lock washer with OEM BMW parts. Definitely the source of my diff oil leak. Edge of the outer mating surface wasn't the best, so cleaned it up before the new seal went in.

                          Drain plug stripped out (welder to the rescue!). I previously saw how rough it was, so had a ​"Deluxe Magnetic Differential Drain Plug" from RaceGerman on hand. It's got a sticker for "Drainplugmagnets.com" just for reference. I'm impressed with the magnet strength, it was sticking to anything within reach when it was sitting on the bench.

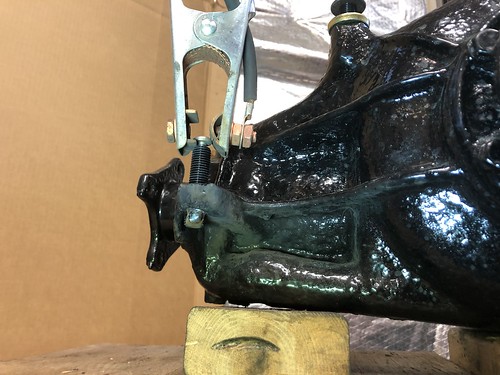
                          Installed a RaceGerman HD Differential Stud Kit. When last installing this diff with the subframe in the car, I crossthreaded one of the lower holes quite badly. Consequently that stud wasn't as tight as I would have liked, so with the welder still set to kill from extracting the drain plug, I made it a permanent stud.

                          Finished things off with a Garagistic Secondary Diff Mount and a freshly resealed cover with an OEM paper gasket + skim coat of RTV Ultra Grey.


                          Last edited by Panici; 03-02-2023, 09:27 AM.

                          Comment


                            Gave it the Ol tractor paint job. I find Por 15 just falls off after a while. Twin ear is exciting.

                            I was up above it, Now I'm down in it ~ Entropy - A Build thread.
                            @Zakspeed_US

                            Comment


                              Originally posted by moatilliatta View Post
                              Gave it the Ol tractor paint job. I find Por 15 just falls off after a while. Twin ear is exciting.
                              I've had the opposite experience, did the rear subframe in 2016 and it's been rock solid since then.

                              From what I've read, a lot of it is down to prep. Here is a copy-paste of my POR15 notes FWIW.

                              POR15 Process:
                              0. Sand down to bare metal with flap disk
                              1. Degreaser (POR15 or other)
                              2. Rinse
                              3. POR15 Metal etch (keep wet for 10 mins)
                              4. Rinse
                              5. Dry
                              6. POR15 first coat
                              7. Wait until finger drag is slightly tacky (6hrs?)
                              8. POR15 second coat

                              Notes:
                              -Clean off rust scale first
                              -Bites into rust, although I've used it on bare metal after etching.
                              -Use flashlight to see bare spots
                              -Wear face mask - well vented area for curing
                              -Cures faster with more humidity
                              -Maintain 60F+ for 96 hours of curing
                              -Not UV stable, topcoat if exposed to sun
                              As a side note, the price point of the POR15 products has really gone up.
                              Yesterday I bought new containers of the degreaser/etch/gloss and paid just over $160CAD for the set.
                              Last edited by Panici; 02-07-2023, 06:17 AM.

                              Comment


                                Originally posted by moatilliatta View Post
                                Gave it the Ol tractor paint job. I find Por 15 just falls off after a while. Twin ear is exciting.
                                I used to use a lot of POR15 but I found the same, probably because I didn't etch and it would overlap other coatings on the edges.
                                Was especially bad when I had the grey stuff and it was inside the trunk seal channel and saw some UV.
                                I think the real reason I stopped was because I had to buy/ship it and as soon as I opened the can, it seemed to harden within a few weeks.

                                I just prime/paint stuff now because I'm cheap.

                                Diff looks great. Interested to see how the garagistic mount fits. I have one in a box that I'd like to get around to installing this year...
                                Originally posted by priapism
                                My girl don't know shit, but she bakes a mean cupcake.
                                Originally posted by shameson
                                Usually it's best not to know how much money you have into your e30

                                Comment

                                Working...
                                X