Announcement

Collapse
No announcement yet.

(Yet another) M42 top end refresh and engine reseal (mid-2021)

Collapse
X
 
  • Filter
  • Time
  • Show
Clear All
new posts

    (Yet another) M42 top end refresh and engine reseal (mid-2021)

    Well, we are in the midst of a journey with a 1991 318is here in Austin, Texas.

    This is a new (to us) car that my daughter and I are going through before it becomes her daily driver in high school (she’s a junior). While I’m new to e30s I have a few decades of experience working on 2002s. I hope this will be a good foundation.

    So on to the car. It has 220k. AlpineWeiss with black interior. I’ve driven the car a few miles and it is in generally good condition. Doesn't blow smoke and no noises from drivetrain. Clutch felt fine, shift linkage loose, drove straight, crappy shocks, buzzy muffler. Car has oil leaks and vacuum leaks. Starts and runs but barely idles until it warms up. No receipts for recent work. To be on the cautious side we are going through all of it (engine, suspension, brakes, drivetrain, steering, interior, etc.), both as a learning exercise and well because it probably needs it. Most importantly, it will be a great memory for both of us. She will do as much of this as possible.

    Thought I’d capture it here for posterity. I want to do it right. I’m concerned about doing the work and still have leaks. Also, I want to be able to come back to this thread and do it again if I need to.

    Some will remind us that this has all been documented before. It has of course. In preparation we’ve scoured the interwebs (a lot on this site) and there are many many references, threads and great advice, most likely from people like yourselves. It is difficult to convey how much it has helped to read documentation and share your hard-earned insight. That's also the challenge; so many pieces of great advice, all over the place. This one will be what I have found to be an aggregated current best practice, with specific step by steps of all details. I reference links in the steps below.

    One note on this M42 top end refresh: I’m choosing not to go to the recommended late M42 front timing chain cover from a 1994-95 e36 318is (removes idler wheel and is recognized as a better design). Why this decision? It’s my first M42 refresh and it adds one or two levels of complexity. It's an added cost. Finally, my daughter won’t be taking this car to redline on every shift (I don’t think). The next M42 I rebuild will get the update (more on that later). I hope by doing this work we will enjoy a “trouble-free” 100k more miles. This decision may haunt me but if it does I’ll own up to it :-).

    What I plan to do is document this refresh process before I do it. I’m hopeful that you all can help nudge in the right direction if I seem to be wandering off. I welcome all feedback, always.

    Should be fun! So, let's begin.

    Goal
    Refresh the top end of an M42 in a 1991 318is. Reseal engine. Replace common wear items (timing components, water pump, oil pump, filters, etc.)

    Preparation steps (I did it in more or less this order).

    This is the “easy” part. YMMV, I didn’t capture every wire and every hose but did try. If there is something obvious I missed let me know. No photos of these steps.
    • A few days in advance - spray all nuts/bolts that you can access with PB Blaster or equivalent. For example, exhaust manifold nuts, front timing cover bolts, oil filter housing bolts, etc. Repeat as often as you can before you start the work. It could make all the difference.
    • Raise front of car - jack stands at proper jack points (right in front of door hinge, use a rubber slot adapter to rest on the pinch weld). Parking brake on. Blocks under rear wheels, etc.
    • Drain oil (17mm bolt). Drain coolant (plastic valve at bottom of radiator).
    • Disconnect throttle cable (the plastic bracket that holds the end of the cable is slotted to make it easier)
    • Disconnect cruise if your car has it.
    • Remove intake manifold (eight 11mm nuts that you see standing at drivers side fender, another two 11mm nuts on the sides, some hose disconnects, disconnect throttle position sensor cable, etc.)
    • Remove intake that holds fuel injectors (five 11mm nuts, some hoses, at least one vacuum hose)
    • Disconnect electric harness from alternator, etc. and fold up to windshield (two 9mm bolts and one 13mm bolt)
    • Remove engine mount nuts (two 17mm nuts).
    • Lift engine a few inches (I used this),
    • I removed the power steering rack because I am replacing it, but I’m not sure it’s required for this job (if so, two 15mm nuts/bolts and then the steering coupler, won’t go into this now).
    • Remove lower oil pan (sixteen 10mm bolts).
    • Remove upper oil pan (twenty 10mm bolts, three T12 torx).
    • Remove major coolant hoses.
    • Remove radiator (two clips on side)
    • Remove AC condenser (10mm bolts)
    • Remove AC pump and bracket (four 13mm bolts holding pump to bracket, then i believe four more that hold bracket to block, AC hoses are 6mm hex)
    • Remove exhaust manifold nuts and pull back from engine (13mm nuts, IIRC)
    • Lock flywheel (I used a right-sized punch in the sight hole next to flywheel).
    • Remove fan (I drilled two holes in a long flat bar and attached to two of the bolts attaching the fan pulley. The arm rested on padding on the driver’s side fender. Then used a large adjustable wrench to unscrew. Note: Reverse Threads!!)
    • Remove crank pulley bolt (22mm socket).
    • Remove oil filter assembly (six 10mm bolts)
    • Remove spark plug wires (grab carefully and pull)
    • Optionally remove ignition module from passenger wheel arch (four 8mm nuts) I did it to clean underneath, not required for this job.
    • Remove timing chain tensioner (one 17mm wrench or socket)
    • Remove valve cover (fifteen 10mm bolts).
    • Set engine at TDC
    • Remove upper timing chain cover (eleven 10mm bolts)
    • Remove cam sprockets and chain (four 13mm bolts each cam. I first etched an up arrow on cams and took a photo too)
    • Remove water pump (four 10mm bolts)
    • Remove lower timing chain cover (eleven 10mm bolts, four 10mm bolts)
    • Remove head (eight T12 torx)
    • Remove front bumper and bumper support (not required but very nice to have direct access to front of engine + clean the area) - misc 10mm bolts, 13mm bolts, two T-55 male torx for bumper, two smaller torx T-15 for bottom of section between fender and nose)
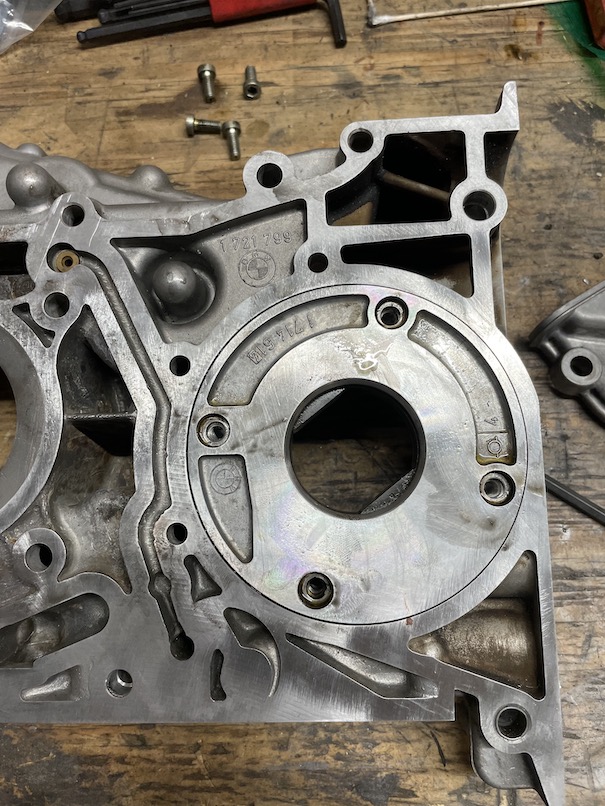
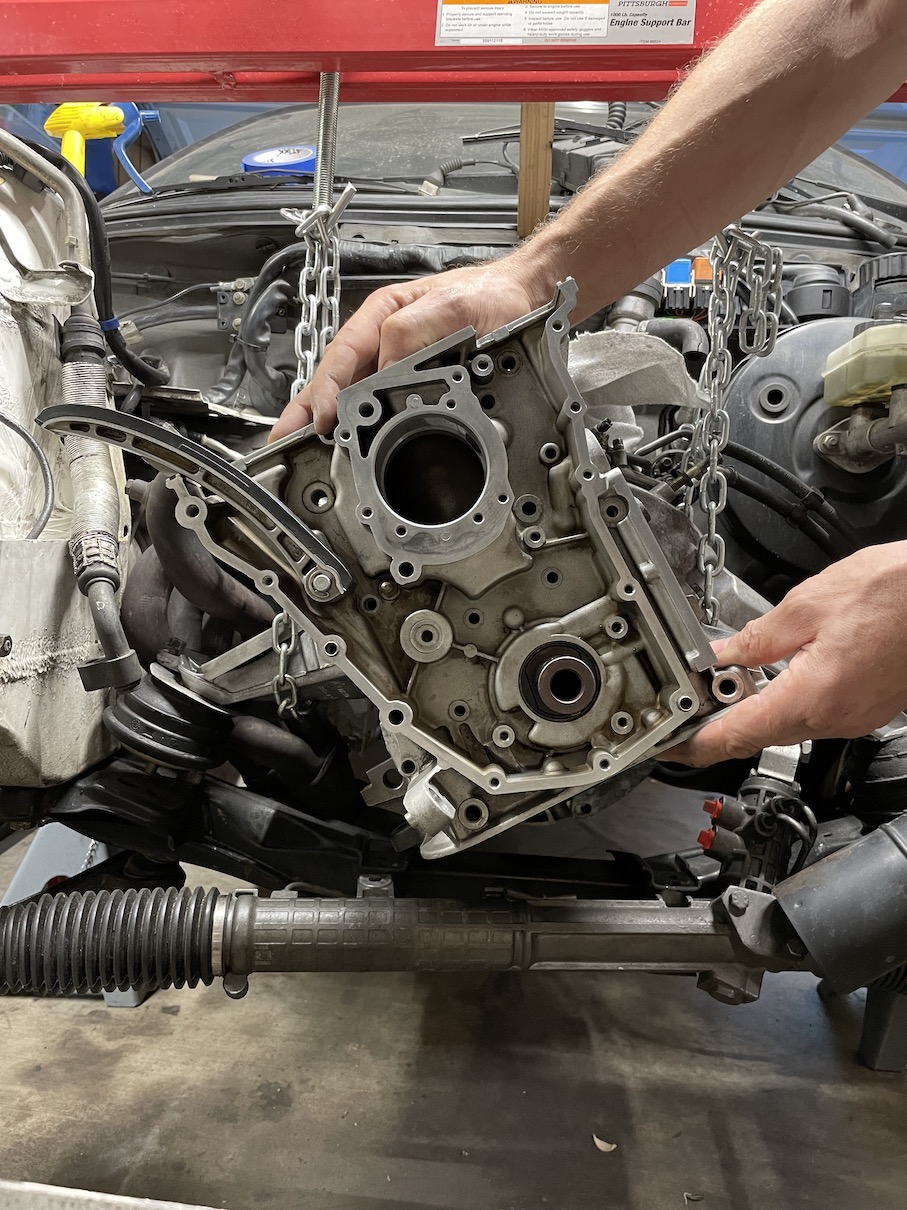
    • Remove front timing case (three 13mm bolts, one 17mm bolt, seven 10mm bolts, two 6mm hex bolts)
      • Inspect back of timing case for coolant corrosion
      • After remove timing case gasket from block, inspect the block for coolant corrosion
      • Question: What to do if there is corrosion?
    • On the bench - Remove cam holders, cams prior to machine shop.
    Doing the above steps brings you here:

    Click image for larger version  Name:	IMG_4788.jpeg Views:	3 Size:	66.7 KB ID:	10029734

    Click image for larger version  Name:	IMG_4792.jpeg Views:	3 Size:	70.4 KB ID:	10029735


    Pleased to see cross-hatching in the cylinder bores.

    Click image for larger version  Name:	IMG_4783.jpeg Views:	3 Size:	61.1 KB ID:	10029736

    Head gasket doesn’t seem to have major blow outs.

    Click image for larger version  Name:	IMG_4789.jpeg Views:	3 Size:	66.6 KB ID:	10029737Click image for larger version  Name:	IMG_4790.jpeg Views:	3 Size:	64.8 KB ID:	10029738

    I'm limited by the number of images I can upload in a single post, so I'm breaking this up into sections.
    Last edited by jsnppp; 11-05-2021, 07:48 PM.

    1991 BMW 318is - AlpineWeiss II
    1991 BMW 318is - DiamondSchwartz
    1973 BMW 2002 Tii - Baikal
    2002 Toyota 4Runner SR5 sport - Black

    #2
    Front timing case to block gasket looks on the way out (sooo glad I chose to do this).


    We cleaned the block and see some corrosion.


    Also a cracked lower timing chain rail. New part will be installed.


    Last edited by jsnppp; 11-05-2021, 07:53 PM.

    1991 BMW 318is - AlpineWeiss II
    1991 BMW 318is - DiamondSchwartz
    1973 BMW 2002 Tii - Baikal
    2002 Toyota 4Runner SR5 sport - Black

    Comment


      #3
      Parts list

      Here are the parts to be replaced for reference.
      • Under the front timing cover
        • Updated chain tensioner (M44 style), PN 11311743187
        • Timing Gasket, case to block, PN 11141739868
        • Timing cover Gasket, front to case, PN 11141247633
        • Lower timing chain guide, PN 11311721419
        • Long deflection rail, PN 11311247483
        • Timing chain tensioner rail, PN 11311727342
        • Profile gasket, PN 11141247849
        • Front main seal, PN 11141439570
        • Idler wheel, PN 11311727569
        • Timing chain (FEBI), PN 11311739480
        • Oil pressure control valve
          • Updated oil pressure control valve, PN 11141247393
          • Updated coil spring, PN 11411706809
          • Updated spacer bushing, PN 11141247397
          • Lock ring, PN 7119934625
      • Head
        • Head gasket, PN 11121721547
        • Head bolts, PN 11121721939
        • Intake manifold gasket, PN 11611734684
        • Exhaust manifold gasket, PN 11621728984
        • Valve stem seals, PN 11349059171
        • Throttle body gasket, PN 13541743261
        • Head will be sent to local machine shop for deck, pressure test, cleaning and valve check.
      • Oil
        • Oil pump, PN 11141714611
        • Oil pump cover, PN 11141714613
        • Oil filter housing gasket, PN 11421709800
        • OIl tube gasket, PN 11411715116
        • Upper oil pan gasket, PN 11131739592
        • Lower oil pan gasket, PN 11131709815
      • Coolant
        • Water pump with o ring, PN 11511734602
        • Thermostat, PN 11537511580
        • Thermostat gasket, PN 11531721172
        • Complete coolant/vacuum hose kit, PN E30M42HoseKit (from FCP Euro)
      • Electrical
        • Alternator, PN 12311466338
        • Alternator bushings, PN 12311715490
      • Air conditioner
        • Parallel flow condenser, PN TBD

      Last edited by jsnppp; 11-05-2021, 07:54 PM.

      1991 BMW 318is - AlpineWeiss II
      1991 BMW 318is - DiamondSchwartz
      1973 BMW 2002 Tii - Baikal
      2002 Toyota 4Runner SR5 sport - Black

      Comment


        #4
        Getting Started

        After considerable research and a mock up of the build process, we will be installing the system in two phases:

        Phase 1
        1. Lower engine timing case
        2. All components attached to the lower engine timing case (idler wheel, deflector rail, timing chain, etc.)
        3. Lower timing case cover (timing chain will be sticking out the top).
        Phase 2
        1. Profile gaskets
        2. Cylinder head
        3. Upper timing case cover

        Recommended reading. Great sources of practical experiences. I reference these in the steps below.-
        Phase 1 - The Basics

        ==============================================

        Step 1: Clean engine bay, wiring, hoses, etc.

        Focus on engine components, mating surfaces, etc
        I use orange engine degreaser, brushes and brake cleaner.

        ==============================================

        Step 2: Clean bolts and nuts prior to reinstallation.

        All engine block threaded holes are chased with a rethreader. Everything should be clean and dry.
        This Tool - Metric thread restorer is a lifesaver here.

        -
        Phase 2 - Prep the lower timing case

        ==============================================

        Step 1 - Install pressure control valve to bottom of timing case.

        Parts:
        • PN 11141247393
        • PN 11411706809
        • PN 11141247397
        • PN 7119934625
        Steps:
        1. On the bench, remove the old pressure control valve in the timing chain case and install new.
        2. Use snap ring pliers, lock ring snaps out, pull out old control valve, reinstall new. Snap in new lock ring. Careful with screwdriver not to score the side.
        ​​

        For those of you interested, here is the new (left) and old (right) oil pressure control valve. I thought it was interesting that the new is nylon.

        ​​

        We added assembly lube to the sides prior to installation. I used a properly sized screwdriver handle (plastic) to push on the spring while I had my partner squeeze the lockring to pop it in. Four hands makes this much easier.

        Guidance:
        * https://www.r3vlimited.com/board/for...-control-valve

        ==============================================

        Step 2: Install oil pump to lower timing case.

        Parts
        • Oil pump, PN 11141714611
        • Oil pump cover, PN 11141714613
        Steps
        1. Remove old pump cover and oil pump. (6mm Hex wrench)
        2. Pack new pump with assembly lube to assist with priming.
        3. Tighten bolts to M6 torque. I used a drop of blue locktite.
          • M6 Bolts - 10 NM / 7.4 ft-lbs / 88.5 in-lbs
        Here is the original. New is installed the same way.
        ​​


        New installed and loaded with assembly lube. Cover torqued to M6 spec (10 NM / 7.4 ft-lbs / 88.5 in-lbs) Drop of blue locktite on each bolt.


        ==============================================

        Step 3: Install front main seal to lower timing case cover.

        Parts
        • PN 11141439570
        Steps
        1. Remove old seal using screw driver and hammer. Lightly tap around perimeter. Don't scratch the housing.
        2. Use large socket to tap the new seal in evenly.
        Our original seal:


        Tapping out the old seal (flipped the case upside down)

        ​​

        We didn't photo installing the new seal. Should have.

        Recommended installing the new front main seal slightly different from original to change wear line (in this case we went slightly deeper).

        Here is our final:


        ==============================================

        Step 4: Check crank damper and crank timing gear

        First: It appears that the newer style crank timing gear has a rubber/plastic ring in the back. The original does not. It does not feel required. At $110 each, I'm not going to buy the new style. I hope not to regret it!

        Second: Verify that the back of the crankshaft pulley is in proper condition. There is plastic (?) component around the perimeter that can disintegrate. Ours looks fine.

        Photo of our pulley:


        Additional reading:
        * https://www.r3vlimited.com/board/for...-request/page2
        Check the condition of the crank damper VERY closely. Push on it and look for any signs of the rubber separating from the metal shells.

        Additional reading:
        * https://www.r3vlimited.com/board/for...into-e30/page3

        ==============================================

        Step 5: Check profile gasket area for corrosion on both lower timing case and upper timing case

        There may be corrosion around the profile gasket. If "too much" then consider a replacement or repair. I don't know the definition of "too much".

        While I am not overjoyed at the amount of pitting but I also do not feel it is too much nor does it feel based on what I can find, especially with a light (light) skim of sealant. The profile gasket is quite thick.

        ​​
        -
        Phase 3 - Install the Lower Timing Case

        Pay attention here!

        ==============================================

        Step 1: Install lower timing case gasket

        Parts
        • PN 11141739868
        Steps
        1. Test fit the paper gasket to the block.
        2. Check where it overhangs into profile gasket
        3. Trim the gasket as needed.
        Prep the block with brake cleaner and wipe down afterwards.


        Back of timing case got the same treatment, after lightly sanding (1000 grit with sanding block). Clean all surfaces (we used clean towel + brake cleaner).


        Test fit the gasket:


        Trimming not necessary as far as I could see.

        Test fit the cover just for fun.


        Ok, time to install. Spray gasket on both sides of the gasket. Do this off the car. Light spray. Don't put too much. I wasn't happy with the first try. The spray nozzle was not even, it left clumps as well as a spray. I hope this isn't a problem. We let it dry until it was sticky. If you use the same, we recommend test spraying on paper first.

        NOTE: We went back and did this again with a new gasket. I didn't photo the new gasket, the process is identical but it turned out much better.


        Additional reading:
        * https://www.r3vlimited.com/board/for...il-leaks/page2
        I have used the Permatex High Tack Spray-A-Gasket stuff in the past for other things and it cleans off fairly easily with acetone. The technical data sheet on the Permatex site says that it is fully oil resistant. Honestly, I think that one of the major factors, if it is not THE major factor, in getting a good no-leak seal is to have all of the gasket surfaces be immaculate. No dirt, no dust, no residual oil or other contaminants. In many cases this can mean a TON of prep work to get rid of old gasket sealer, baked chunks of old gasket, etc,

        *
        https://www.r3vlimited.com/board/for...ection-request
        When I do use a gasket sealer, I use Permatex High-Tack Spray A Gasket (funny smelling red stuff), and I apply it LIGHTLY; enough to make the gasket uniformly reddish, but NOT dripping or running, and not enough to look super glazed over. Even this stuff will allow gasket shift if used too heavily. After spraying, I let it cure for 15-20 minutes (in ~70°F weather, longer if colder) before assembly. During assembly. I pop it into place and then slowly clamp / bolt down the mating part, tightening each one progressively in 4-5 passes (light finger tight, finger tight, hard finger tight, 50% final torque and then 100%). Also visually check the part of the gasket that sticks out and make sure that it has not shifted.

        Permatex High-Tack Spray-A-Gasket sealer is used on all paper gaskets.


        ==============================================
        ​​
        Step 2: Install lower timing chain case to engine block

        Parts
        • None
        Steps
        1. Mount the case to the block
        2. Install the bolts in the right locations, finger tight.
        3. Add blue locktite
        4. Torque the bolts as per below, in the order listed.
        NOTE: Be careful, some have noted that threads in the block can strip. Make sure threads are clear. Don't over torque!

        Additional reading:
        * https://www.r3vlimited.com/board/for...-request/page2
        The M6 ones are tightened to 10 Nm / 89 in-lbs, and the M8 ones are tightened to 22 Nm / 195 in-lbs. There are occasional exceptions with special higher grade fasteners, but not with any of these. If you really want to be extra careful, you could use some medium strength thread locker, although it is really not necessary.

        We used this photo for torque values from the link as reference. Not my engine. Torque in the order shown. 1 - 2 - 3 - 4 - 5 - 6


        Here we placed the cover over the gasket. Before installing the bolts, we inspected each hole to ensure the gasket was not covering threads. We installed the 17mm bolt first, after applying a drop of blue locktite. Just snug, not torqued.


        We then installed all bolts, again just snugged up. Then we followed the torquing order in the diagram listed above. #1 is the 17mm, etc.

        Be careful to pay attention to the torques! Stop if it doesn't feel right!

        M6: 10 NM / 7.4 ft-lbs / 88.5 in-lbs
        M8: 22NM / 16.2 ft-lbs / 194.7 in-lbs

        (47NM = 34.7 ft-lbs)


        We then followed the first diagram and torqued the bolts accordingly. Note that this photo shows the idler wheel installed, which is technically covered in the next step. Doesn't matter when you do it.


        Additional reading:
        * https://www.r3vlimited.com/board/for...into-e30/page6


        ==============================================

        Step 3: Install idler wheel to lower timing chain case.

        Parts
        • PN 11311727342
        Steps
        1. Install idler wheel with one 12mm hex bolt.
        2. Blue locktite
        3. Torque bolt to M8 specs (M8: 22NM / 16.2 ft-lbs / 194.7 in-lbs) ​​
        No photos for this. Pretty self explanatory.

        ==============================================

        Step 4: Install timing chain tensioner rail (the one that pivots)

        Parts
        • PN 11311727342
        Steps
        1. Place tensioner rail over stub.
        2. One clip to hold the rail on the pivot point.
        3. Small amount of engine lube to help move.
        4. Don't install the chain tensioner yet.
        Note that the photo below is from the earlier step but this is how it should look.


        ==============================================

        Step 5: Install long deflection rail

        The newer deflection rail is plastic and its new dimensions block the timing cover bolts. The new design also requires a longer bolt in the top most hole.

        Parts
        • PN 11311247483 (rail)
        • PN 07119919629 (longer bolt, for future step. Can't install until the head is mounted.
        Steps
        1. Install the lower three 12mm hex bolts. Blue loctite for each.
        2. Torque to M6 specs (10 NM / 7.4 ft-lbs / 88.5 in-lbs)


        The fourth top bolt (longer bolt if you are using the newer style long rail like we are) will be installed once the head is installed.​​

        Additional reading:
        * https://www.r3vlimited.com/board/for...into-e30/page6

        ==============================================

        Step 6: Install crank shaft pulley

        Parts
        • No parts other than pulley
        Steps
        1. Install crank pulley along with a bit of engine assembly lube. It just slides in, make sure the long end is first and the slot fits over the woodruff key.


        ==============================================

        Step 7: Install timing chain and lower timing chain rail

        Parts
        • Timing chain: TBD
        • Lower timing chain rail: TBD
        Steps
        1. Loop timing chain under the crankshaft pulley, around the idler gear and through the long tensioner rail.
        2. Install the lower timing chain rail and torque the two bolts to M6 specs (10 NM / 7.4 ft-lbs / 88.5 in-lbs). I don't show this step. Make sure to orient the lower timing chain rail correctly, i don't have a photo but the longer side points to the left as you look at it from the front.
        When we first put on the timing chain, the chain just fell to the bottom:

        ​​

        We tied it up with a (loose) zip tie.

        Hopefully timing chains are not uni-directional.

        ​​


        ==============================================

        Step 8: Install lower timing chain cover

        We chose to go BMW OEM on this one b/c it was available and not crazy expensive. There are two gaskets in the set, one for each side.

        Parts
        • Gasket PN: TBD
        Steps
        1. Lightly spray gasket (no splatter, not shiny) with Permatex.
        2. Install lower (long) gasket on the timing case. It should stick somewhat.
        3. Install smaller gasket around the water pump area.
        4. Install lower timing cover.
        5. Carefully inspect to make sure the gasket hasn't moved. You want all threaded holes to be clear (see example below)
        6. Add blue loctite to bolts and finger tight them
        7. Torque bolts to spec. Most are M6 10NM (10 NM / 7.4 ft-lbs / 88.5 in-lbs), but two are M8 (TBD).
        IMPORTANT: The M6 bolts are multiple lengths and so you have to pay attention as to where they go. I don't have a cheat sheet on this but for the most part its clear where they go. Install the longer bolts in the holes where you have maybe 1/3 inch of thread exposed. The shorter bolts won't fit in the longer holes so you can't get that wrong.

        MORE: Two of the bolts are M8! These are tied to the AC pump bracket. You need the bracket for the lengths to work out. If you are removing the AC you need smaller bolts. There are threads on this topic, I'm leaving AC in so don't know the proper new lengths.

        Verify gasket was centered properly in each hole. You can use a pick or small screwdriver to push it over, or remove the cover to move the entire gasket. You can see an example of what can happen in the photo below.

        ​​​​​

        This is how we left it. AC bracket installed because the two M8's are required. I loosely fit the water pump just to see how it looks.

        NOTE: This was a fail because we forgot to install the crankshaft position sensor behind the AC bracket. As you can see it's not in the photo below. It won't fit without removing. We had to remove the bracket and install the cable later. Suggest running the sensor cable now if it's possible.

        ​​​​​

        Phase 3.5: Prep the head (Optional)

        For those of you that had their cylinder head cleaned or had valve work down and need to install cams, here is what we did, step by step to install the cams in the head.

        We bought a camshaft alignment tool to hold the cams in place, from Amazon for $50 ($25). Had to modify it despite it saying it fit an M42.

        Install spring caps/covers in the cam tray. Have to do this off the head.


        To install on the head, flip the head on the side to install the cam tray (otherwise the spring caps/covers fall out). Make sure head leaning on something rigid or a partner is holding it up.


        Flipped the head back right side up. Placed the cam in the cam tray. Cam should be as close as possible to TDC (furthermost right lobes pointing slightly up in the image, the two dots on the square section on the left also should be pointing up):


        Assembly lube on each cap:


        Caps on and 11mm nuts on finger tight.Was generous with assembly lube.


        Not shown in the photos below (we had to do it twice) is the camshaft alignment tool to hold camshaft at TDC. We had to drill two plates to allow the tool to separate


        This tool stops the cams from shifting when you tighten the caps. We will leave it on until the head goes on the cylinder head. The steps below are the same, just imagine the tool on the head :-)

        Tightening the caps and torquing

        Started on the bottom row of the 11mm nuts, left to right, each turned 1/4. Went back to the left and did the same across the top. Repeated top bottom top bottom, etc. until the cam was tight. Not torqued to specs

        With diagram - we tightened 1, 2, 3, 4, 5 each 1/4 turn. Then tightened A, B, C, D, E 1/4 turn. Note that sometimes the next nut in the sequence is loose because the nut prior pushed the cam down. If that happened I tightened it finger tight again and then turned it 1/4. Then returned back to 1, 2, 3, and then back to A, B, C, etc. Repeat until complete. By complete I mean the cam is in place and all caps are snugged on the cam tray. Haven't torqued them yet.


        Repeated on the intake side. We then installed the cam sprockets, only loosely to get them off the table.


        After both cams are in we walked down the 11mm cap bolts and torqued to 11 ft-lbs.
        This felt like a lot but it was the only reference we could find. Imagine a torque wrench in the photo below.


        At this point the head is ready to install on the block.

        If you feel the need to check valve clearance after head has been decked, here is a thread: http://www.m42club.com/forum/index.php?topic=17501.45. However note that this should be completed before the next step.
        Phase 4: Profile gasket and Cylinder Head

        !! Pay really close attention now !!

        Here is the TL;DR. Details on each step will follow.
        • Put tiny bit of sealant (hondabond, RTV, etc.) across the entire lower part of the profile gasket channel (lower timing chain case + cover). I mean tiny amount, very thin skim. A bit more in butt joint area. Alternatively you can add the skim to the gasket. It dries fast.
        • Immediately press on both sides of the profile gasket. Add a bit more on the actual butt joint itself (not just top and bottom, but the parts that meet).
        • Lay head gasket on engine block
        • Put another thin skim of sealant (hondabond, RTV) on the top of the profile gaskets, again a bit more in butt area.
        • Lay head in place w/o front timing chain cover in place
          • Really helpful to have a second set of hands here. You don't want to mar the surfaces. Try to lead with the side of the head that has the chain.
          • Also - I put a bunch of garage blankets/foam on the passenger side fender so that I can rest and have a place to hold the head. Really helped.
        • Thread timing chain over the camshaft ends
        • Make sure head is even and snug.
        • install front top timing chain cover gasket (Permatex light spray)
        • Install front top timing chain cover. Don't torque.
        • Oil head bolts AND WASHERS and put in place. Should be ten each.
          • Don't worry about the cam alignment yet, but they should be very close to how you want them. You can't use the tool yet b/c it will block access to the two most rear ward head bolts.
        • Torque head bolts as per directions. (see below)
        • Clamp the front top timing cover to compress flush with top of valve cover
        • Torque timing cover to spec

        Here we go:

        ==============================================

        Step 1: Install both sides of profile gasket


        Parts
        • PN 11141247849 (TBD)
        Steps

        1. Lightly (very thin) amount of RTV black (or hondabond, etc.) in the channel where both sides of profile gasket will lay. Paper thin. Ensure the butt joint area is covered. Can also instead put the skim on the profile gasket.

        Additional reading:
        * https://www.r3vlimited.com/board/for...iming-question
        More crucial than that is proper installation of the upper timing case cover. You will note that the bolt holes around the outside are ovaled. Basically, you need to compress it down onto the profile gasket so that the top of it sits flush with the head. I usually do this using the valve cover. If you remove the VC gasket and get the right combo of 6mm bolts and stacked washers, you can use it as a clamp to push the cover into place. So get the upper timing cover & gaskets into place after doing what you want with RTV, tighten the 6 outer cover bolts (the ones around the tstat can be partially threaded too) JUST enough so that there is no gap between the head/gasket/cover (but not "finger tight"), then clamp it down with the valve cover. Once it is pressed down, you can install the bolts around the thermostat housing, and then do the 6 outer bolts, in that order.

        * https://www.r3vlimited.com/board/for...iming-question and https://www.r3vlimited.com/board/for...case-swap-info
        You are correct that you will want some sealant where the PG ends meet. Use a sealant that cures (not sure if TRS does). Don't seal the ends until the head is on and you are putting the front PG on, obviously. As for the rest of the PG, I have not used sealant on the main mating surfaces and things have been fine.


        2. Install both sides of profile gasket in the channel. Make sure edges are not folded over. Make sure sealant is without gaps. Make sure the two faces of the profile gasket have sealant. Put extra in the butt joint area.

        PHOTO HERE

        3. If need be, trim the paper timing cover gasket so it does not interfere with the profile gasket. You will likely need to do this. Can just snip 1/16 or maybe 1/8" off the bottom of both sides.

        Additional reading:
        You 100% need some oil-proof RTV in the butt-joint between the rubber profile gaskets.

        Also, you need to trim the paper timing cover gaskets so that they do not overhang into the area where the rubber profile gaskets are or you will have an oil leak. It is OK if you trim them a little "too high" since RTV will fill the gap between the cover & head / timing case. This is one reason why that gasket joint is so notorious for oil leaks.

        Don't be shy with the RTV in the butt joints, you want it to fill in all the little gaps and stuff there.


        Additional reading:
        * https://www.r3vlimited.com/board/for...did-i-do-wrong
        Yeah, the seals which it says need cutting are the paper ones (or metal if M44). The idea is to have the rubber profile gaskets butt up against the other profile gasket, with sealant gooped in at the butt joints. I am not sure how much the temperature of the part during installation matters either. I have had a leaky joint right above the chain tensioner as well after doing everything "by the book" in warm CA weather. I sort of wonder if the procedure of clamping everything down while the sealant is wet is wrong...you definitely don't tighten covers and stuff down on engines where they use RTV instead of gaskets, you apply it, mate the parts, finger-tighten fasteners and then fully tighten them after a full cure. Tightening them right away forces all of the RTV out.

        In the case of the M42 though, I am not sure if you will ever get the upper timing case cover flush with the top of the head if you wait for the sealant to cure, so as roguetoaster says, you have to get the sealant in there, assemble it and accept the less-than-100% of a perfect seal, and repeat if needed. It sure is annoying!


        PHOTO HERE


        ==============================================

        Step 2: Lay the cylinder head gasket on the block

        Parts
        • PN 11121721547
        Steps

        1. The top of engine block should be clean and dry. Make sure cylinder tops are clean and dry too.
        2. Place head gasket on block, writing side up, with "Front" at the front.
        3. I am choosing not to spray gasket with copper spray, etc.

        Note: I went with Goetze brand HG for reference.

        ==============================================

        Step 3: Lay the cylinder head on the block

        1. First, rotate the engine clockwise 45 degrees so that outer two cylinders are down so as not to touch the valves. See guidance below.

        PHOTO HERE

        Additional reading:
        * http://www.m42club.com/forum/index.php?topic=11162.0
        Put your 24mm socket on the crank bolt and move turn it counter clock wise about 45 degrees to bring ALL of the piston tops down from the top of the block.

        2. Carefully place head on top of the block. It should not rock.

        3. You will need to work carefully. Have a helper move the timing chain so you can keep both hands on the block. (see step 4)

        PHOTO HERE


        ==============================================

        Step 4: Loop the timing chain over the cam gears

        Parts
        • None
        Steps
        • The cams should be as near to TDC as possible.
        • The crankshaft should be about 30 deg off of TDC (clockwise when you are looking at the pulley from front of car).
        • With the head in place, route the timing chain up and over the cam gears.
        PHOTOS HERE

        Additional reading:
        * https://www.r3vlimited.com/board/for...into-e30/page5
        The cam gears' bolts should be centered in the slots when the cams are in their TDC position. That can only be accomplished with the chain on the exact right link. Now, with that said, you'll still likely need to do some tweaking after the initial alignment. Get everything as TDC-looking as possible, and then turn the engine 2 revolutions by hand/wrench, and re-check. Adjust the cams as needed and repeat once more. It is possible to get all of the slack out of the sections on the first try, but I have always found that doing at least one turn-and-repeat has allowed me to correct 0.5-1 degree of error that appears after cycling it.

        ==============================================

        Step 5: Install upper timing chain case cover to head.

        Parts
        • Upper timing chain cover + 10mm bolts
        Steps
        • Clean both the head and the timing chain cover. We used brake cleaner. Let it dry.
        • Make sure all 10mm bolts are cleaned
        • Spray Permatex sealant on both sides of the paper gaskets
        • Place gaskets on the head
        • Place timing cover on the head over the gasket.
        • Install the 10mm bolts.
        • Torque all bolts to M6 torque (to be confirmed, 10 NM / 7.4 ft-lbs / 88.5 in-lbs)
        PHOTO HERE

        Additional reading:
        Also, you need to trim the paper timing cover gaskets so that they do not overhang into the area where the rubber profile gaskets are or you will have an oil leak. It is OK if you trim them a little "too high" since RTV will fill the gap between the cover & head / timing case. This is one reason why that gasket joint is so notorious for oil leaks.

        Don't be shy with the RTV in the butt joints, you want it to fill in all the little gaps and stuff there.

        -
        Additional reading:
        * https://www.r3vlimited.com/board/for...did-i-do-wrong
        Yeah, the seals which it says need cutting are the paper ones (or metal if M44). The idea is to have the rubber profile gaskets butt up against the other profile gasket, with sealant gooped in at the butt joints. I am not sure how much the temperature of the part during installation matters either. I have had a leaky joint right above the chain tensioner as well after doing everything "by the book" in warm CA weather. I sort of wonder if the procedure of clamping everything down while the sealant is wet is wrong...you definitely don't tighten covers and stuff down on engines where they use RTV instead of gaskets, you apply it, mate the parts, finger-tighten fasteners and then fully tighten them after a full cure. Tightening them right away forces all of the RTV out.

        In the case of the M42 though, I am not sure if you will ever get the upper timing case cover flush with the top of the head if you wait for the sealant to cure, so as roguetoaster says, you have to get the sealant in there, assemble it and accept the less-than-100% of a perfect seal, and repeat if needed. It sure is annoying!

        -
        Additional reading:
        * https://www.r3vlimited.com/board/for...into-e30/page4
        Also, it looks like the upper timing cover may not be properly seated. The proper procedure is to use some spare M6 bolts and the valve cover (with no gasket) to clamp the upper timing cover down, compressing the profile gasket before fully securing all of the front bolts. It should then be perfectly flush with the top of the head where the valve cover seats.
        -
        Additional reading:
        * https://www.r3vlimited.com/board/for...into-e30/page4
        More crucial than that is proper installation of the upper timing case cover. You will note that the bolt holes around the outside are ovaled. Basically, you need to compress it down onto the profile gasket so that the top of it sits flush with the head.

        I usually do this using the valve cover. If you remove the VC gasket and get the right combo of 6mm bolts and stacked washers, you can use it as a clamp to push the cover into place. So get the upper timing cover & gaskets into place after doing what you want with RTV, tighten the 6 outer cover bolts (the ones around the tstat can be partially threaded too) JUST enough so that there is no gap between the head/gasket/cover (but not "finger tight"), then clamp it down with the valve cover.

        Once it is pressed down, you can install the bolts around the thermostat housing, and then do the 6 outer bolts, in that order.


        ==============================================

        Step 6 - Torque the head bolts

        4. Insert new head bolts. Add washers from original head bolts if not included.
        5. Torque the head bolts as per below. Wait 15min between steps. https://www.e30zone.net/e30wiki/inde...orque_Settings

        7__5__1__3__9
        10_4__2__6__8


        Additional reading:
        * https://www.r3vlimited.com/board/for...et-replacement
        The manual procedure on the torx (E12) bolts is:
        Stage 1 … 30Nm (22ft-lb)
        Stage 2 … +90°
        Stage 3 … +90°

        Torque order per view from passenger side of head:
        7__5__1__3__9
        10_4__2__6__8

        I waited 20-30 minutes between torque stages.


        ==============================================

        Step 7 - Install the long tensioner rail screw

        1. Can now install the last M6 bolt that holds the top of the long tensioner rail. Torque to proper specs. Remember it's a longer bolt.
        Phase 5 - Set timing, mount cam gears, etc.

        Note that the pistons should still be about 30 degrees off of TDC.

        ==============================================

        Step 1 - Mount the cam gears

        Steps:
        1. Install the cam timing gear tool to hold the cams at TDC
        2. Take the exhaust cam gear, align so the arrow is pointing "up" but is really perpendicular to the head.
        3. Tuck under the timing chain
        4. Slip on the camshaft end.
        5. Take the intake cam gear, align with arrow pointing up, tuck under the chain and slip on camshaft end.
        This is where it can be tricky. It may take a few tries to get this to align. If you can't quite get the second cam gear on the camshaft, try shifting the intake by a tooth.


        ==============================================

        Step 2 - Set timing

        Steps
        1. Ensure cams and crank are set for TDC, see guidance below.
        2. TBD
        Additional reading:
        * https://www.r3vlimited.com/board/for...n-an-m42/page2
        Last edited by jsnppp; 01-16-2022, 07:41 AM.

        1991 BMW 318is - AlpineWeiss II
        1991 BMW 318is - DiamondSchwartz
        1973 BMW 2002 Tii - Baikal
        2002 Toyota 4Runner SR5 sport - Black

        Comment


          #5
          Install Remaining Engine Parts

          With the hard parts done, we are left to install everything else. At this point I won't document them, but if there is a good guidance link I'll include it. Relevant torques below.
          • Temp sensors in head (2)
            • Torque: 13 ft. lbs. +/- 1 ft. lb. (Bentley manual)
            • I added Permatex high temp sealant to the threads too.
          • Power steering rack to body
            • Rack mount bolts (2): 42 Nm (30 ft lbs.)
            • Steering coupler bolts: TBD
          • Engine mounts
            • 17mm nut + wavy washer
            • Torque = Tight but not unlimited! Use a large 1/2 drive socket, not a breaker bar.
          • Oil filter bracket
            • Spray both sides of paper gasket with Permatex sealant.
            • Not much sealant, not shiny. Let dry for 15min.
            • Install paper gasket on block
            • Add grease/oil to oil filter o-ring. Pay special attention to oil filter housing.
            • Install bracket on block with six bolts
            • Blue locktite
            • Torque bolts to 120 in-lbs
            • Additional reading:
              * https://www.r3vlimited.com/board/for...il-leaks/page2
              "I went with the Permatex High-Tack Spray-A-Gasket sealer on the OEM paper gasket too. I like it because it is very easy to apply a thin, uniform coat simply because it is an aerosol product. Lay a couple of coats on your gasket and let it sit in open air for 10 minutes to let the solvent evaporate, then install it...done! I'll report back in a few months (or sooner if it starts leaking again).

              The six M6 bolts that hold the filter housing on are hard to find the proper torque spec for. I saw everything from 70 in-lbs to 210 in-lbs in different discussions online. A thread here in r3v made 120 in-lbs sound like a good torque, and it "feels" like that is the max that the little M6 bolts (and aluminum timing case threads) will tolerate. Lots of people seem to have had these bolts break on them."
          • Install cam position sensor
            • RTV the hell out of my cam position sensor or it leaks, even with a new o-ring.
          • Install crankshaft position sensor
            • Just an allen key, torque = tight enough, probably follows M6 spec.
          • Fan
            • 1st - Fan pulley to water pump housing
              • Two bolts only (next to each other)
                • M8 bolts =22 Nm (195 in-lbs)
              • Install a long arm (used to counter act the fan install in next step) in remaining two bolts and tighten bolts
            • 2nd - Fan to water pump housing
              • Left hand thread
              • Screw on, tighten with large wrench (feels like 24mm or something big)
              • Torque = "tight enough"
            • 3rd - Remove long arm and finish off the M8 bolts to 22 Nm (195 in-lbs)
          • Exhaust manifold to head
            • Exhaust manifold to cylinder head (use new M7 nuts) - 20 Nm (15 ft-lb)
            • Front exhaust pipe to exhaust manifold (M10) - 30Nm (22 ft-lb)
          • Intake manifold rail to head
            • M8 nuts - 22 Nm (195 in-lbs)
          • Intake manifold to intake manifold rail
            • M8 nuts - 22 Nm (195 in-lbs)
          • Alternator
            • Bracket to block: TBD
            • Swivel bolt + nut: TBD
            • Locking nut: TBD
          • AC compressor
            • Bracket to block: Already complete, this is required for lower front timing case cover installation. See above.
            • AC compressor to bracket: TBD
          • Belts
            • Alternator, Water Pump, Fan:
            • Power steering:
            • AC compressor:
          • Spark plugs
            • NGK BKR6EK
            • Torque the spark plugs to 25 Nm (18.4 ft-lbs).
          • Hoses
            • Coolant/vacuum hoses
            • Thermostat and hose junction
          • Timing chain tensioner
          • Water pump
            • Install water pump rubber seal
            • Install water pump.
            • Torque bolts - 3 are M6, 1 is M8

          Last edited by jsnppp; 01-16-2022, 07:32 AM.

          1991 BMW 318is - AlpineWeiss II
          1991 BMW 318is - DiamondSchwartz
          1973 BMW 2002 Tii - Baikal
          2002 Toyota 4Runner SR5 sport - Black

          Comment


            #6
            Prep before Starting
            • Add power steering fluid


            Guidance:
            *
            https://www.r3vlimited.com/board/for...​​​​
            On first startup fill the system as usual, maybe crank over a few times by hand, then disable the fuel system and gently crank in short bursts until you have oil pressure. Some people with especially stubborn pumps packed them with assembly lube to ensure first crank operation, but in most cases it's probably not necessary.
            Last edited by jsnppp; 09-05-2021, 08:32 PM.

            1991 BMW 318is - AlpineWeiss II
            1991 BMW 318is - DiamondSchwartz
            1973 BMW 2002 Tii - Baikal
            2002 Toyota 4Runner SR5 sport - Black

            Comment


              #7
              In for future reference.
              sigpic

              Comment


                #8
                We've been working on the car, mostly cleaning it, while we are waiting on some parts.

                During this time I've been redesigning this page. I've moved away from tables, the html tied to them makes it less flexible.

                I mocked up the build which led to the decision on the order of reinstallation. Was super helpful for us to understand what is happening.

                Here is how it will look once mounted on the engine, with both upper and lower covers in place. The top cover mounts to the head directly:


                And here it is without the top cover to showcase the profile gasket:


                The infamous "butt joints". There are butt joint on both sides. The two rubber pieces form an interference fit in order to properly seal. This is a primary reason for installing the entire lower case and cover on first. Doing so will allow more control over the quality of the seal. (We think!)


                I will also remove this vender tab, it's unnecessary:


                As per the guidance from the you all, we will ensure that joint has sealant.

                1991 BMW 318is - AlpineWeiss II
                1991 BMW 318is - DiamondSchwartz
                1973 BMW 2002 Tii - Baikal
                2002 Toyota 4Runner SR5 sport - Black

                Comment


                  #9
                  A bit of a disappointment today. Realized that part 11311727342 is backordered and has been so for a long time.

                  The new part is on the right (11311743262) and the pivot shaft is larger. Will not fit without the late M42 timing cover (possibly M44 too).


                  Found this thread that covers the new part. I'll save the one I bought for the other M42.

                  Anyone have a 11311727342 for sale? I'll use the old if need be, but I prefer not to.
                  Last edited by jsnppp; 09-08-2021, 06:44 PM.

                  1991 BMW 318is - AlpineWeiss II
                  1991 BMW 318is - DiamondSchwartz
                  1973 BMW 2002 Tii - Baikal
                  2002 Toyota 4Runner SR5 sport - Black

                  Comment


                    #10
                    Ah, you've found the other reason to go to the late M42 timing arrangement...

                    Nice writeup!

                    t
                    Has finally come around to the personal opinion that the best rebuild
                    for an M42 is an M54- but respects others opinions, too.
                    He says, having driven M42- powered cars for at least a decade, now.
                    now, sometimes I just mess with people. It's more entertaining that way. george graves

                    Comment


                      #11
                      So much detail. This is a great reference for when I tackle this on my m42.

                      Comment


                        #12
                        Ah, you've found the other reason to go to the late M42 timing arrangement...

                        Nice writeup!

                        t

                        Hi Toby, I'm also jsnppp on the 'Faq!

                        Yes, the lack of availability of tensioner rails for early M42s is a solid reason to move to late M42 timing case (or M44). However, I'm committed to moving forward on this car with what is there. While I hope to find a replacement, the existing isn't bad.

                        ~Jason
                        Last edited by jsnppp; 09-09-2021, 02:09 PM.

                        1991 BMW 318is - AlpineWeiss II
                        1991 BMW 318is - DiamondSchwartz
                        1973 BMW 2002 Tii - Baikal
                        2002 Toyota 4Runner SR5 sport - Black

                        Comment


                          #13
                          Originally posted by Victell View Post
                          So much detail. This is a great reference for when I tackle this on my m42.
                          Thanks Victell. This page is still in active development as I research, gather parts and make a decision as to how to move forward. There are many pieces of good advice to sift through and I want a single place to look at when I do it again on my other M42.

                          If it helps others, I'm happy.

                          ~JasonP

                          1991 BMW 318is - AlpineWeiss II
                          1991 BMW 318is - DiamondSchwartz
                          1973 BMW 2002 Tii - Baikal
                          2002 Toyota 4Runner SR5 sport - Black

                          Comment


                            #14
                            Originally posted by jsnppp View Post
                            Anyone have a 11311727342 for sale? I'll use the old if need be, but I prefer not to.
                            Good luck. They are undergoing a redesign from BMW head office and I could not find any aftermarket manufacturers. I had to search for a loooong time to find one for mine.

                            Great writeup though.
                            sigpic

                            (clicky on piccy to get to thread)

                            Comment


                              #15
                              Originally posted by econti View Post

                              Good luck. They are undergoing a redesign from BMW head office and I could not find any aftermarket manufacturers. I had to search for a loooong time to find one for mine.

                              Great writeup though.
                              Do you mean that BMW is issuing a new/updated design for this part, and production on the old one has stopped in the interim? I know that the part is currently NLA, but it would be pretty cool if they were going to release a newer part.

                              Transaction Feedback: LINK

                              Comment

                              Working...
                              X